
With this project I largely continue from my previous project with the investigation into the elevation of industrial materials, specifically fittings, and how they might be used in furniture. The goal of the project would be for the end users to gain a closer affinity for the materials which make up the infrastructure of everyday life and for me personally to explore my personal connection with he materials growing up in a environment which encouraged the questioning of the material world.
I began this project in a different way than I previously have. Normally I storm into things with a clear idea of what I want to make and how I'm going to do it, but weather it was a lack of inspiration or general fatigue from the first part of the year I had no clue what I'd be making but a strong direction with the use of industrial materials in furniture.
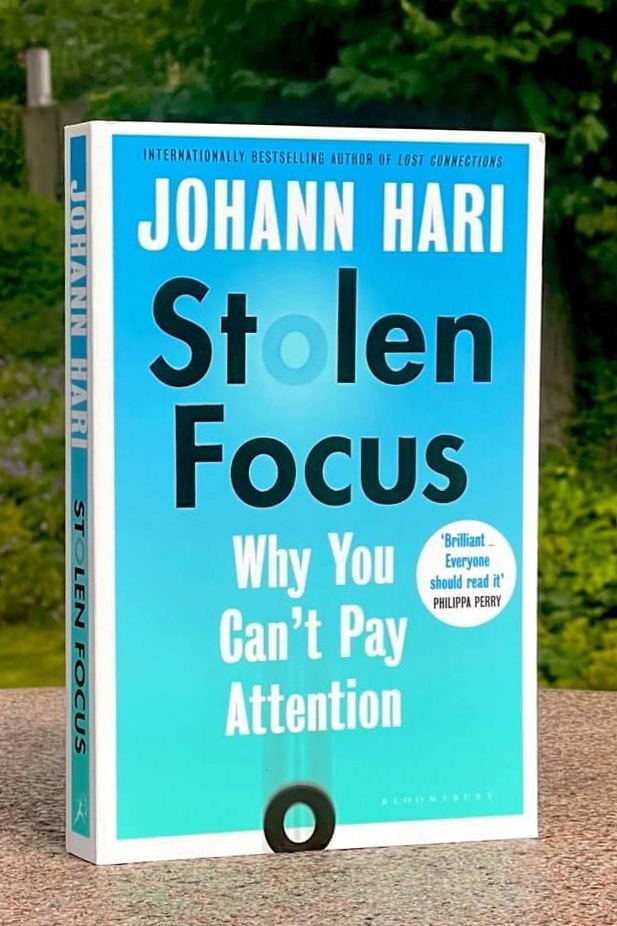
The fatigue I felt from the previous term was not caused by the work done but instead the effort I had to put in to try and remain focused on the documenting and reflection, arguably the most important part of any project. A lot of the discipline I'd had to stay on task seemed to be gone and I was interest to figure out where it might have gone. So I found a book called 'Stolen focus' by Johann Hari. Now despite Hari's rather chequered journalistic past a lot of the answers given in this book assisted me in regaining some of the focus I'd lost, and raised more interesting question linking directly to the other reading I've been using to support my practice.
The link I've made between Hari's 'Stolen Focus' and more subject specific books like Adamson and Korn is that people connection to materials is changing, not just in the context of craft is but just in the general public and that this is an opportunity for me to develop something which is unique. As Korn put it 'craft is a cultural consruct that evolves in response to changing mindsets and conditions of society.'


Alternate Fittings
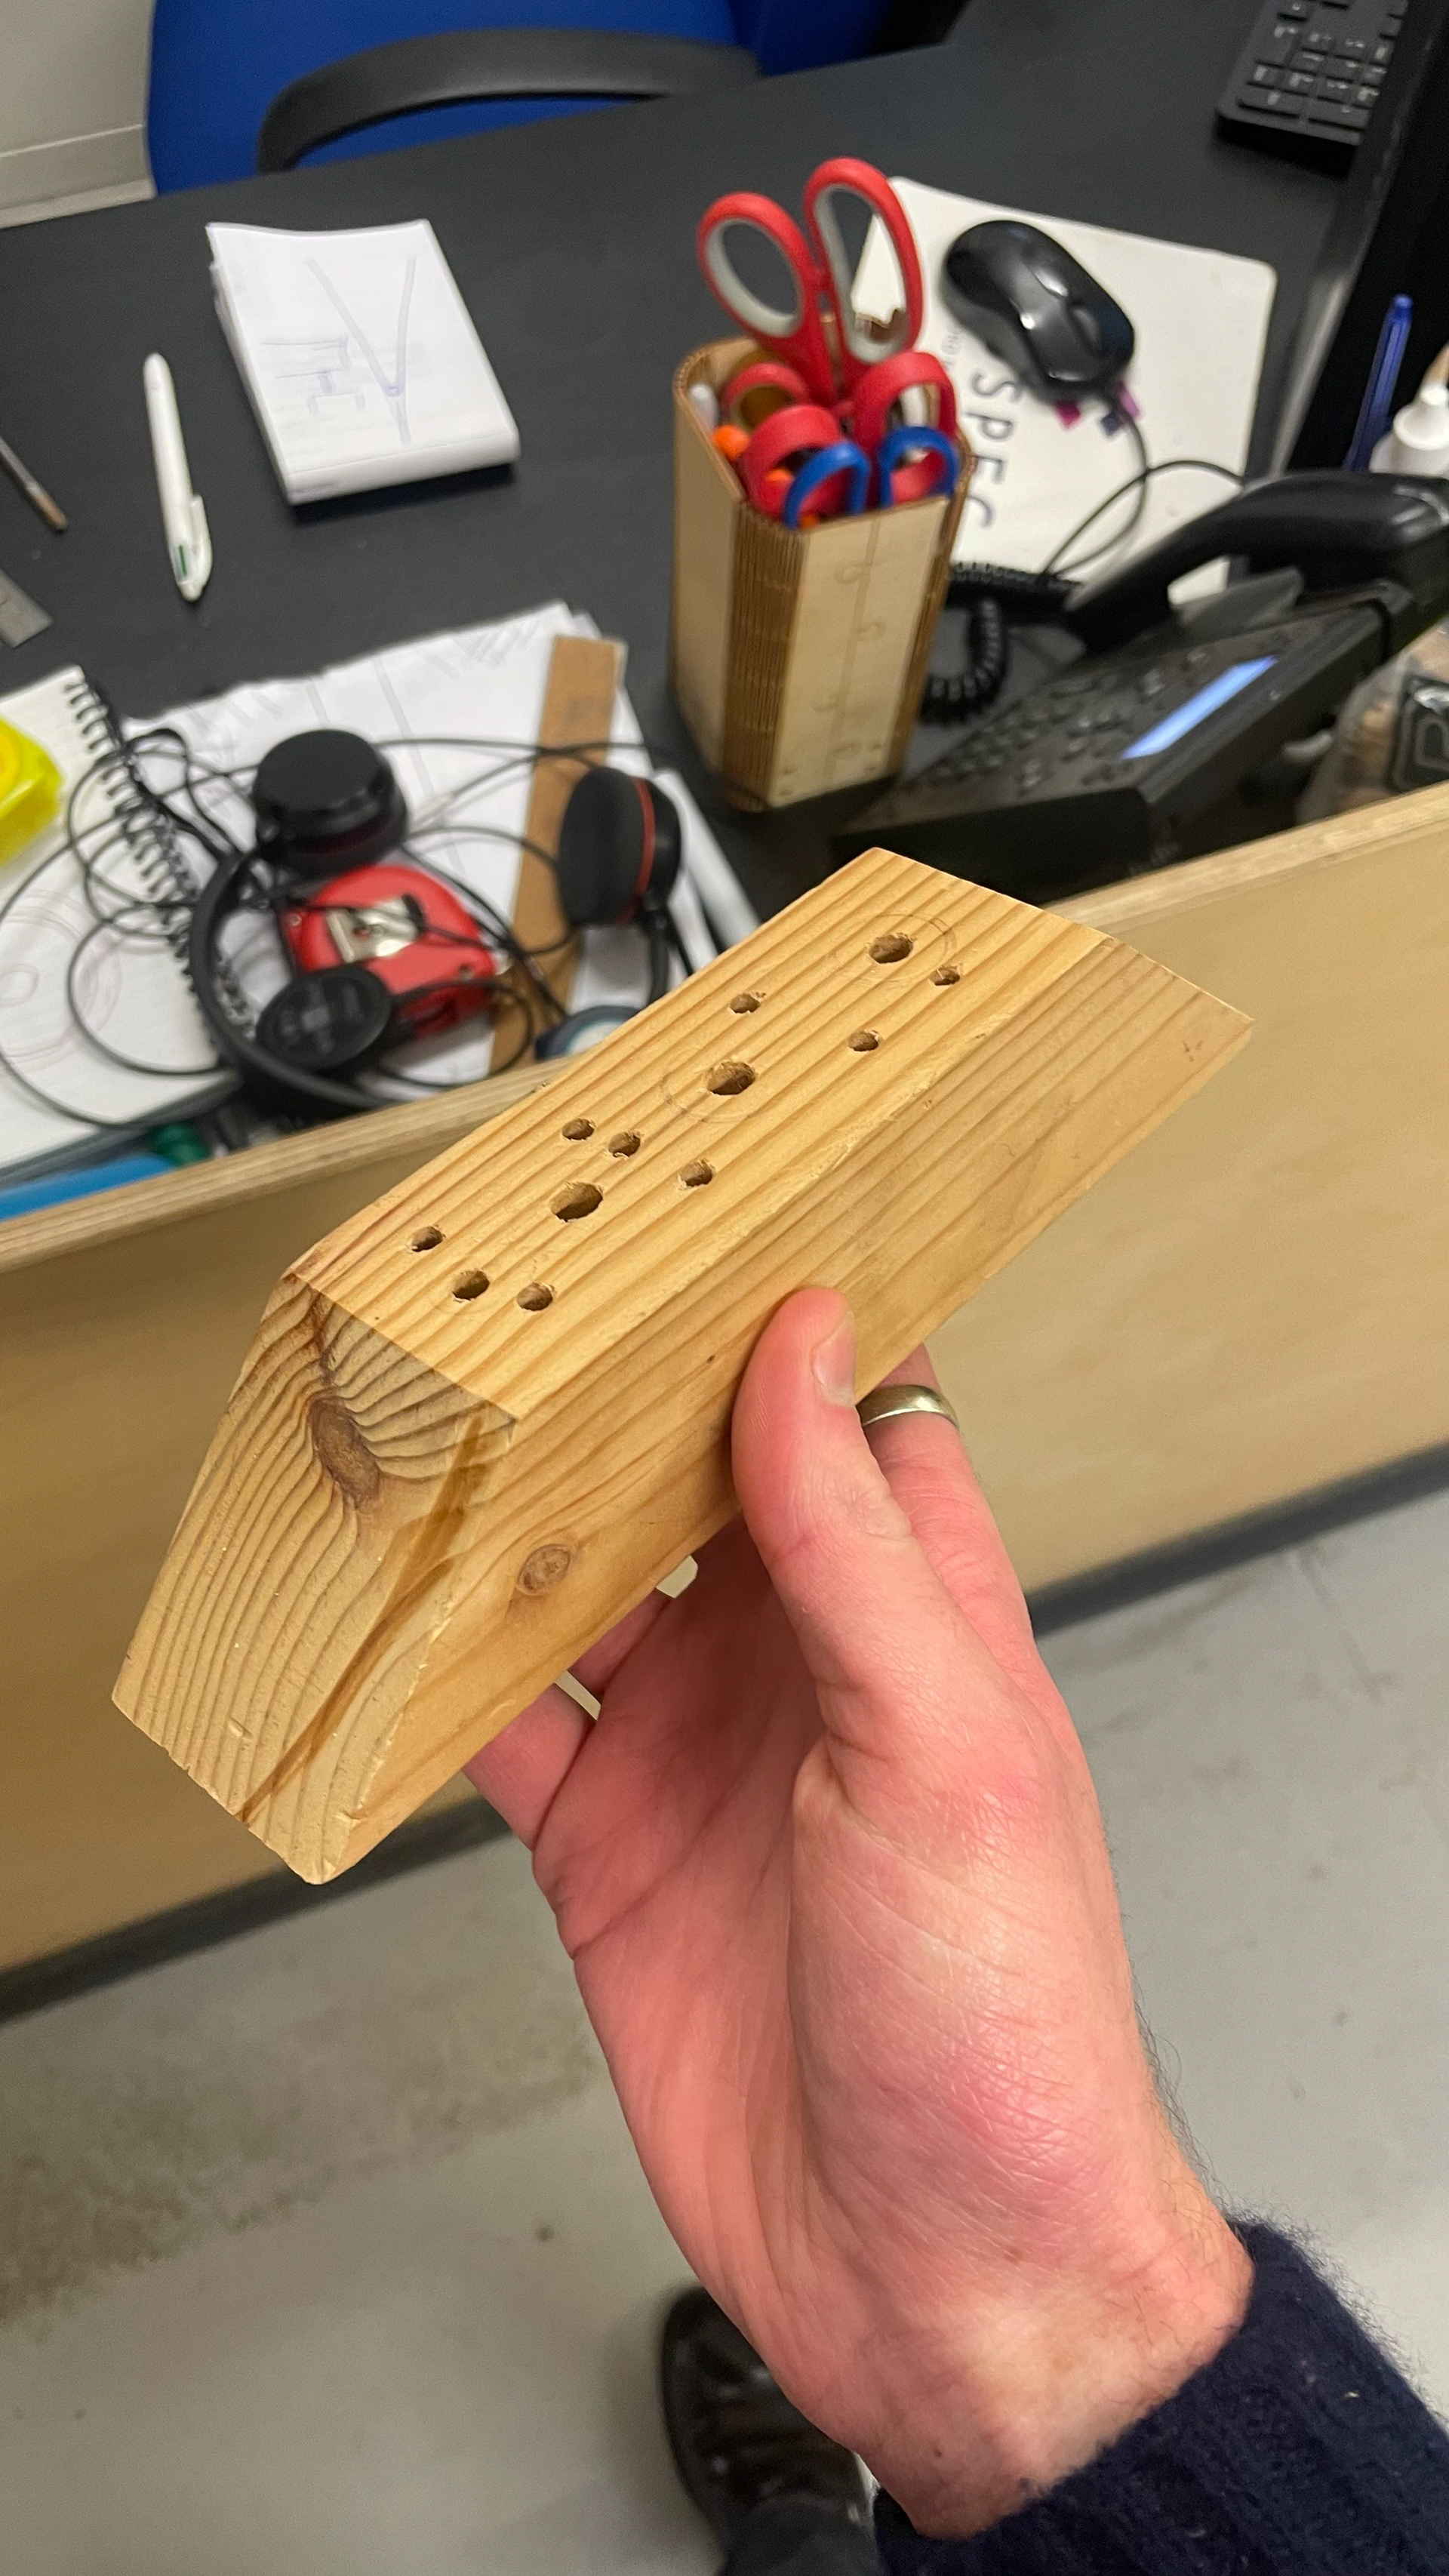
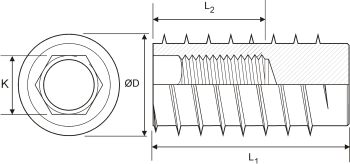
In order to get started on making I'm choosing to focus on the element of my objects which most closely affects the ability for the user to connect/identify industrial material, that being the fittings used. I've been most excited about developing the compression bolt joint but wanted to see what else might be available in order to improve usability and reduce manufacture time. The workshop technicians suggested these two fitting that they had available in the workshop but recommended I do my own research into the larger marketplace of furniture/industrial fittings.
With the fittings I'm aiming to identify the most versatile which might be used on a large range of different items of furniture but would hope to find one which also intrigues me the most, perhaps it might be the materials used or the simplicity/complexity of its function. The second point is quite loose but I'll examine the two examples above in hopes that it might explain my decision making process.
Insert nuts [left] - as a fitting category of fitting these offer an wide verity of options and materials, they require a lot of nuance in installation to be as strong as possible which I like and when installed work in a very pleasing way as the bolt smoothly glides into the material.
Threaded screws [right] - less range of designs available with a slightly more complicated installation process, feels to similar to a simple wood screw but that could be interesting given the right context. Worry about the accuracy of joining board together as the tolerances to get a correct fit are smaller.


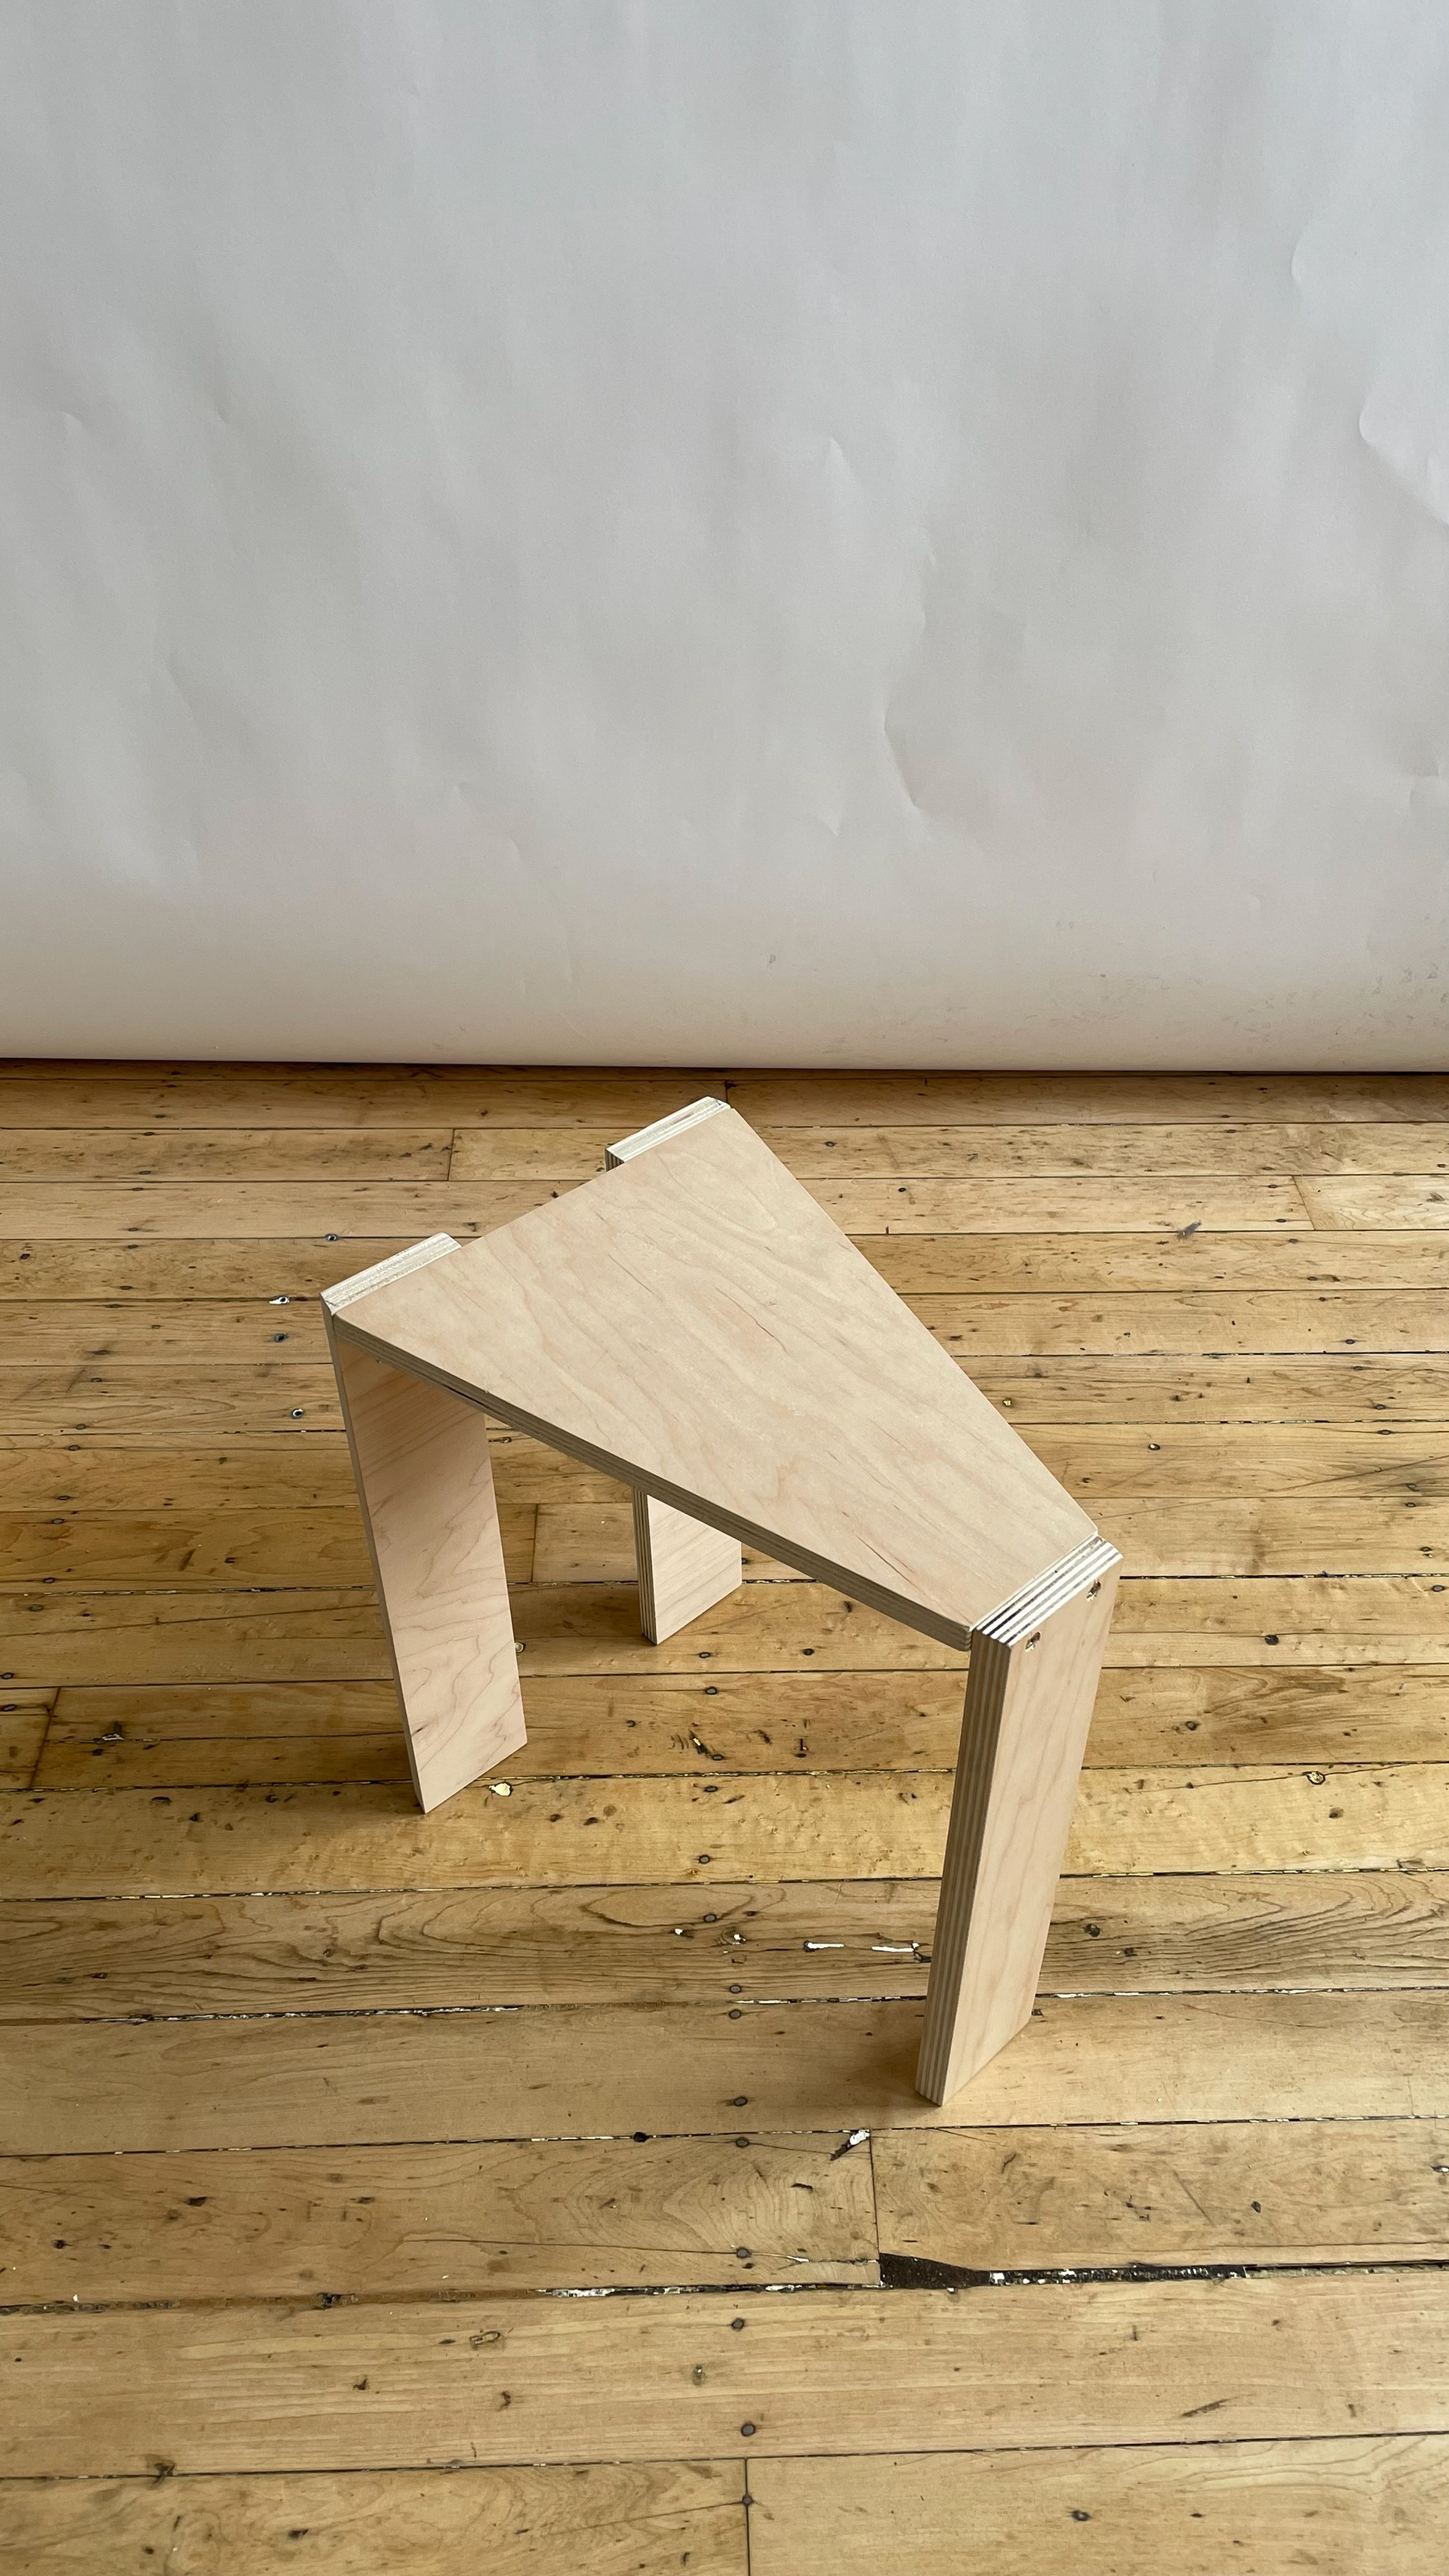
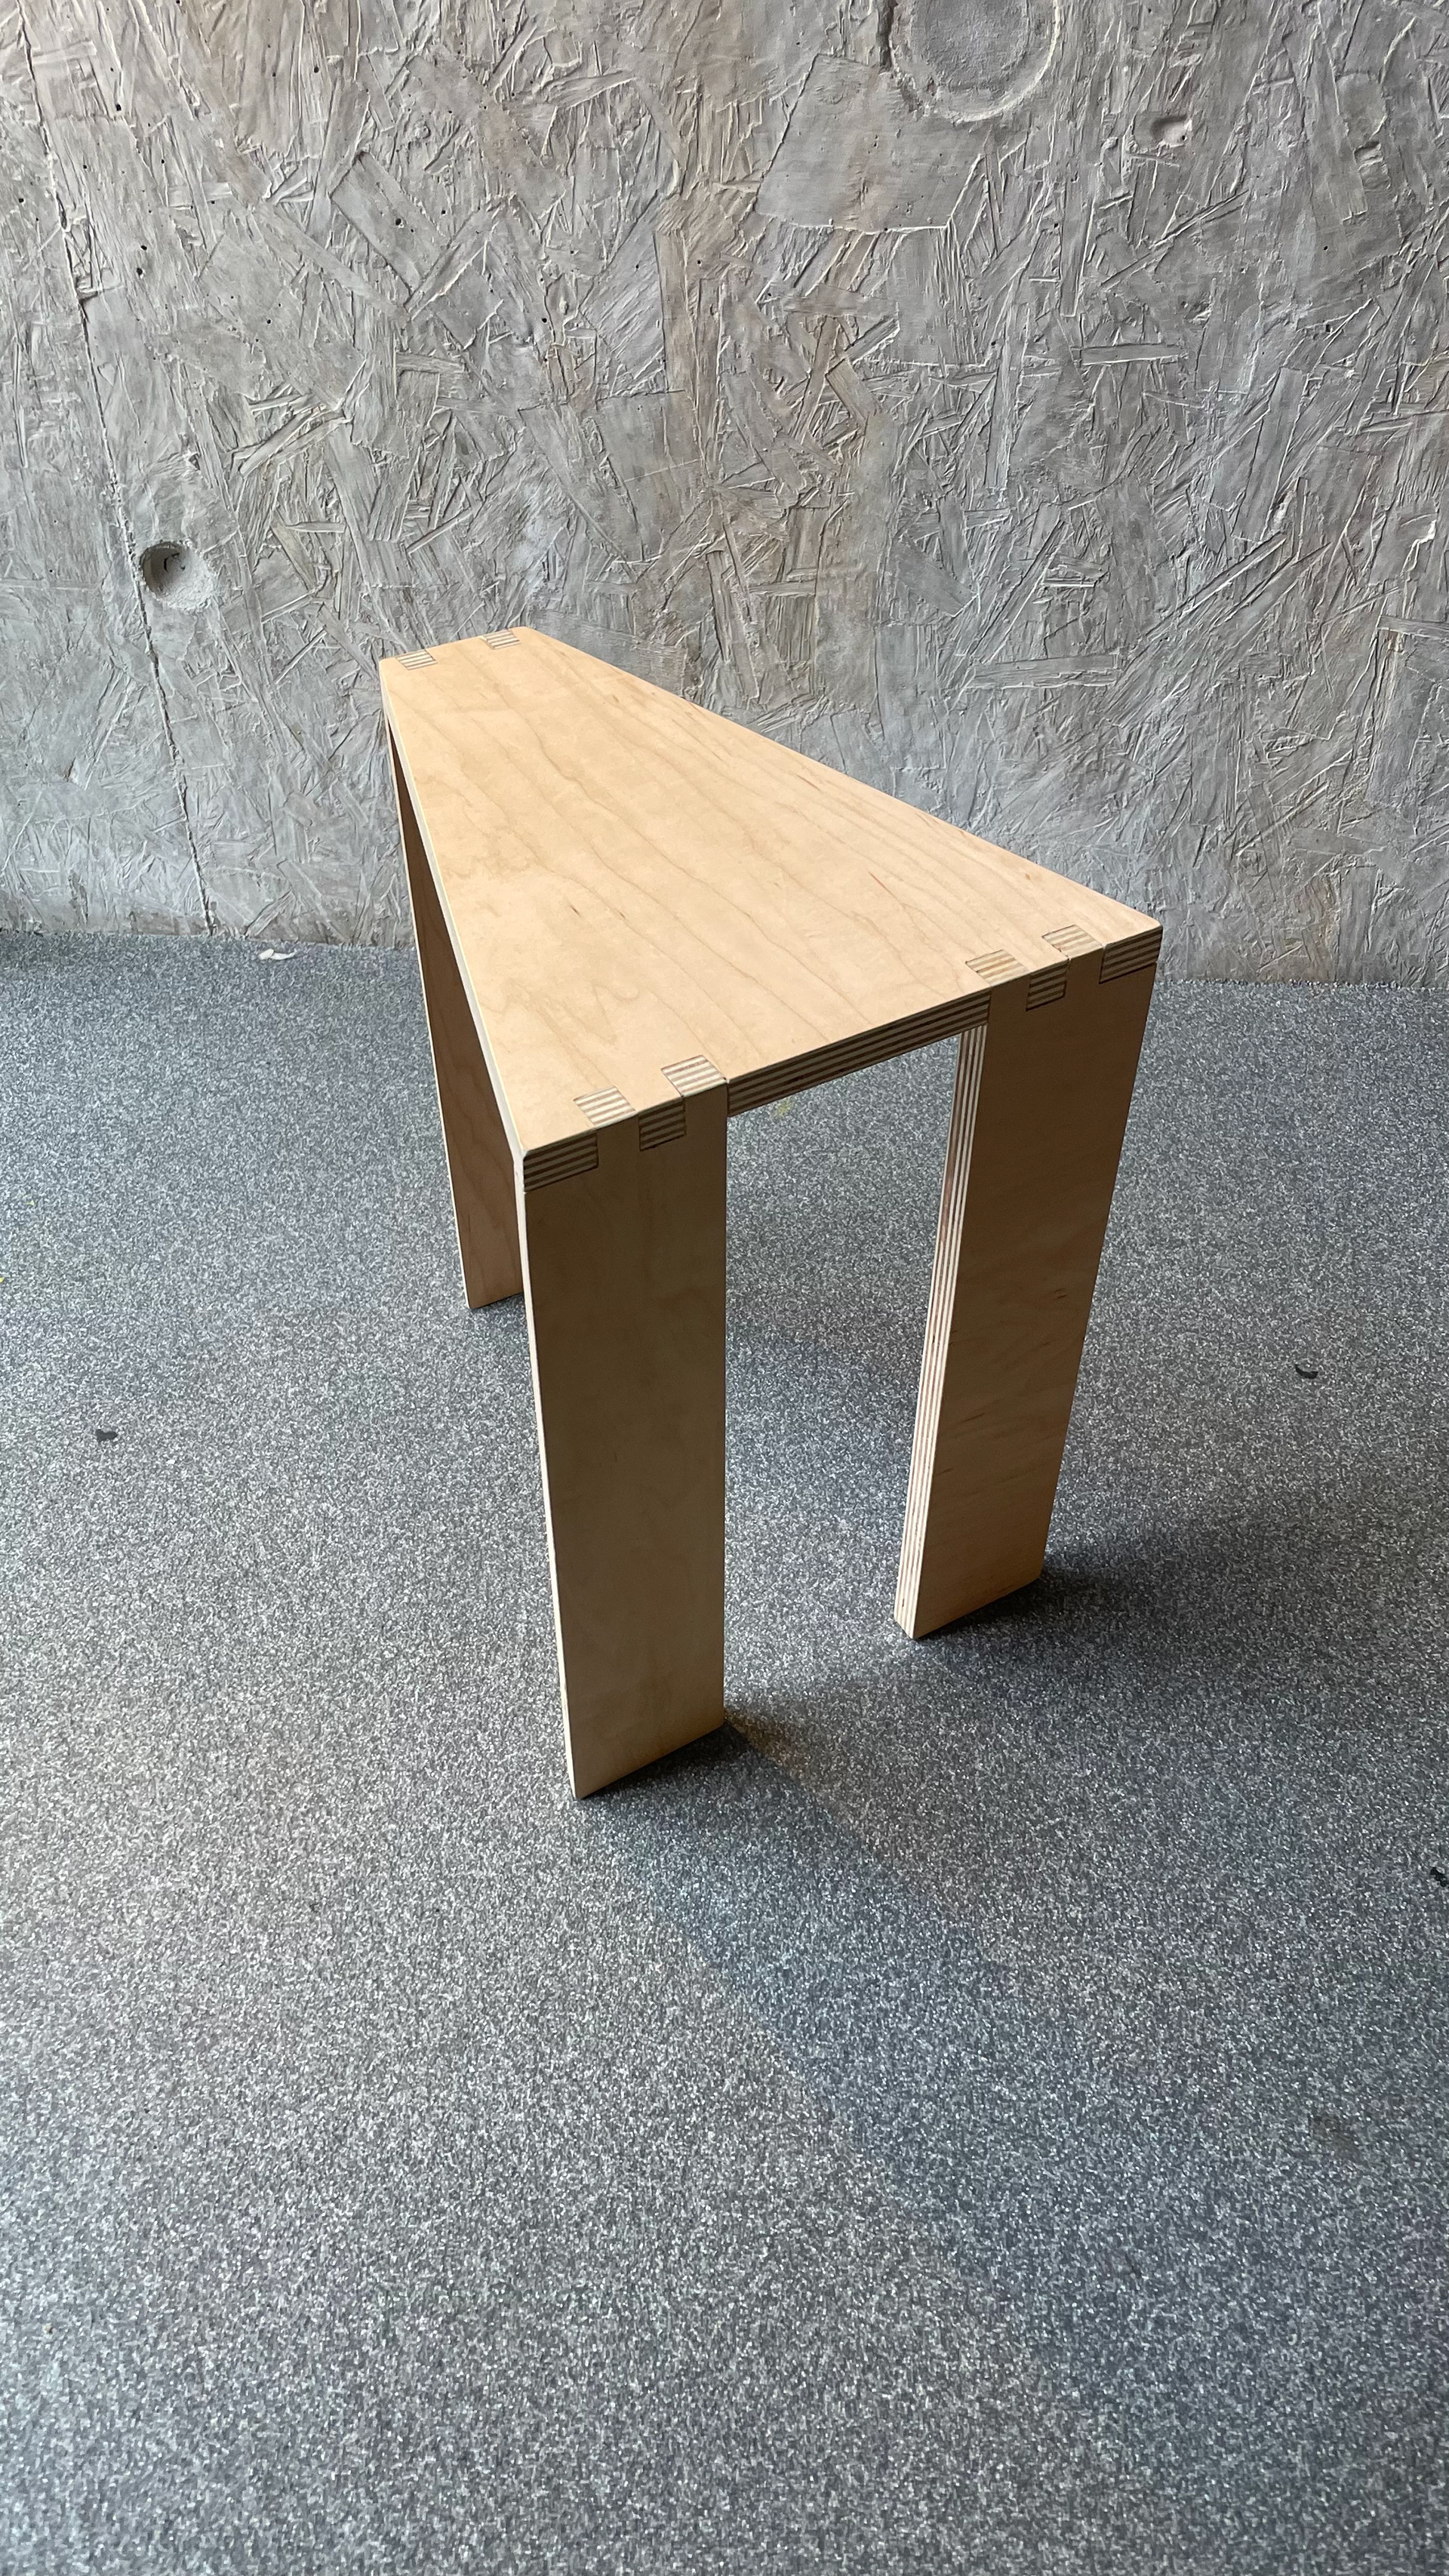
Compression Bolt Joint - Tested in Plywood
Continuing my investigation of fittings I wanted to see how the compression bolt joint might work with plywood, with my previous project I found working with pine interesting but couldn't see how that might convert well into [batch] manufactured products, with manufactured boards I could explore how CNC might be used in the manufacture process and reduce material waste but first I had to return to research joint types. For the compression bolt joint I've found some countersunk headed bolts which resolves the non-functionality of having large bolt heads sticking out of a table top and I also saw how square bolts increased the joint strength by increasing the area facing the nut mortise walls.
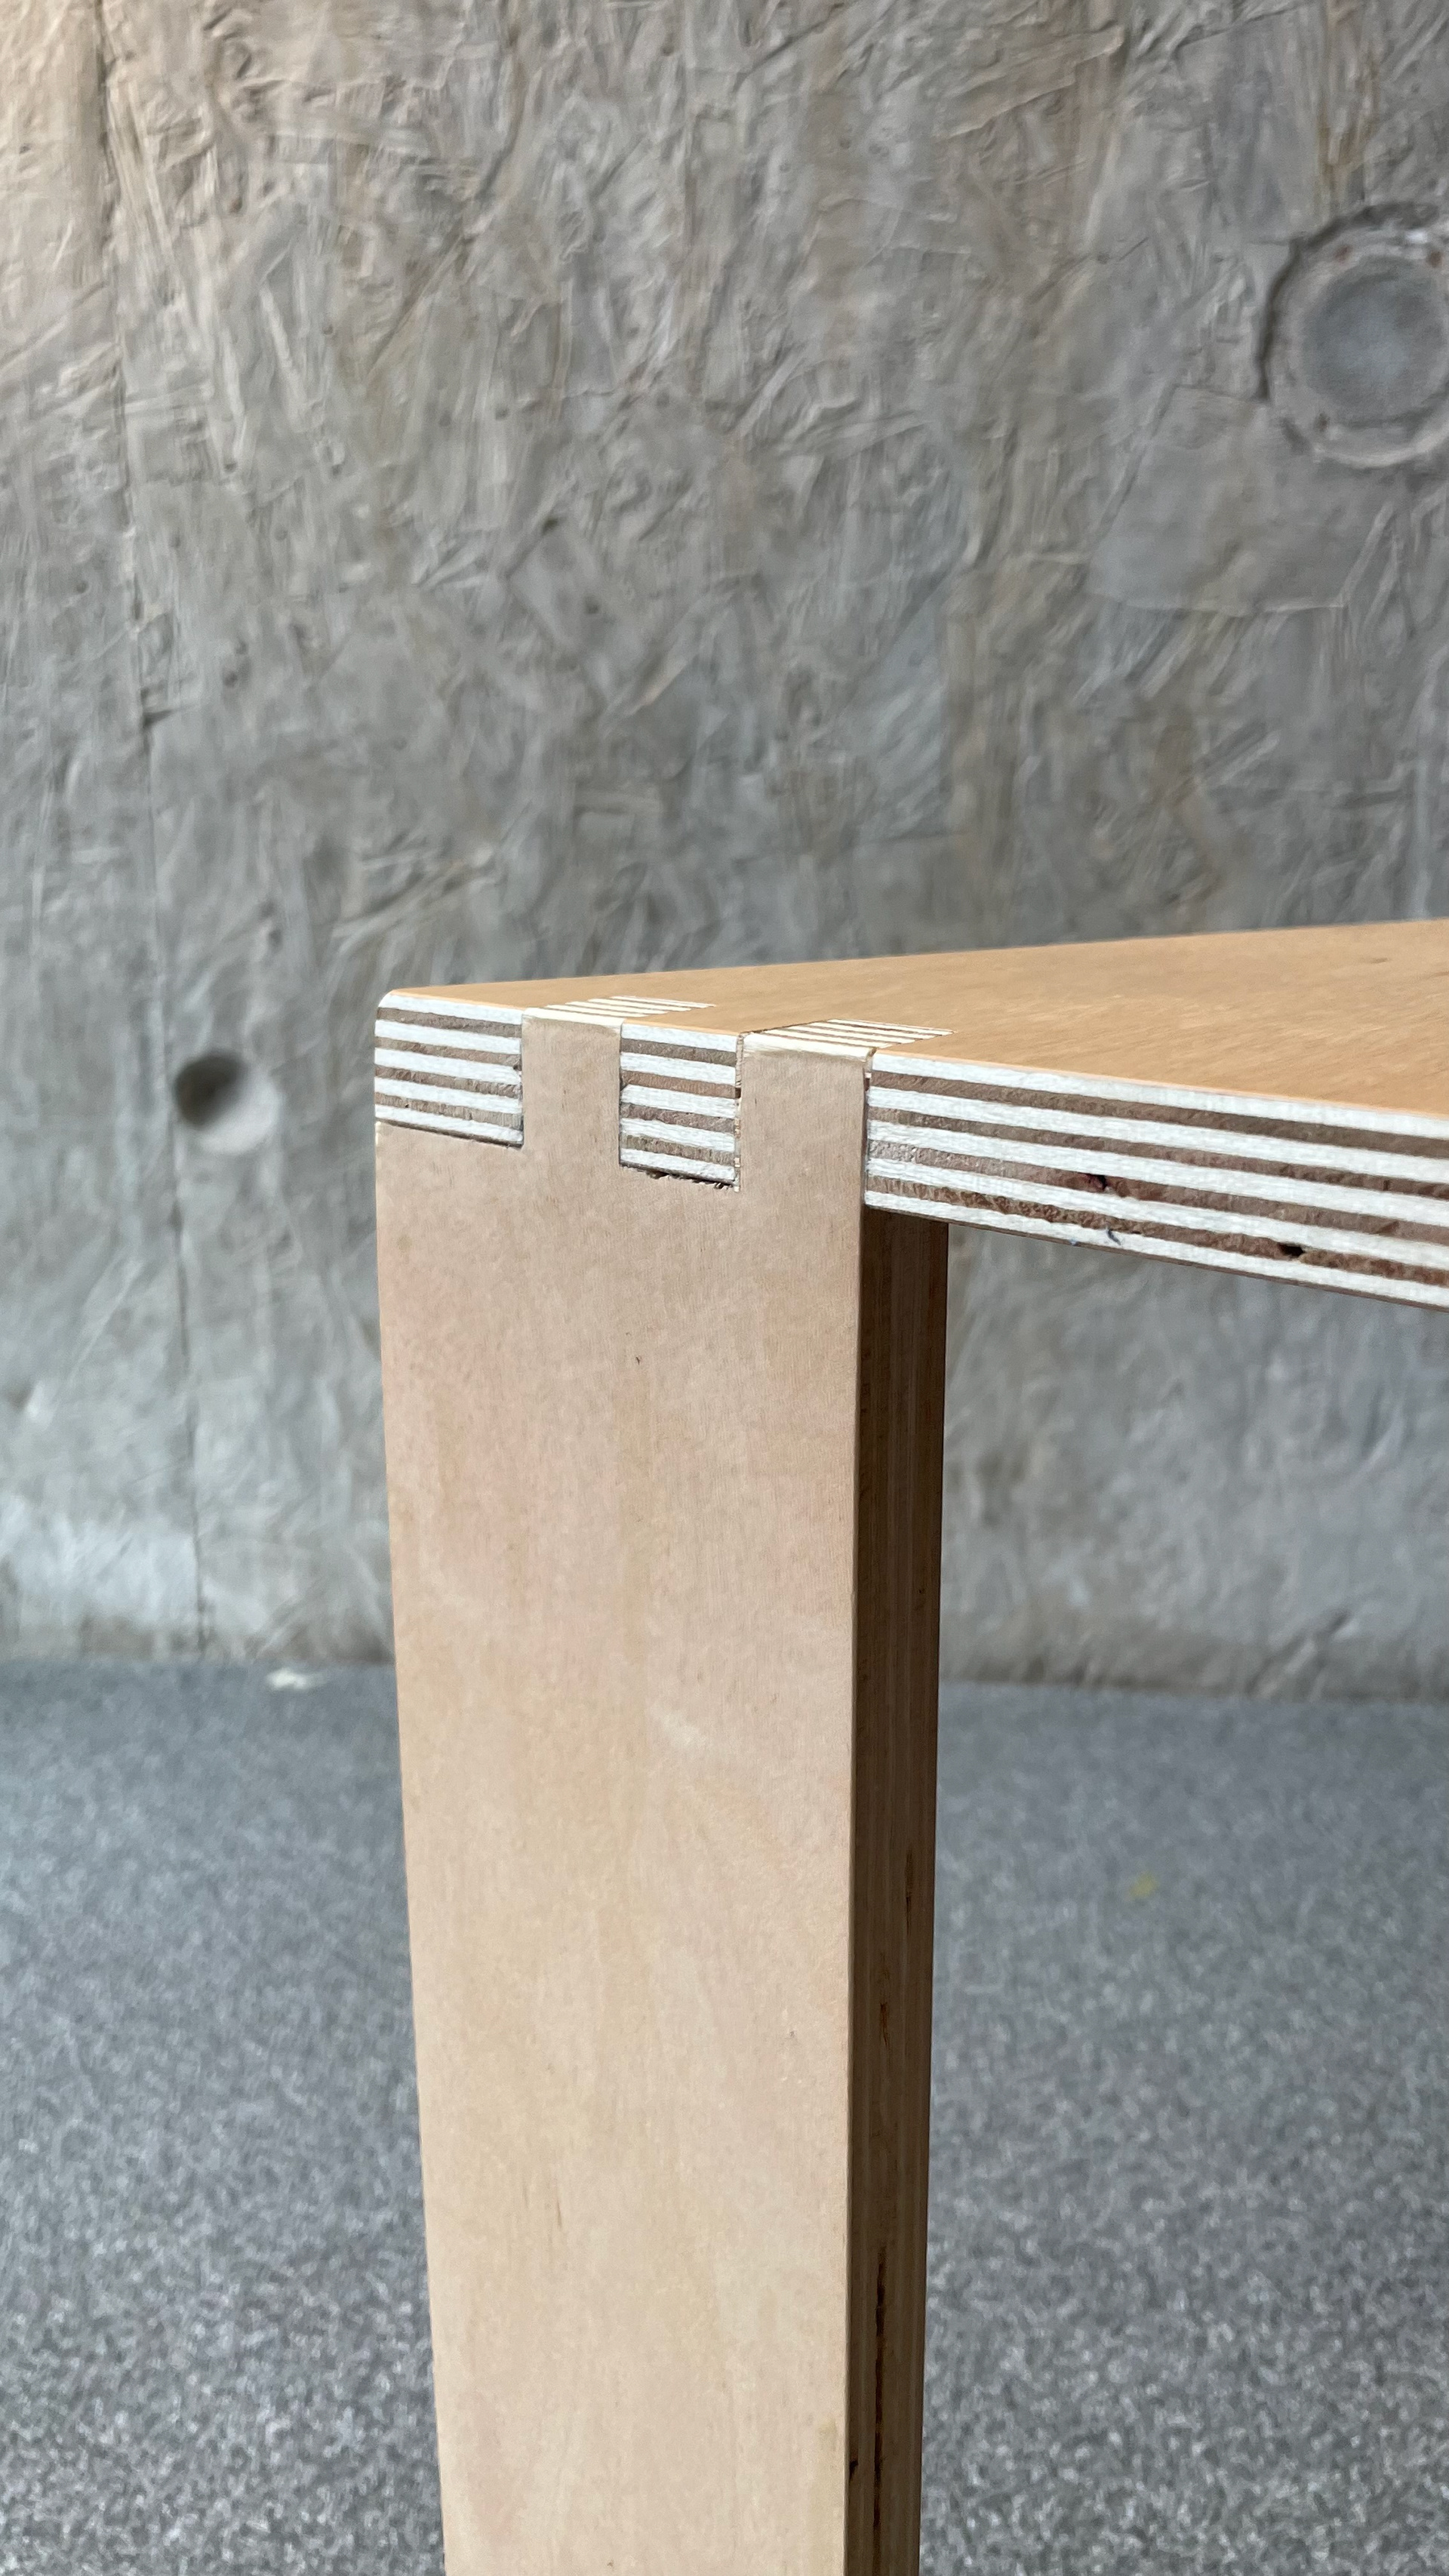
As you can see above I also tested three different bolt diameter to see how that might affect strength, accuracy, and aesthetics. Previously I'd used M12 bolts which although just small enough for pine would be far too big for use in manufacture boards, even 25mm. In the examples above you can see how M10, 8 and 6 bolts have advantages and disadvantages, when used in 18mm Birch ply, which I will list below:
M10 - A very strong joint and overall aesthetically quite pleasing with the square nut actually being the same thickness as the 18mm board used. A downside is that the joining of two boards perpendicular to each other just be done away from the edge to the countersunk bolt head does not spill over the edge.
M8 - Again a very strong joint, with a little flex but nothing to worry about. The bolt head sits quite nicely away from the edge of the top board when joined to make a continuous edge, but would cause issues if a routed edge were to be added. I found the nut locating quite difficult on this size. The hole must be small enough as to not slip when tightening but I struggled to correctly align the nut in such a small hole.
M6 - Not very strong, the joint flexes a lot and I would need far more of these to securely hold a table top in place. I do have a lot of room before hitting the edge of the top board and the actual bolt head size it so small that I wonder if aesthetically its the right look, if the objects I make are meant to encourage engagement with industrial materials it doesn't make sense to have such a small and easily covered bolt head. The nut locating issue remains and is also exaggerated in with this size of bolt.
There are a wide range of nuts and bolts available but and can safely exclude the M6 diameter currently as being not fit for my purposes. The M10 and 8 however are slightly harder to choose between and have decided to keep both in consideration when I come to apply them to a design.
Improving Manufacture - Jigs
While exploring all the shiny fitting is exciting [not really] I also have to improve other areas of the process and primary the accuracy of perpendicular holes which go into the side of the boards/planks. In almost all of the samples and items I've made thus far these holes have become slightly skewed and off angled, most of the time it has very little affect on the joint but it can disrupt the users construction process as it takes some fiddling to correctly align the holes. This cannot remain as part of my outputs so I'm looking into some solutions.
Initially I went into thinking how pre-existing bush's [a gig which hold the drill bit perpendicular] but found none which would work very well with the side of a 18mm or even 25mm board.
A few videos online suggested using gigs and a hand held router to dill similar holes but as I'm working in the university workshop there's availability of the tool to consider and safety, but I do like the suggestion of using a gig.
Use of a gig would greatly improve the accuracy of repeatable tasks and if I'm thinking of batch making designs making out a gig which can be used the same way over and over it would increase accuracy which saving time on making out.
A slightly more complicated version of the gig to the left could be made to solve this problem. I'd route a channel though a piece of material which is the thickness of my board and mark out the holes, drilling using a pillar drill to ensure they're straight. Metal washers could also be inserted into the gigs so that the accuracy remains over time.


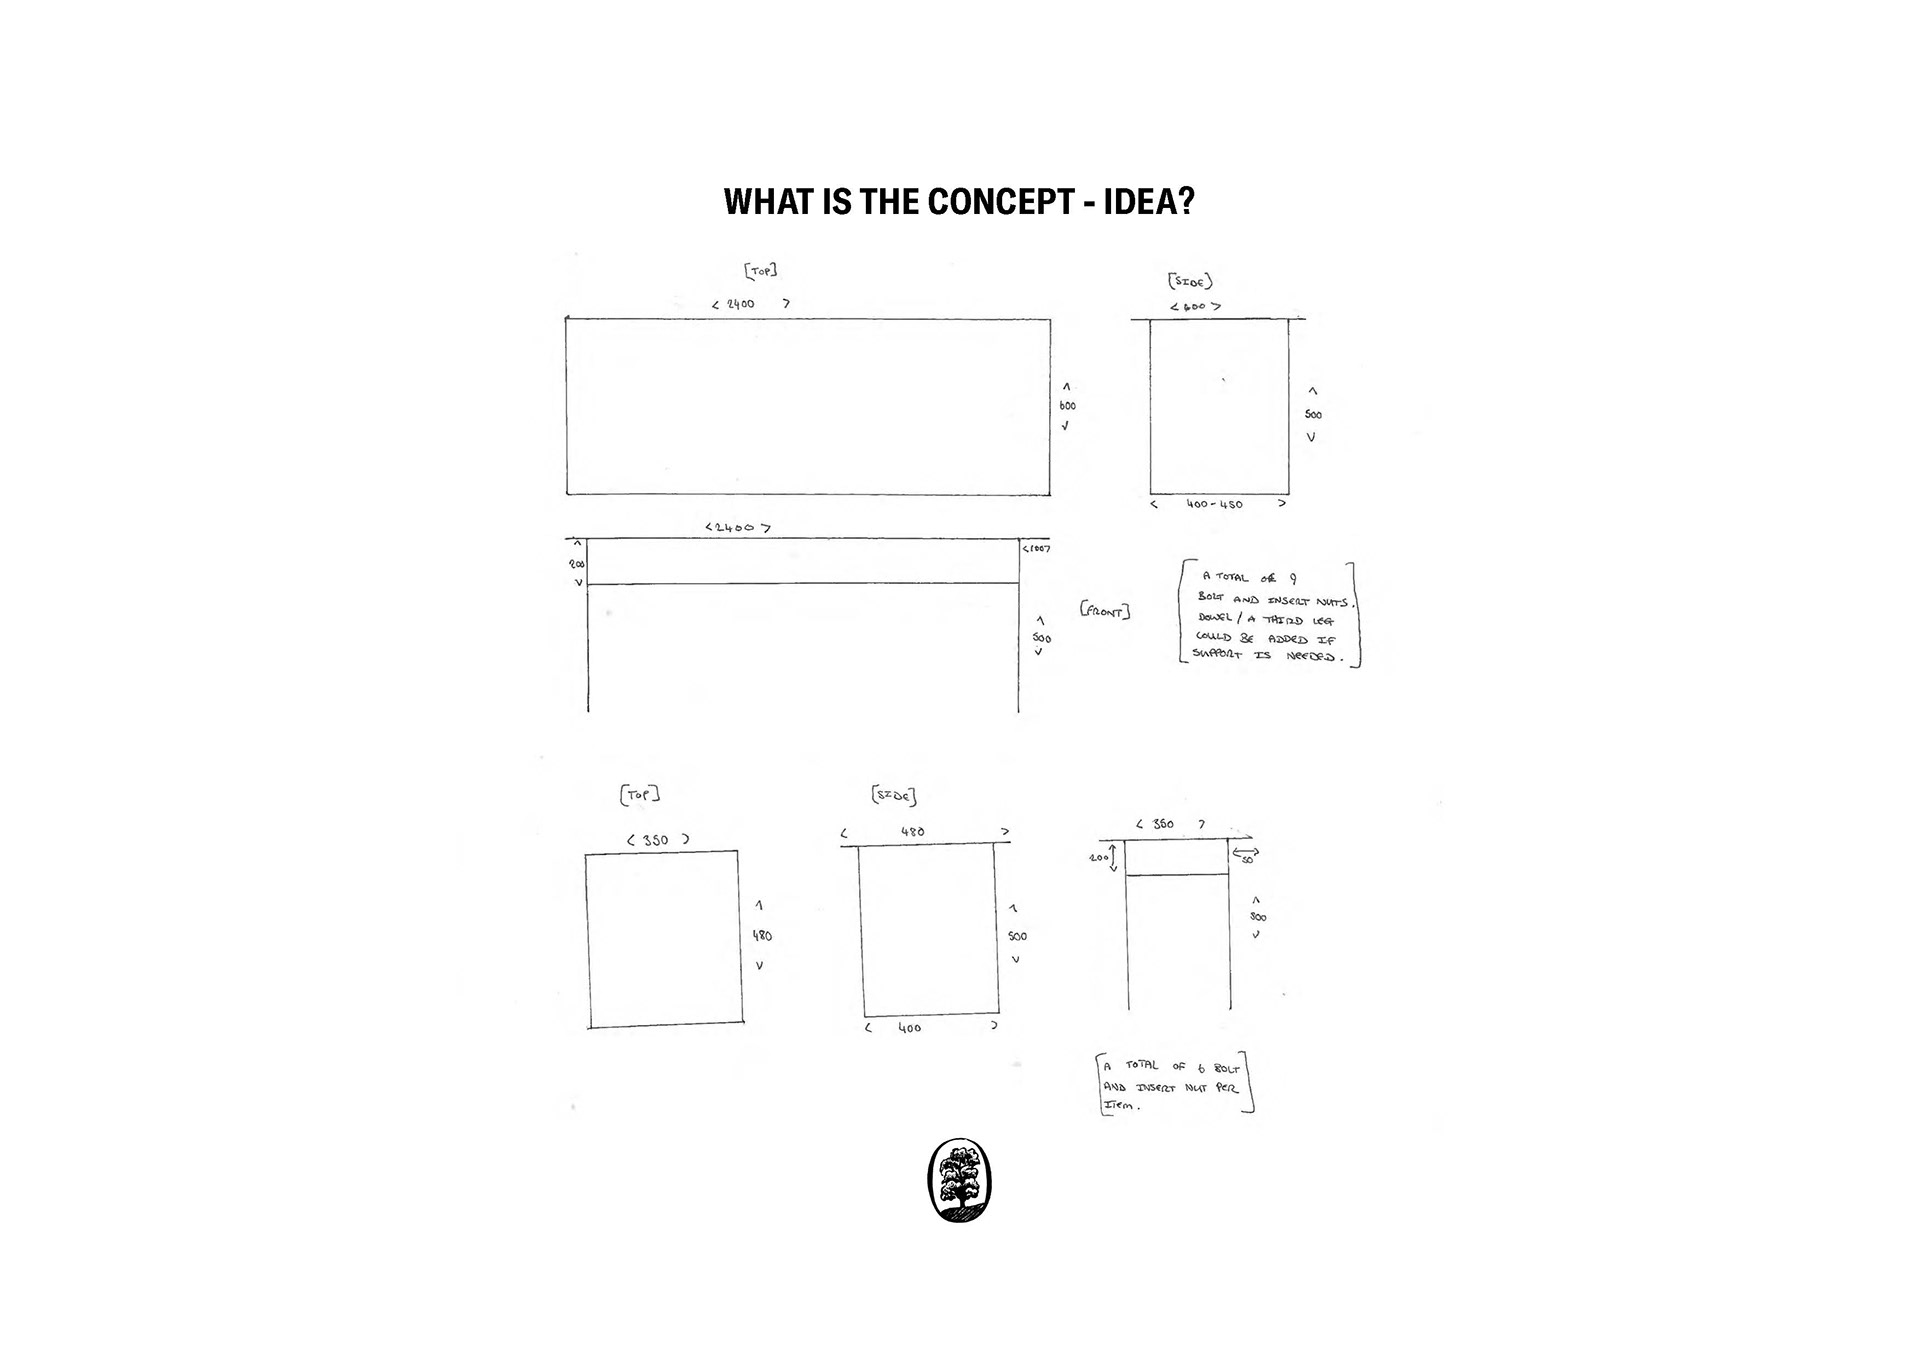
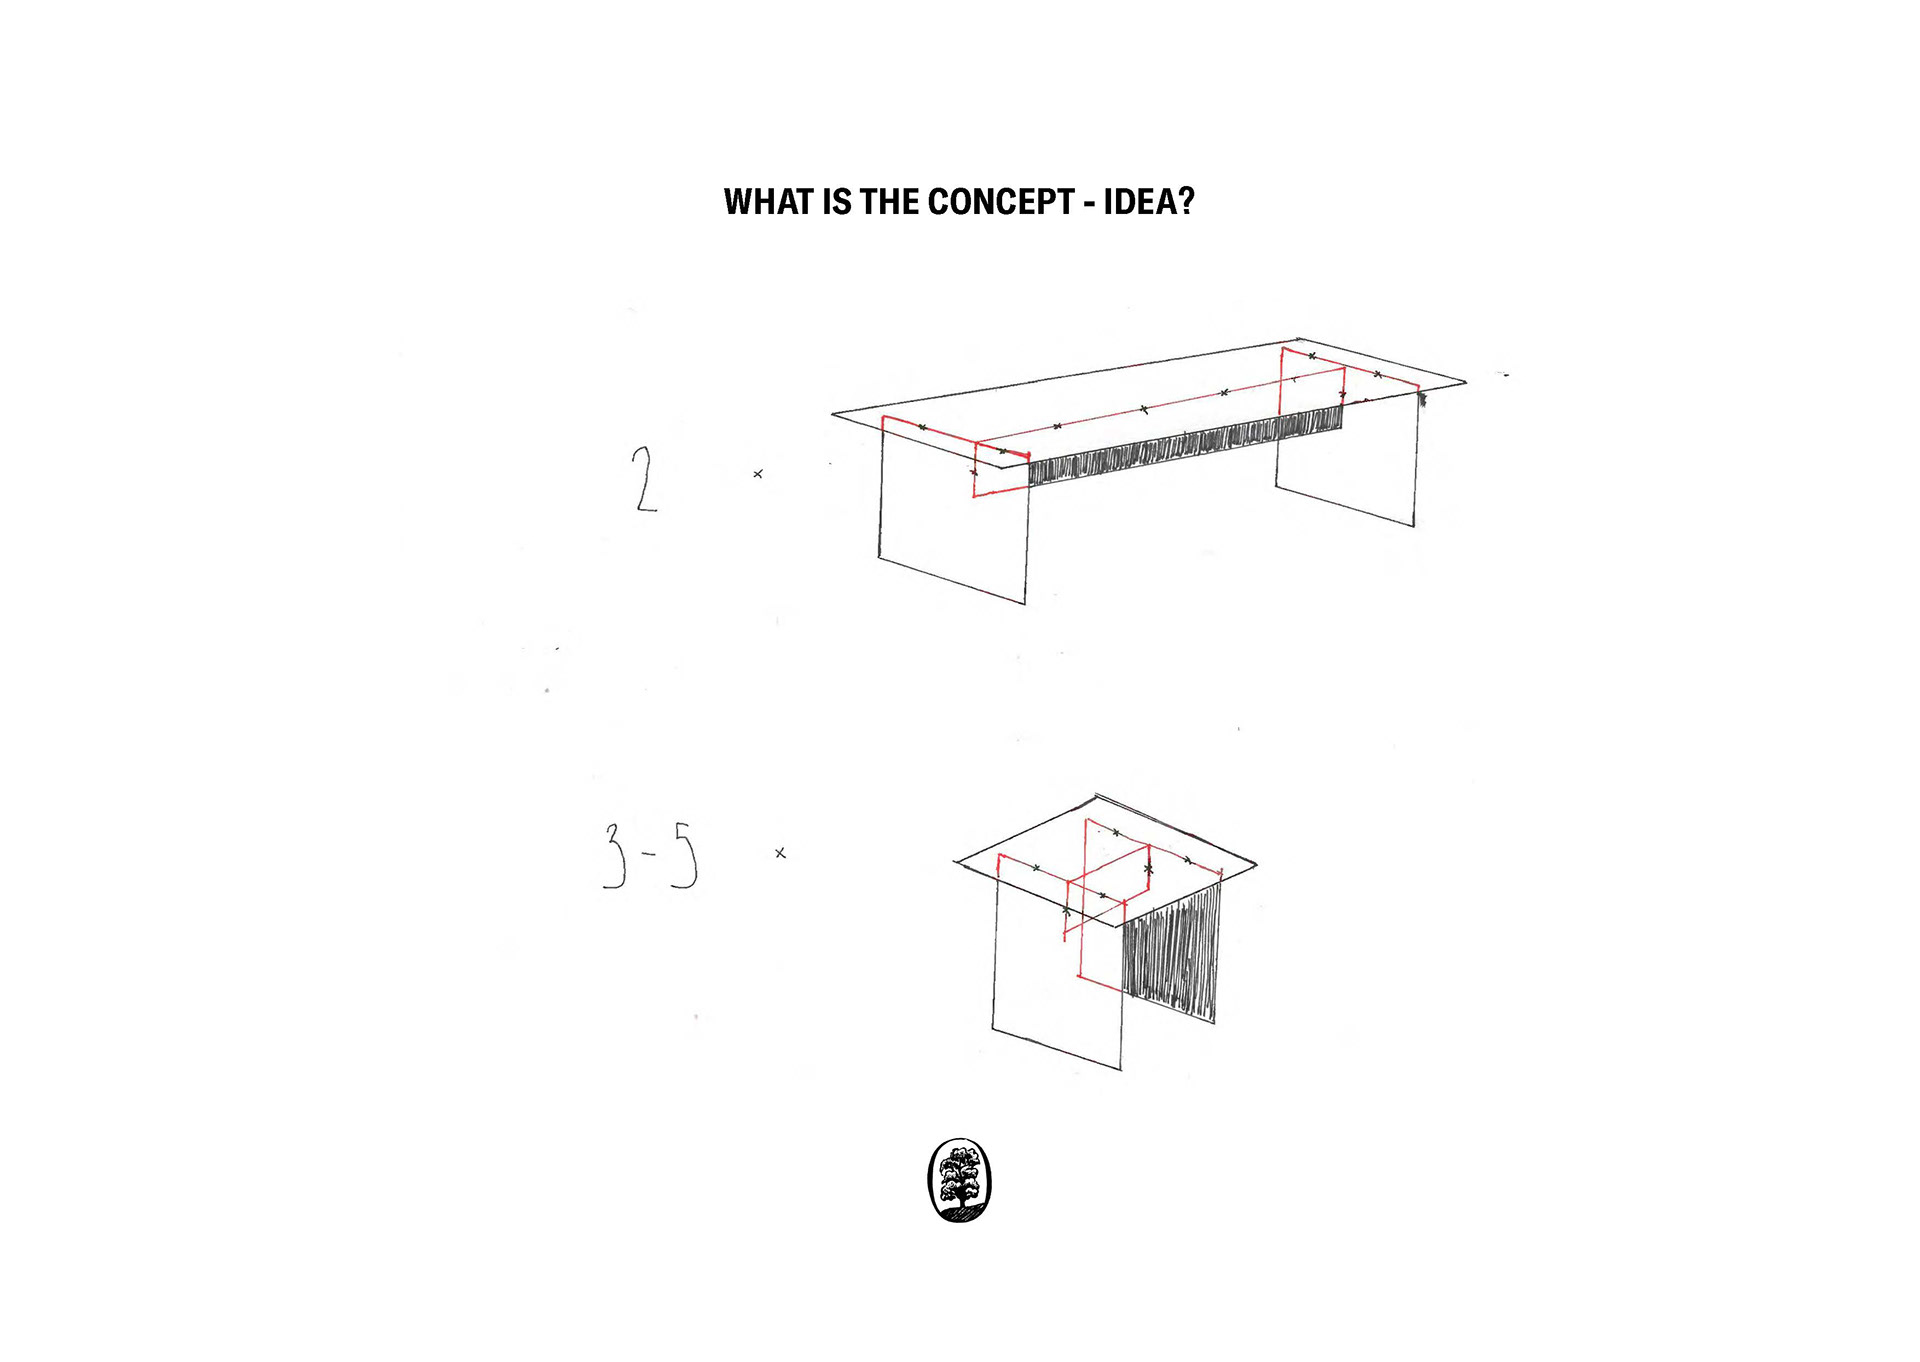
Desk Design - Self Commissioning
Above are the sketch developments for what I'm going to call a 'self-commissioned' piece of furniture. In my research conducted as part of unit x and contextualising practice, I found that many of the items of furniture created my people like Jesse Cracknell are either private commissions or objects made taking into consideration his idea of a customer he'd like to sell to. With the designs for this desk I've explored how a custom piece of furniture might come about through a series of conversations, granted with myself [I've not gone fully mad just yet]. Feedback from this finished piece and more objects made for briefs/competitions should give me a better idea of the types of customers I might be able to sell directly too.
Some key considerations with the design which I might have with someone commissioning an item are the side and dimensions of the cubby, I've chosen to place it on the right hand side as it works the best for me being left handed and leaning over to write while having my laptop in front of me. Also the compact size of the desktop is intended to fit discreetly into my room but for other clients that could be altered dramatically.


Exploring commercial materials - Plywood decision
My experience order from Atlantic timber for this project was quite interesting. Visiting the site I was opened up for the first time to the massive amount of commercial materials available, within the workshop at uni it can sometimes be hard to imagine the use of materials not available there. Some standouts of the visit was the masonry insert fittings seen above, although unsuitable for most wood applications due to the splitting of wood which would occur they were interesting in showing how perhaps my material palette could expand to concrete or other hard material which might be resistant to splitting. In terms of manufactured board I was excited to see Valchromat was available, a material I have only handled briefly but am interested in using. Also available was pre-bonded pine board which could be helpful given the interest in commissions for the ratchet strap table made last semester.
Most importantly I was able to explore the plywood boards available. Due to the war in Ukraine the supply of birch faced plywood, and many other commodities, have stopped and prices have increased massively. Atlantic timber actually had 18mm birch ply in stock but my eye was drawn to the poplar face ply they also had available. The 25mm thickness poplar plywood manufactured by Garnica was really interesting to handle, due to the thickness it still has a nice weight to it but when compared to the birch board of the same thickness it feels so much more manageable. When I consider how I'd like someone to use and live with a piece of my furniture the poplar ply just seems more appropriate in almost every way, the only reservation I do have is the softness of the facing veneers do dent quite easy but I'm going to continue with it and see how the finish might help to negate this.
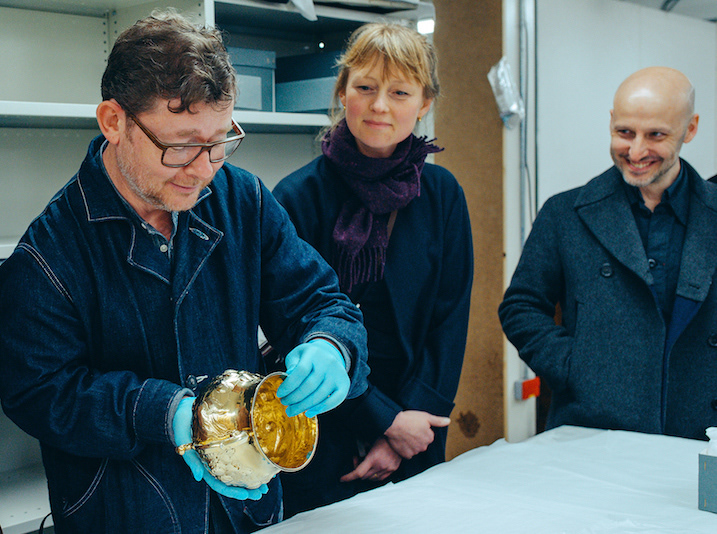
David Clarke + Choi Keeryong Interview and Tutorial
Guest lecture w/ David Clarke and Choi Keeryong. Both these makers and their presentations were fantastic and I'm quite amazed at how dedicated both the makers are to their crafts. You're always aware of how much work has to be done to get to the top of any discipline, no one just arrives, but it's great to be confronted by it sometimes. Keeryong's innovative objects which he explained came about through a 'failure' in the casting process, and his reconsidering of what could actually become the foundation for exciting new works is something I have to bare in mind going forward as failure is inevitably part of any creative process. I could perhaps reconsider the use of the compression bolt joint for a different project/use.
David Clarke's lecture was filled with lots of interesting anecdotes and I can defiantly respect his journey and practice even if I'm not particularly a fan of his works. The tutorial with David was very helpful in me really defining what it is I want to archive in the short term. I'd heard him asking everyone who sat down with him what it is they're doing now? and what they want to be doing after uni? He stressed the latter. So when I sat down I empathised all aspects of my practice, furniture design, photography and publishing, although I've felt strongly about these three things it was maybe the first time I've vocalised my dream to be practicing all three of these things once I graduate.
In relation to this project David suggested a few things, some of which I really agreed with and other I could slightly confusing. The overall goal he agreed was interesting and used to term - making standard special - which I'm a big fan of. When I think of the reason I'm so interested in these fittings and with furniture, it is that these things seem so special to me. Not just through the process of design and making but in their intended state these standard objects and materials have a unique interest to me. More generally speaking David advised me to always interrogate and argue why the fittings I use should be made special, which is something different to just my interest in them, research into other makers and academics to discover what the science behind my practice is.
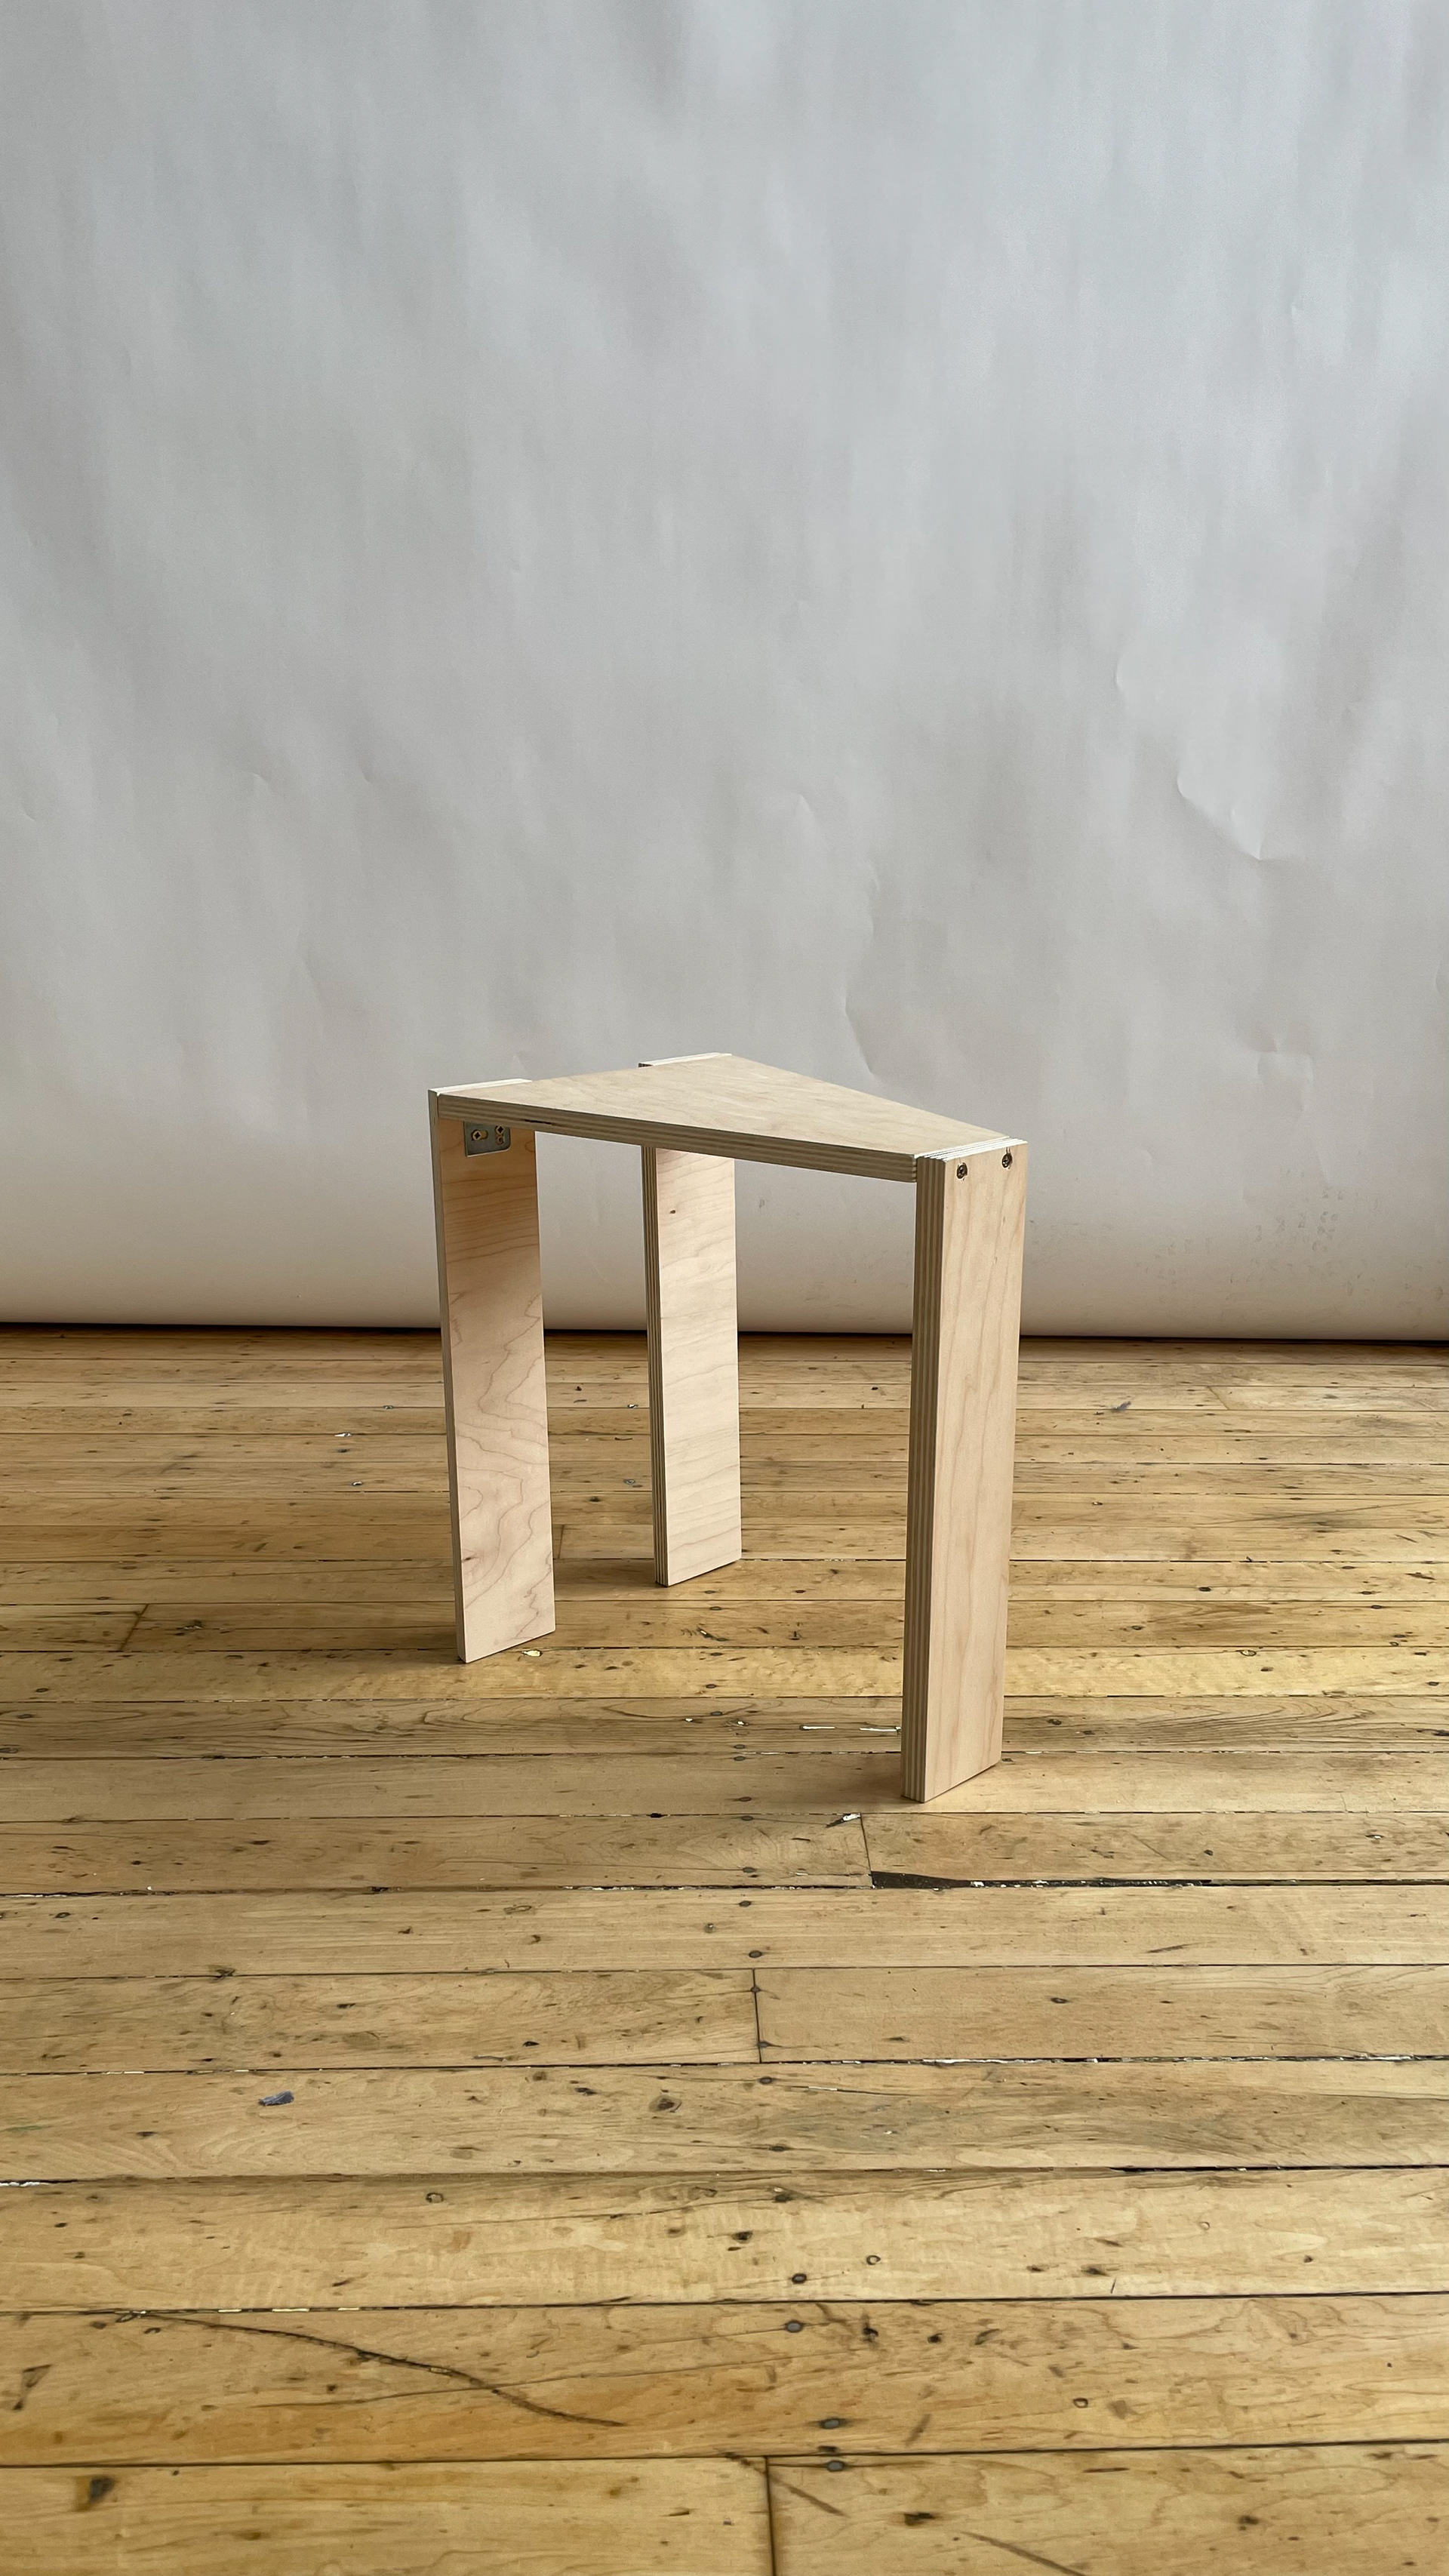
Off cut stools - Video creation - Carl Clerkin Q+A
Above are two stools made as part of a short brief set by Geoff. The aim, to go out and make a video to be posted online. This practice is essential for anyone hoping to engage in building a community of people interested in your work, it helps viewers connect with your process and the pieces you create. I was quite stuck with the project at this point as I was waiting on the arrival of the insert nuts below and hadn't really been able to digest the information and research I'd conducted so far, thankfully on the 'workshop gods' blessed me with a large amount of plywood offcuts. These offcuts were discarded by an external lecturer who, quite similar to me, designs and makes plywood furniture. This small brief interlude was helpful in advancing my project and stopped me from getting stuck in a set way of thinking about materials and making, I have to remember to return to this quick process when I next have a lull in making.
Please see the video made alongside these stools here.
A designers work which is quite similar to these stools but of a much higher quality is Carl Clerkin's. I've been intrigued by Clerkin's work since seeing his Beasley Brothers exhibit at Somerset House and the interview he gave on Material Matters podcast. Aside from his obvious skill as a maker and unique approach to materials, Clerkin also seems to have a magnetic and quite charismatic personality which come across in interviews and in his work.
I reached out to him through Instagram to see if I could better understand his approach to material, which I feel is Clerkin's most defining feature. On the subject he said 'How the work is normally made, is governed by my limited making skills, accessible and affordable materials and appropriate processes - I’m very much a nuts and bolts maker.' I also extended the question to include something more relevant to my interest in design in response to the technological revolution, his response made me aware the he see's the growing use of technology in design as something to be harnessed and used another tool something that has 'afforded me more precision and allowed me to appear to be a better maker.'
Moving forward from this interview I realised that although the technological revolution has impacted designers and their careers so much already they're only just realising it's full impact. Clerkin could be used as a case study for someone who in his own words appears to be a better maker than they are in reality thanks to the effects of the internet and who's work wouldn't exist in the same way without the affects of both the industrial revolution, making standardised and mass production methods commonplace, and the technological revolution, which at once elevates Clerkin's work but also facilitates the growth and potential for new work.
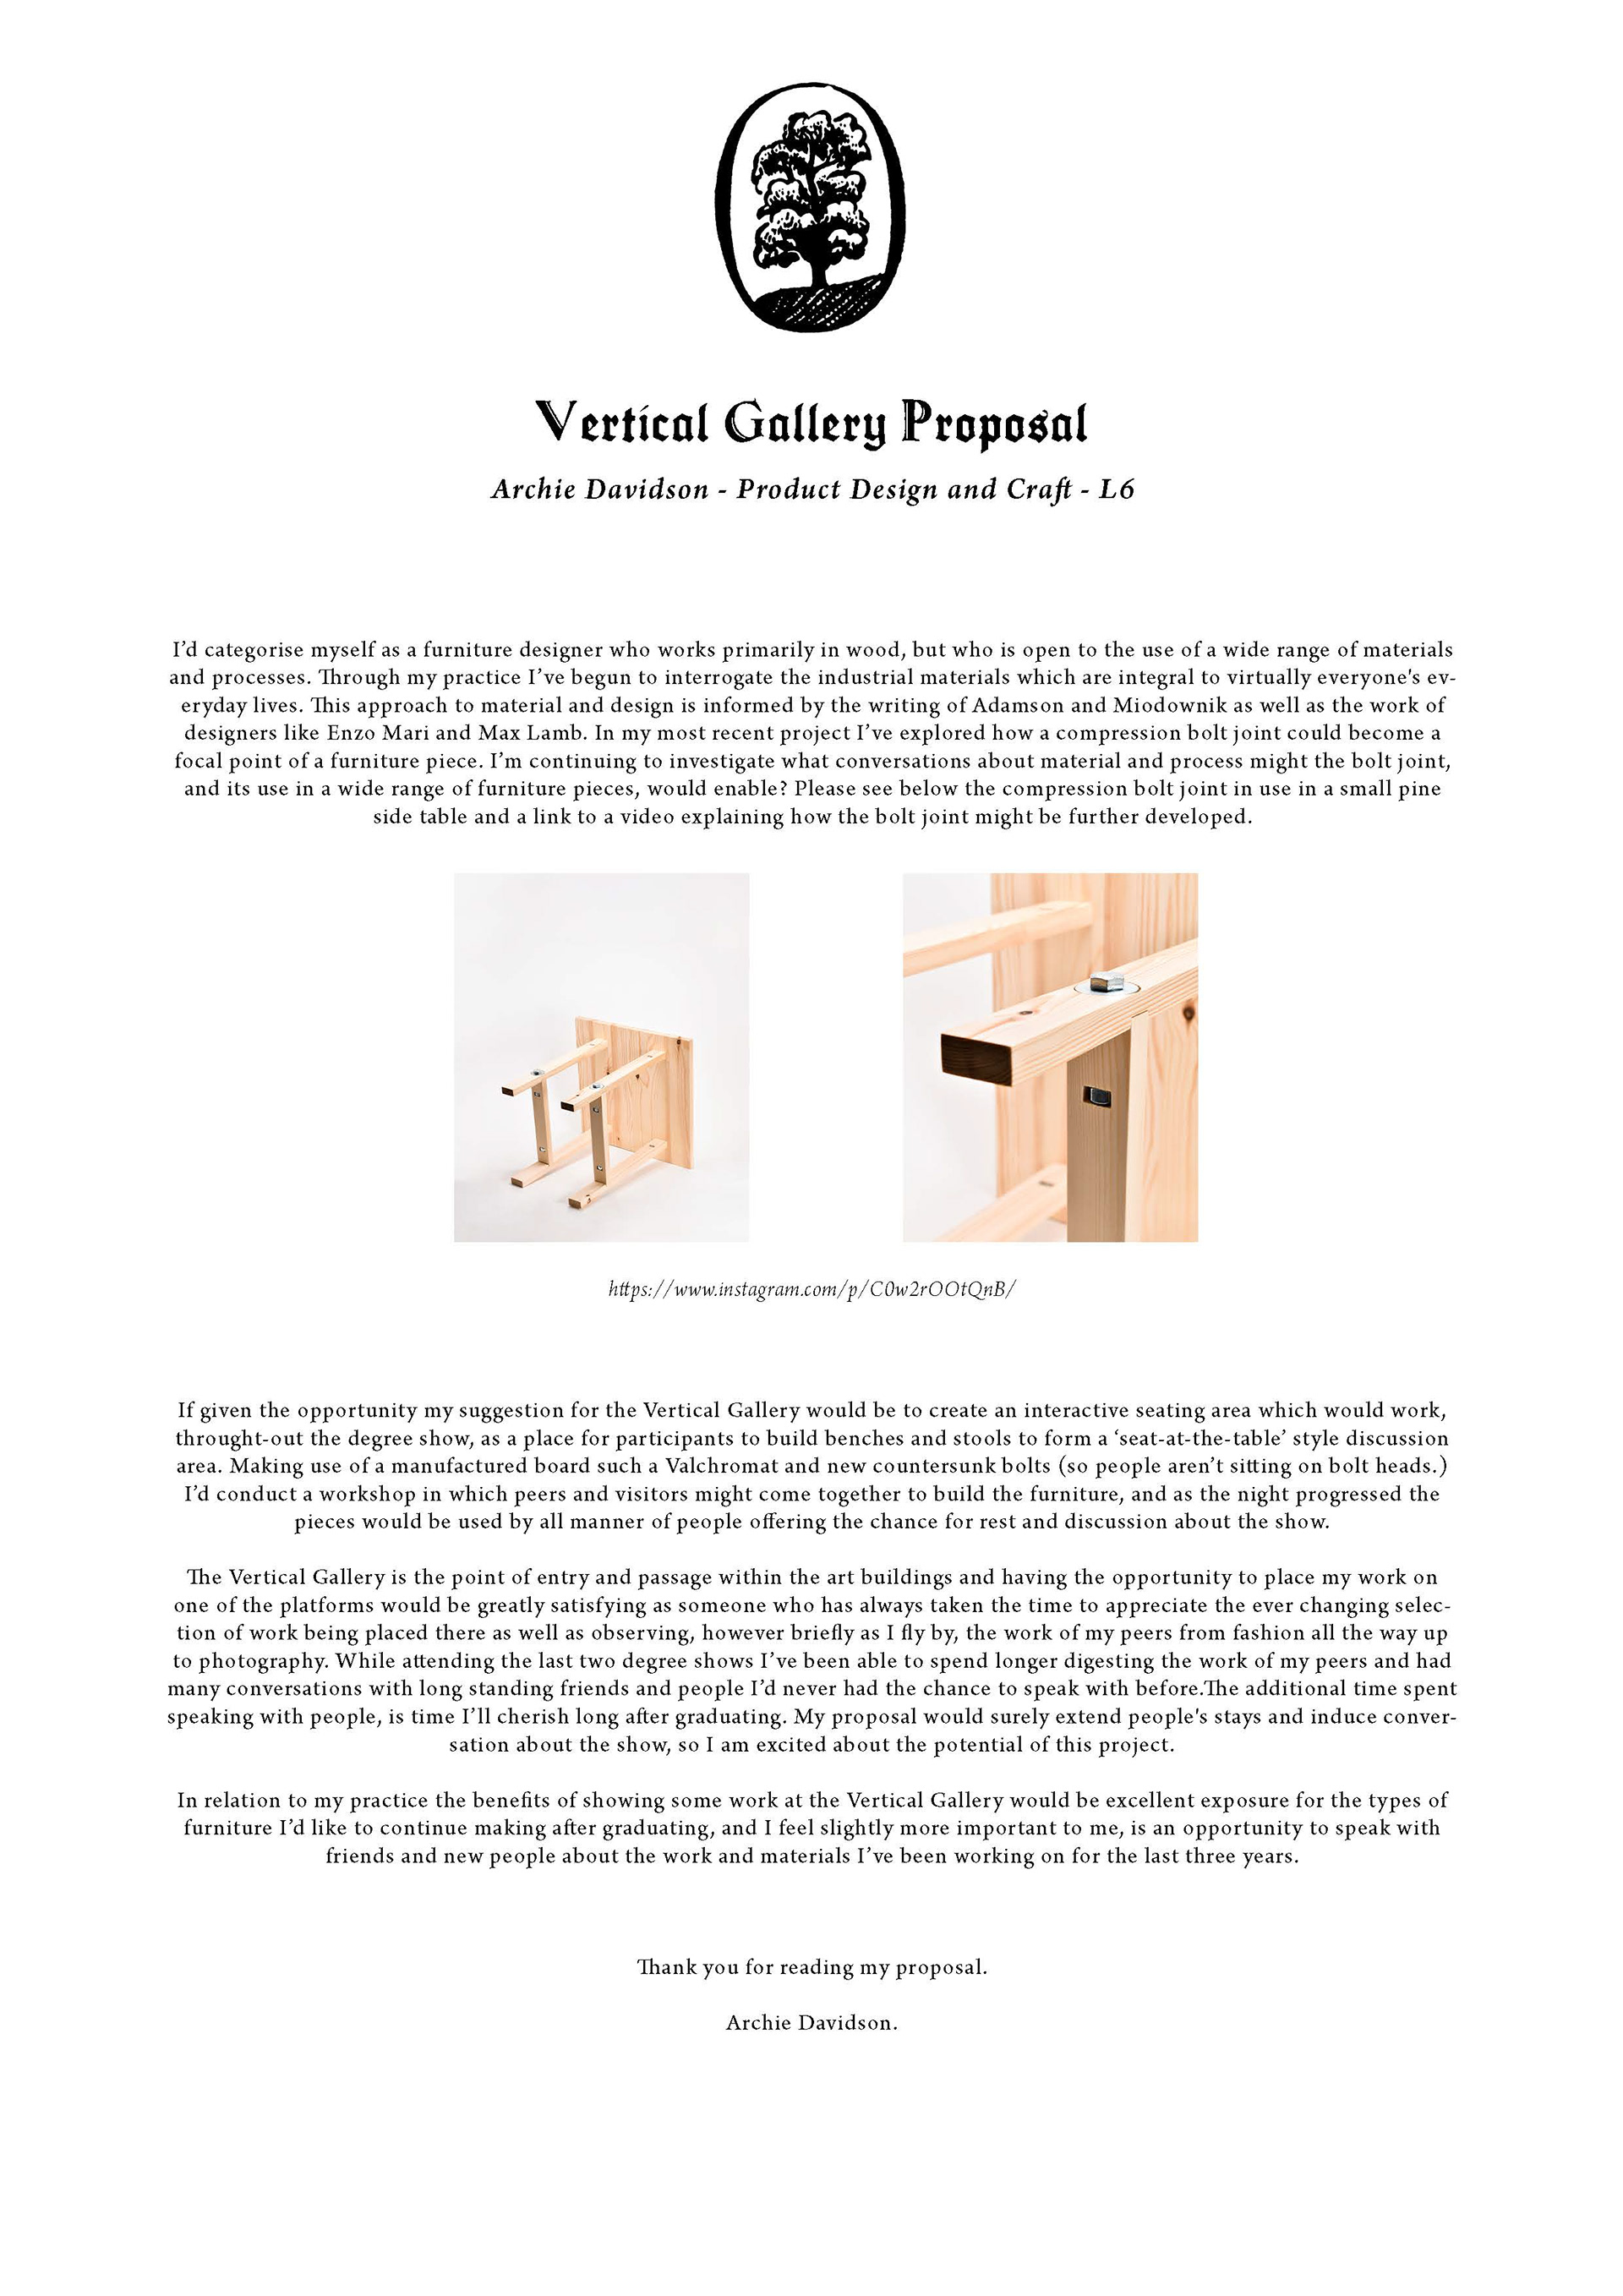
Vertical Gallery Proposal:
The Vertical Gallery showcase is a yearly opportunity that runs alongside the degree show and design students are invited to submit proposals for work to be commissioned for the space.
For this initial proposal applicants had to define their practice, state some of their influences, explore why the vertical gallery commission would be important to their practice and a brief description of the work they'd like to make.
This proposal really brought into focus the type of work I'd enjoy making but I felt quite conflicted listing Max Lamb and Enzo Mari as some of the design influences, I have of course researched both their work but don't feel my work has much in common with either of the designers.
Insert Nut - Pricing/Testing
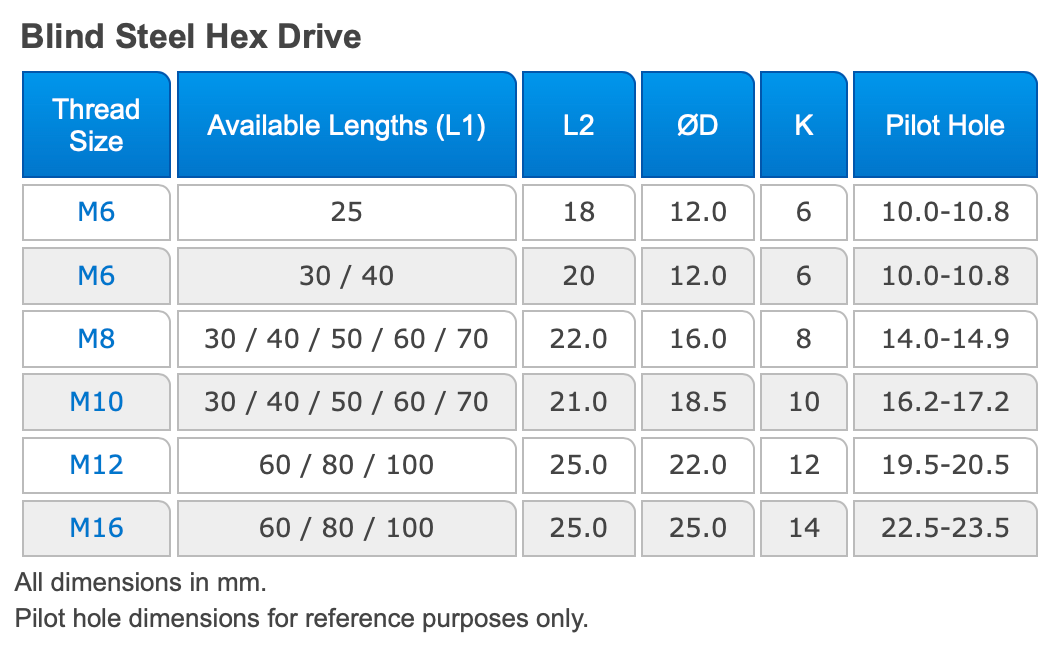
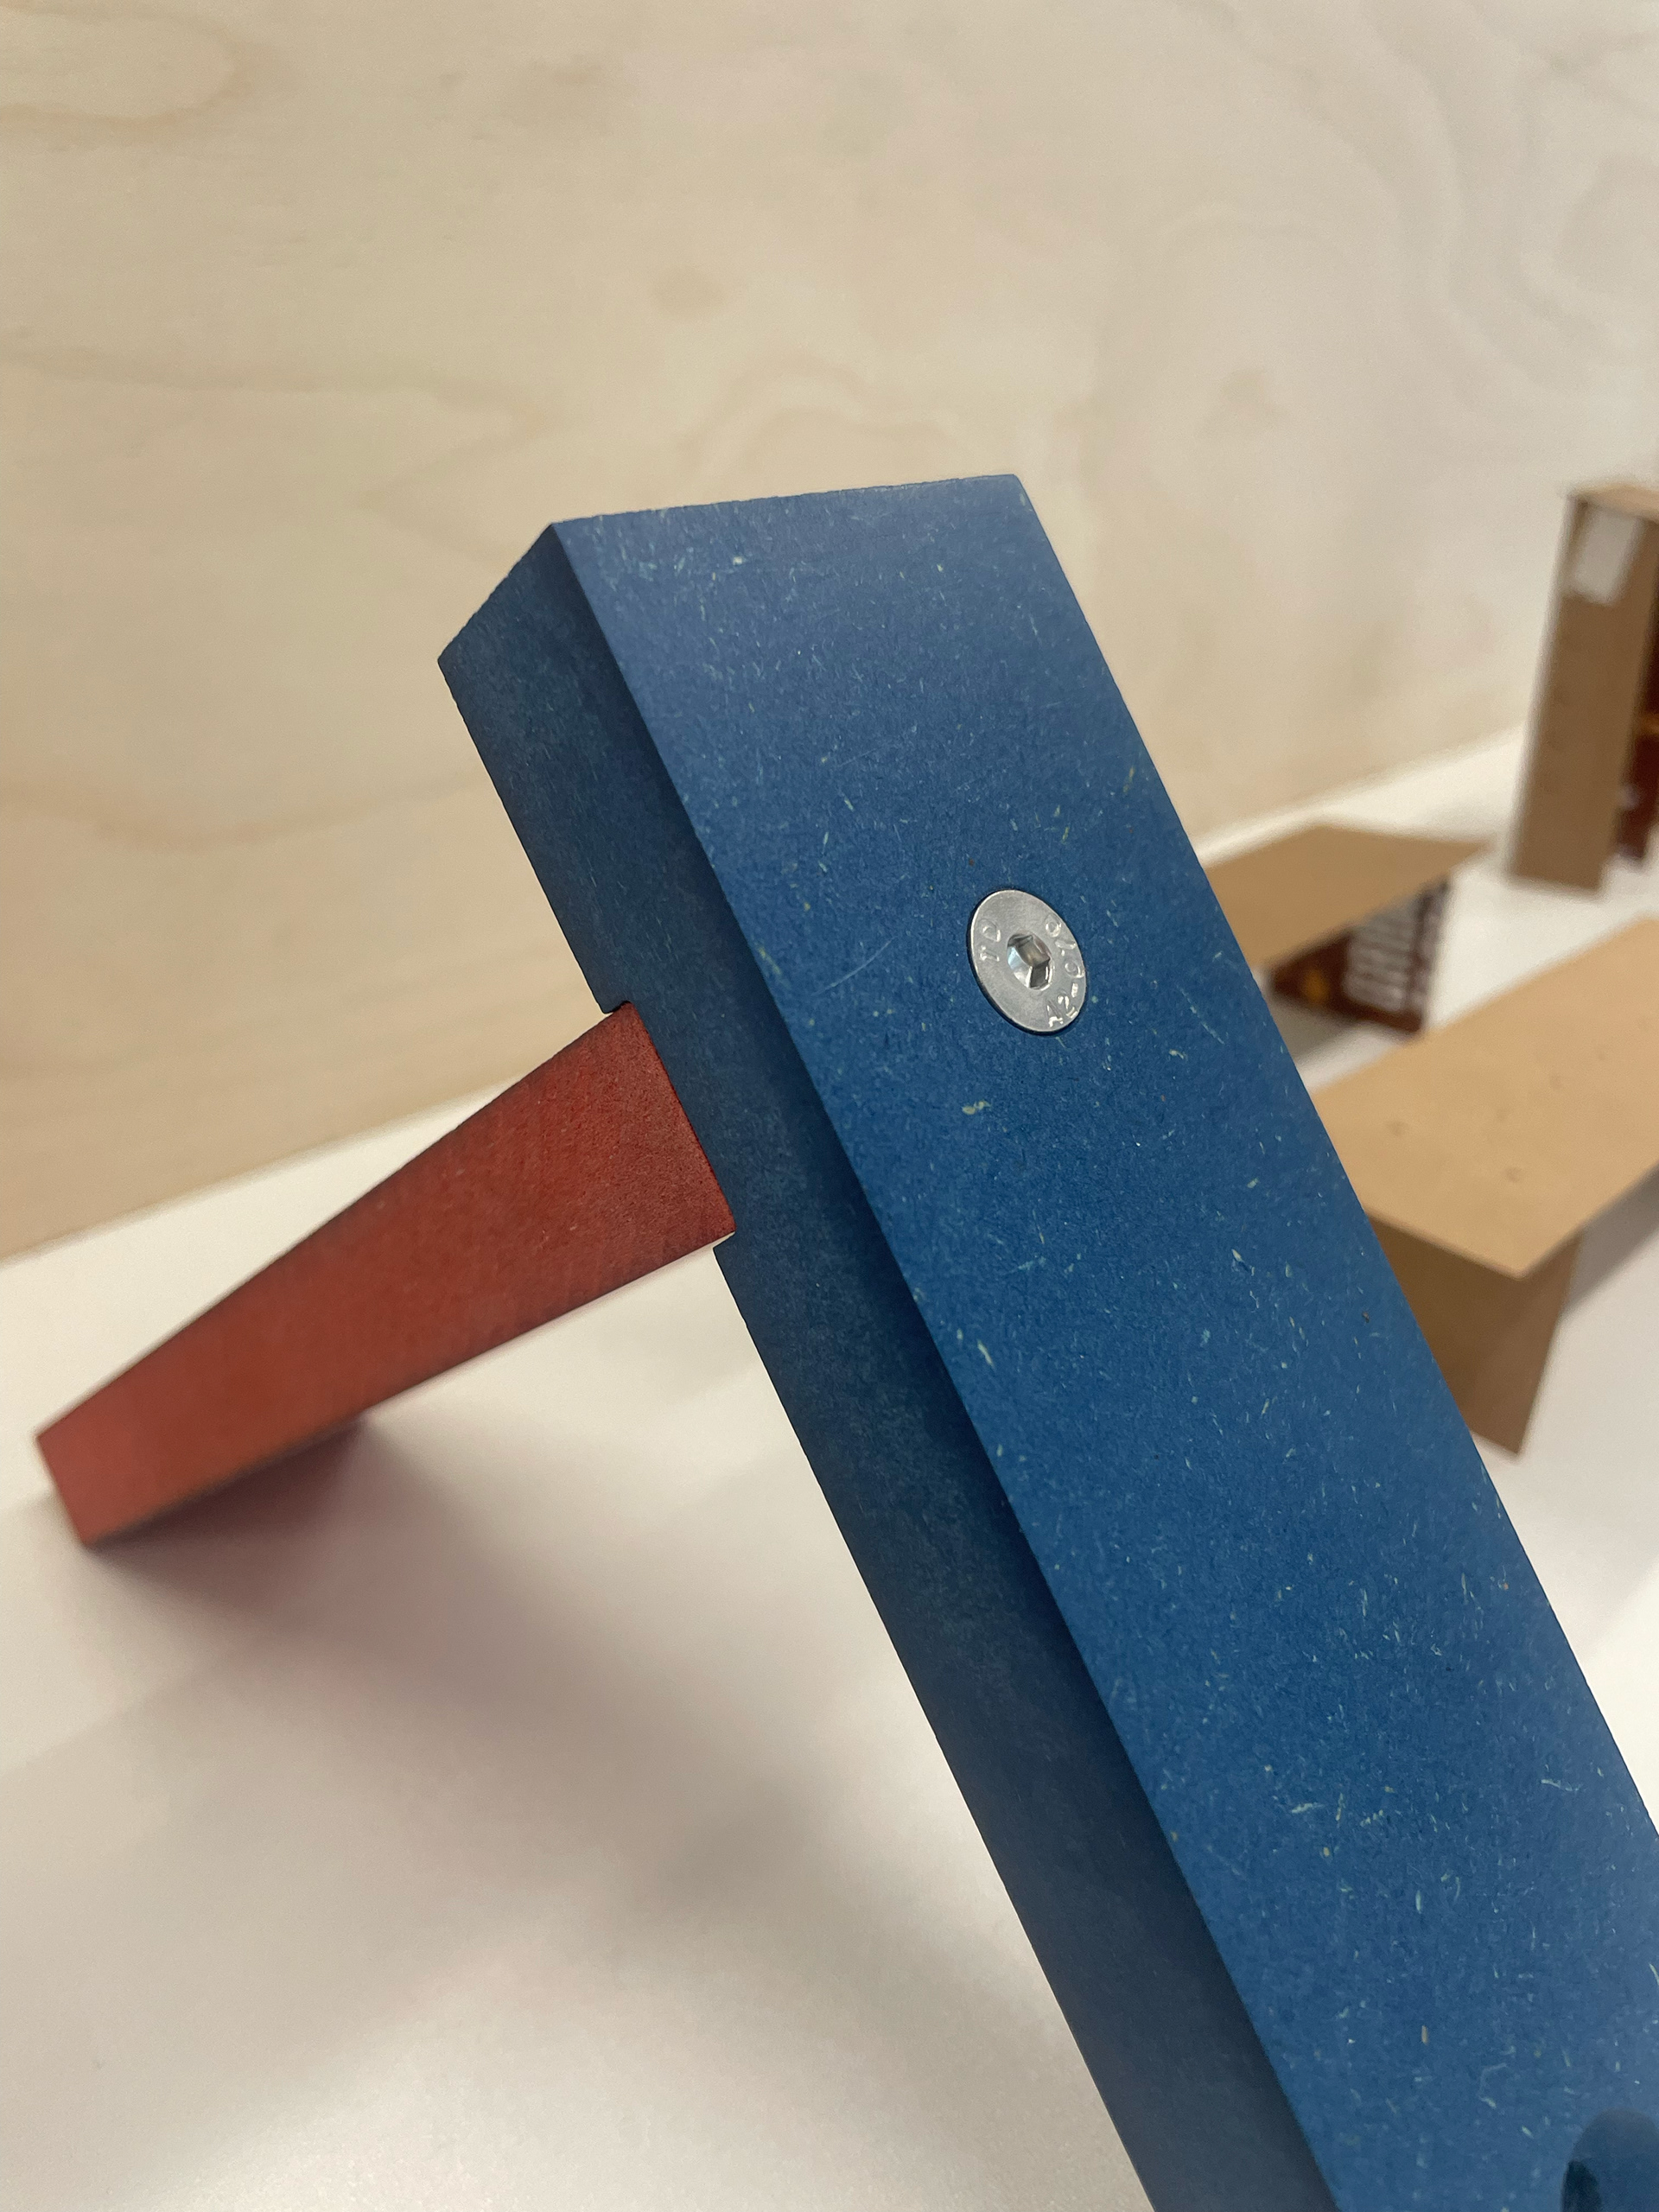
So the much awaited insert nuts! Moving forward from my testing of the compression bolt joint and the aesthetic 'advantages' to using the insert nuts I'm going to test and then I'm quite confident - construct a desk using these insert nuts. I would say that there's a slight element of over-engineering as the insert nuts selected are 60mm long, much longer than anything readily available to ensure the strength of the desk but cost is significantly increased by this decision increasing the fitting cost from ~£40 to ~£140.


The joint is solid! It works exactly as excepted and doesn't crack the plywood layer as was feared could occur. Lining up these two blanks was a dream fit, the bolt shaft sticking out the bottom side aligns itself so well the the initial smooth area of the insert nut and tightening slightly insures there's no chance of cross threading. The bolt tightens down well and as seen above due to the countersunk-head, distributes the pressure across a larger surface area.


Once the joint was tested and satisfied my expectations I wanted to see about finishing. From my experience with plywood straight edges and corner if left straight tend to tear out through use significantly decreasing the items aesthetic value, it's not a nice patina type aging. Using a planer I tested how the edges both with and across the grain reacted and found that with the grain a nice chamfer could be easily added with a few passes, but across the grain it was rough and would have to be hand sanded if I wanted to math the with grain edges.


Improved Manufacture Technique
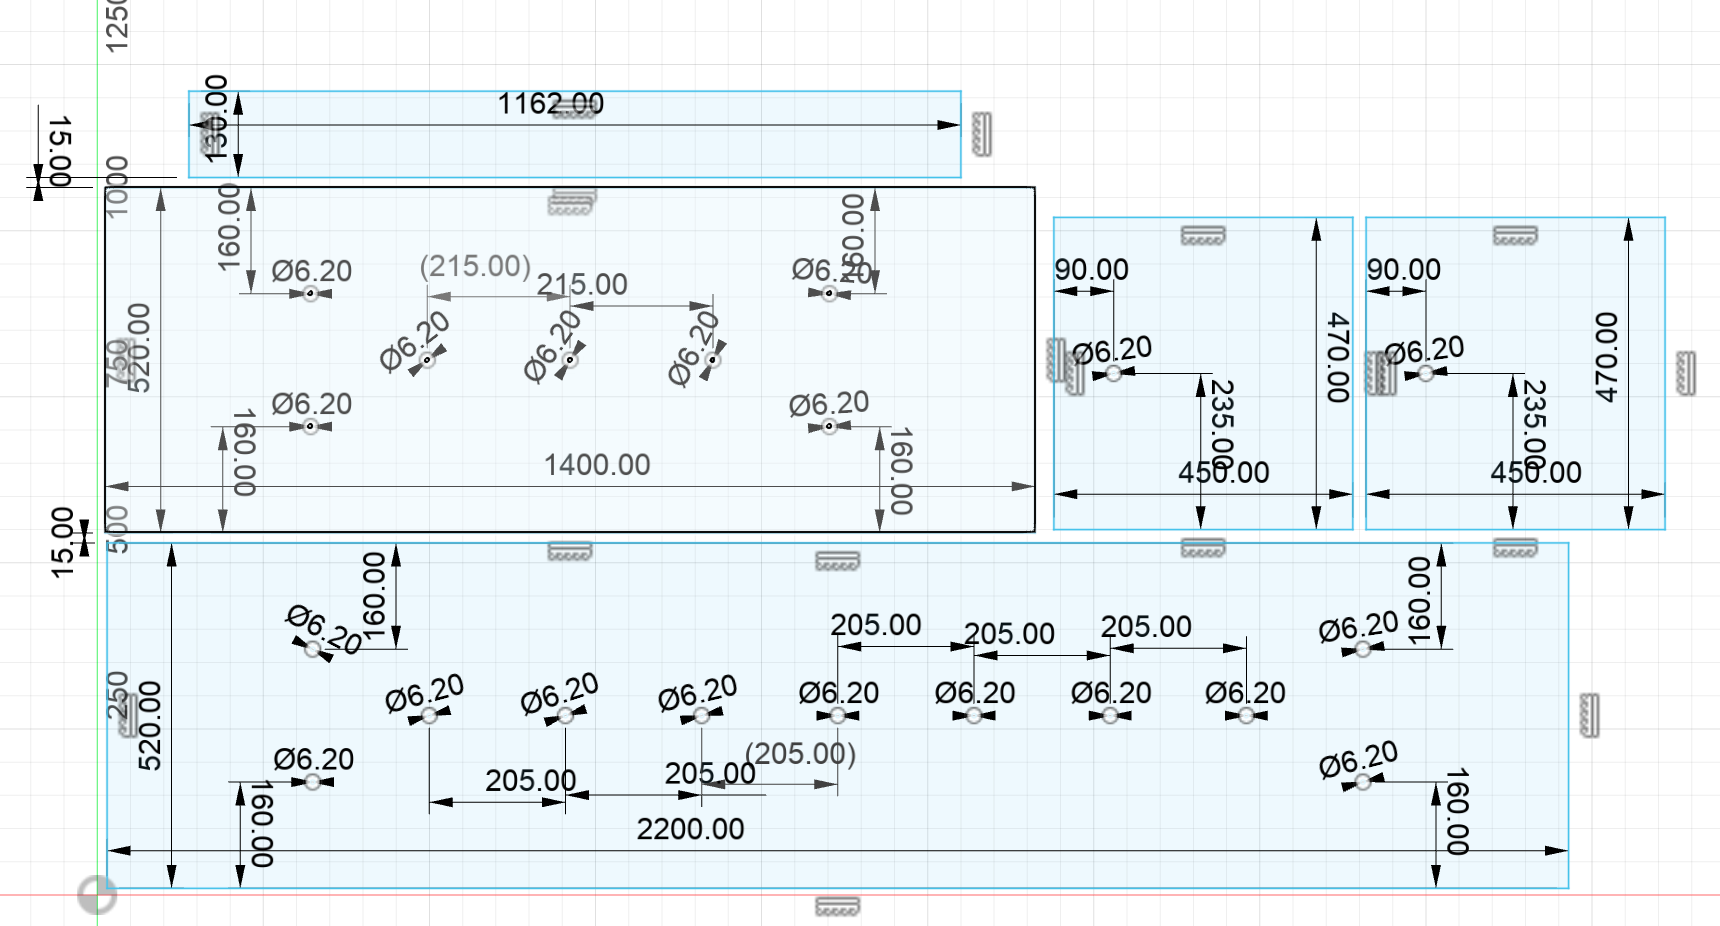
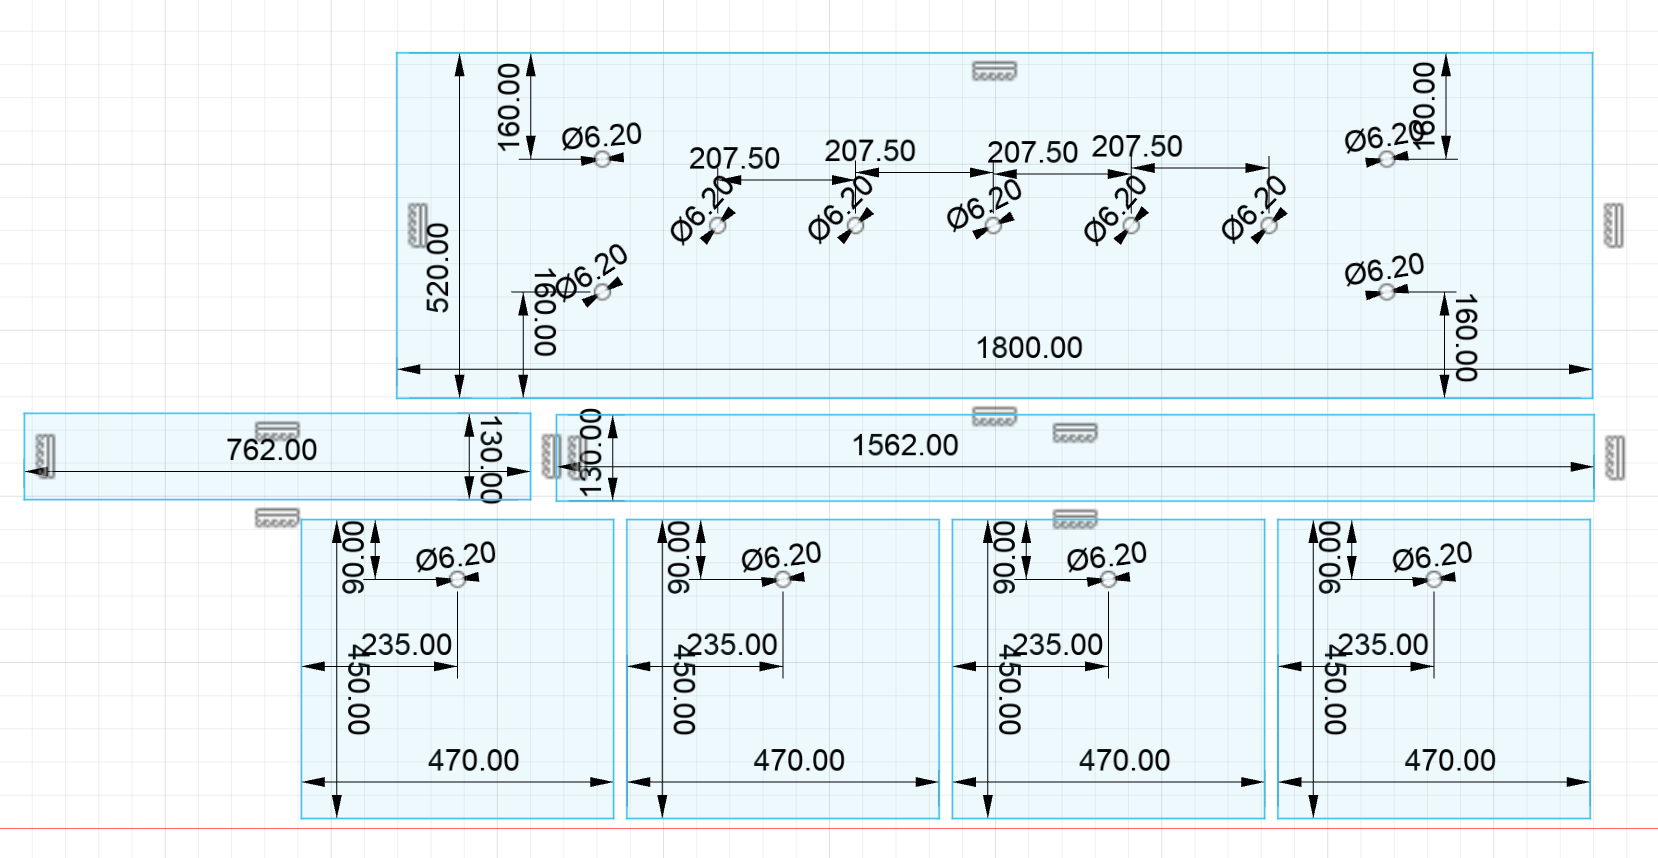
A note from these workshop sessions I carried with me was the need for focus when marking out and machining. I wanted to aim for a level of finish, on a scale of object, I hadn't archived as of yet. This meant a slow and methodical approach to each measurement ensure it was accurate and aligned with joining faces, although this sounds relatively obvious and I had been doing this to an extent before I wanted to really focus. I wore earplugs for the majority of my making sessions and found myself falling into flow states through the process which made the making process very satisfying.
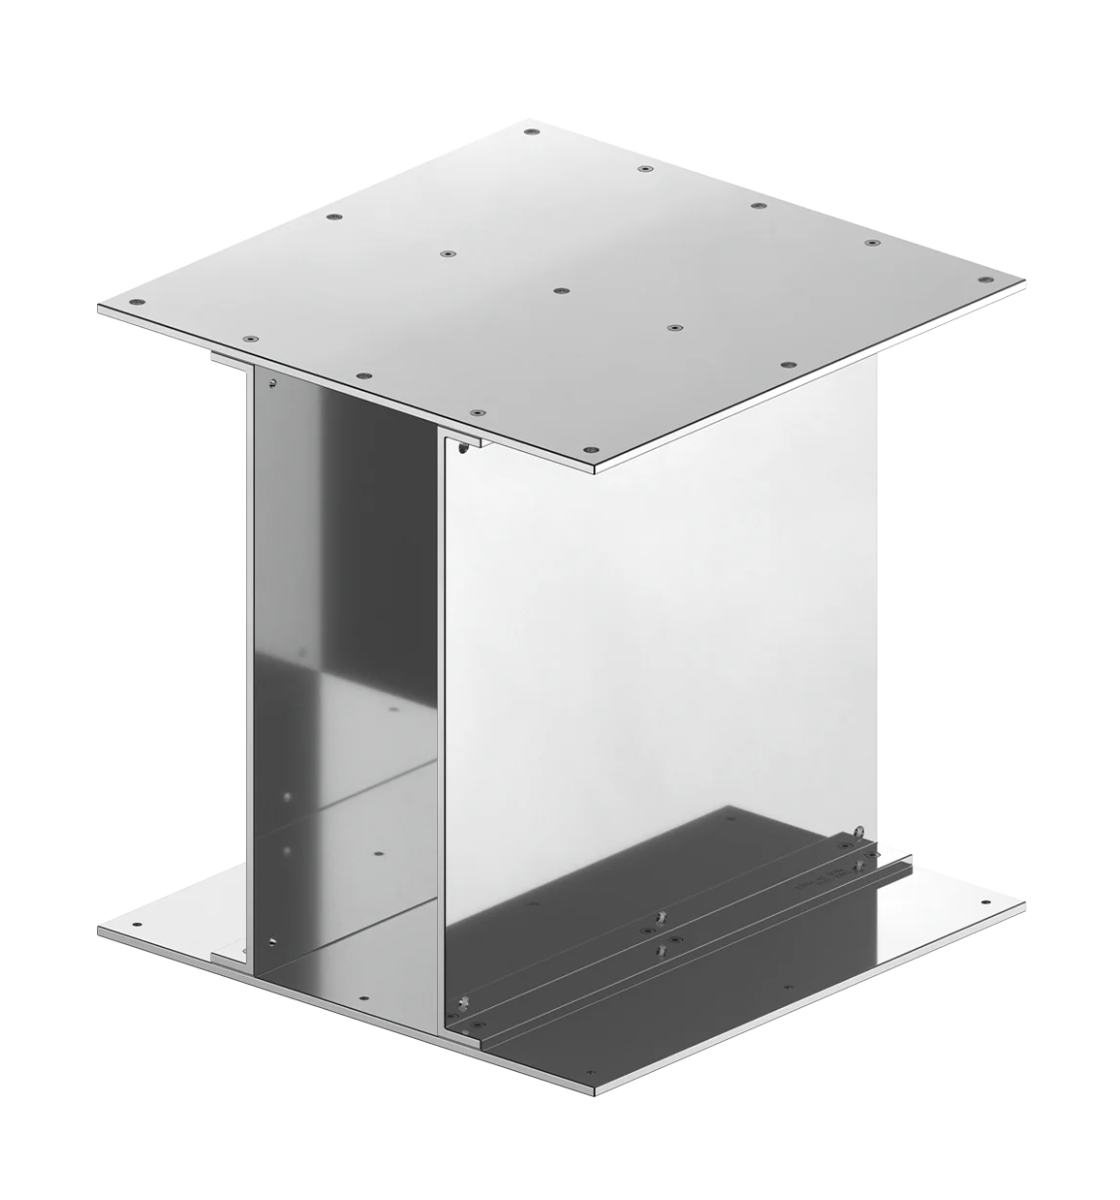
Machining these boards was a challenge due to the size and drilling angles, as seen above I bought and modified a pillar drill jig to accurately drill all holes on the piece. If put into manufacture this system would also increase speed, being able to move and change holes and drill bits more quickly than on a traditional pillar drill.


At this stage of construction I really couldn't wait to be finished, I mean the excitement to put the biggest piece of furniture together was a bit to much. So with the help of Graham the technician currently on duty we did a quick dry fit to test the deign before sanding and it worked!!! All the pieces bar the bottom cubby fit together to create a sturdy and functional desk. As mentioned above I had real focus on making out accurately and this included adding tolerances of 2mm to almost all of the edges to ensure the desk top would essentially be slightly too long, its easier to take excess material from the desk top, cubby bottom and support than have gaps which I feel would significantly impact the perceived quality of the piece.
On reflection all the panels were cut exactly to size and with the time spent making out I should have trusted myself to have everything in place. A note on the sanding which meant everything aligned correctly but did add time to the finishing process.
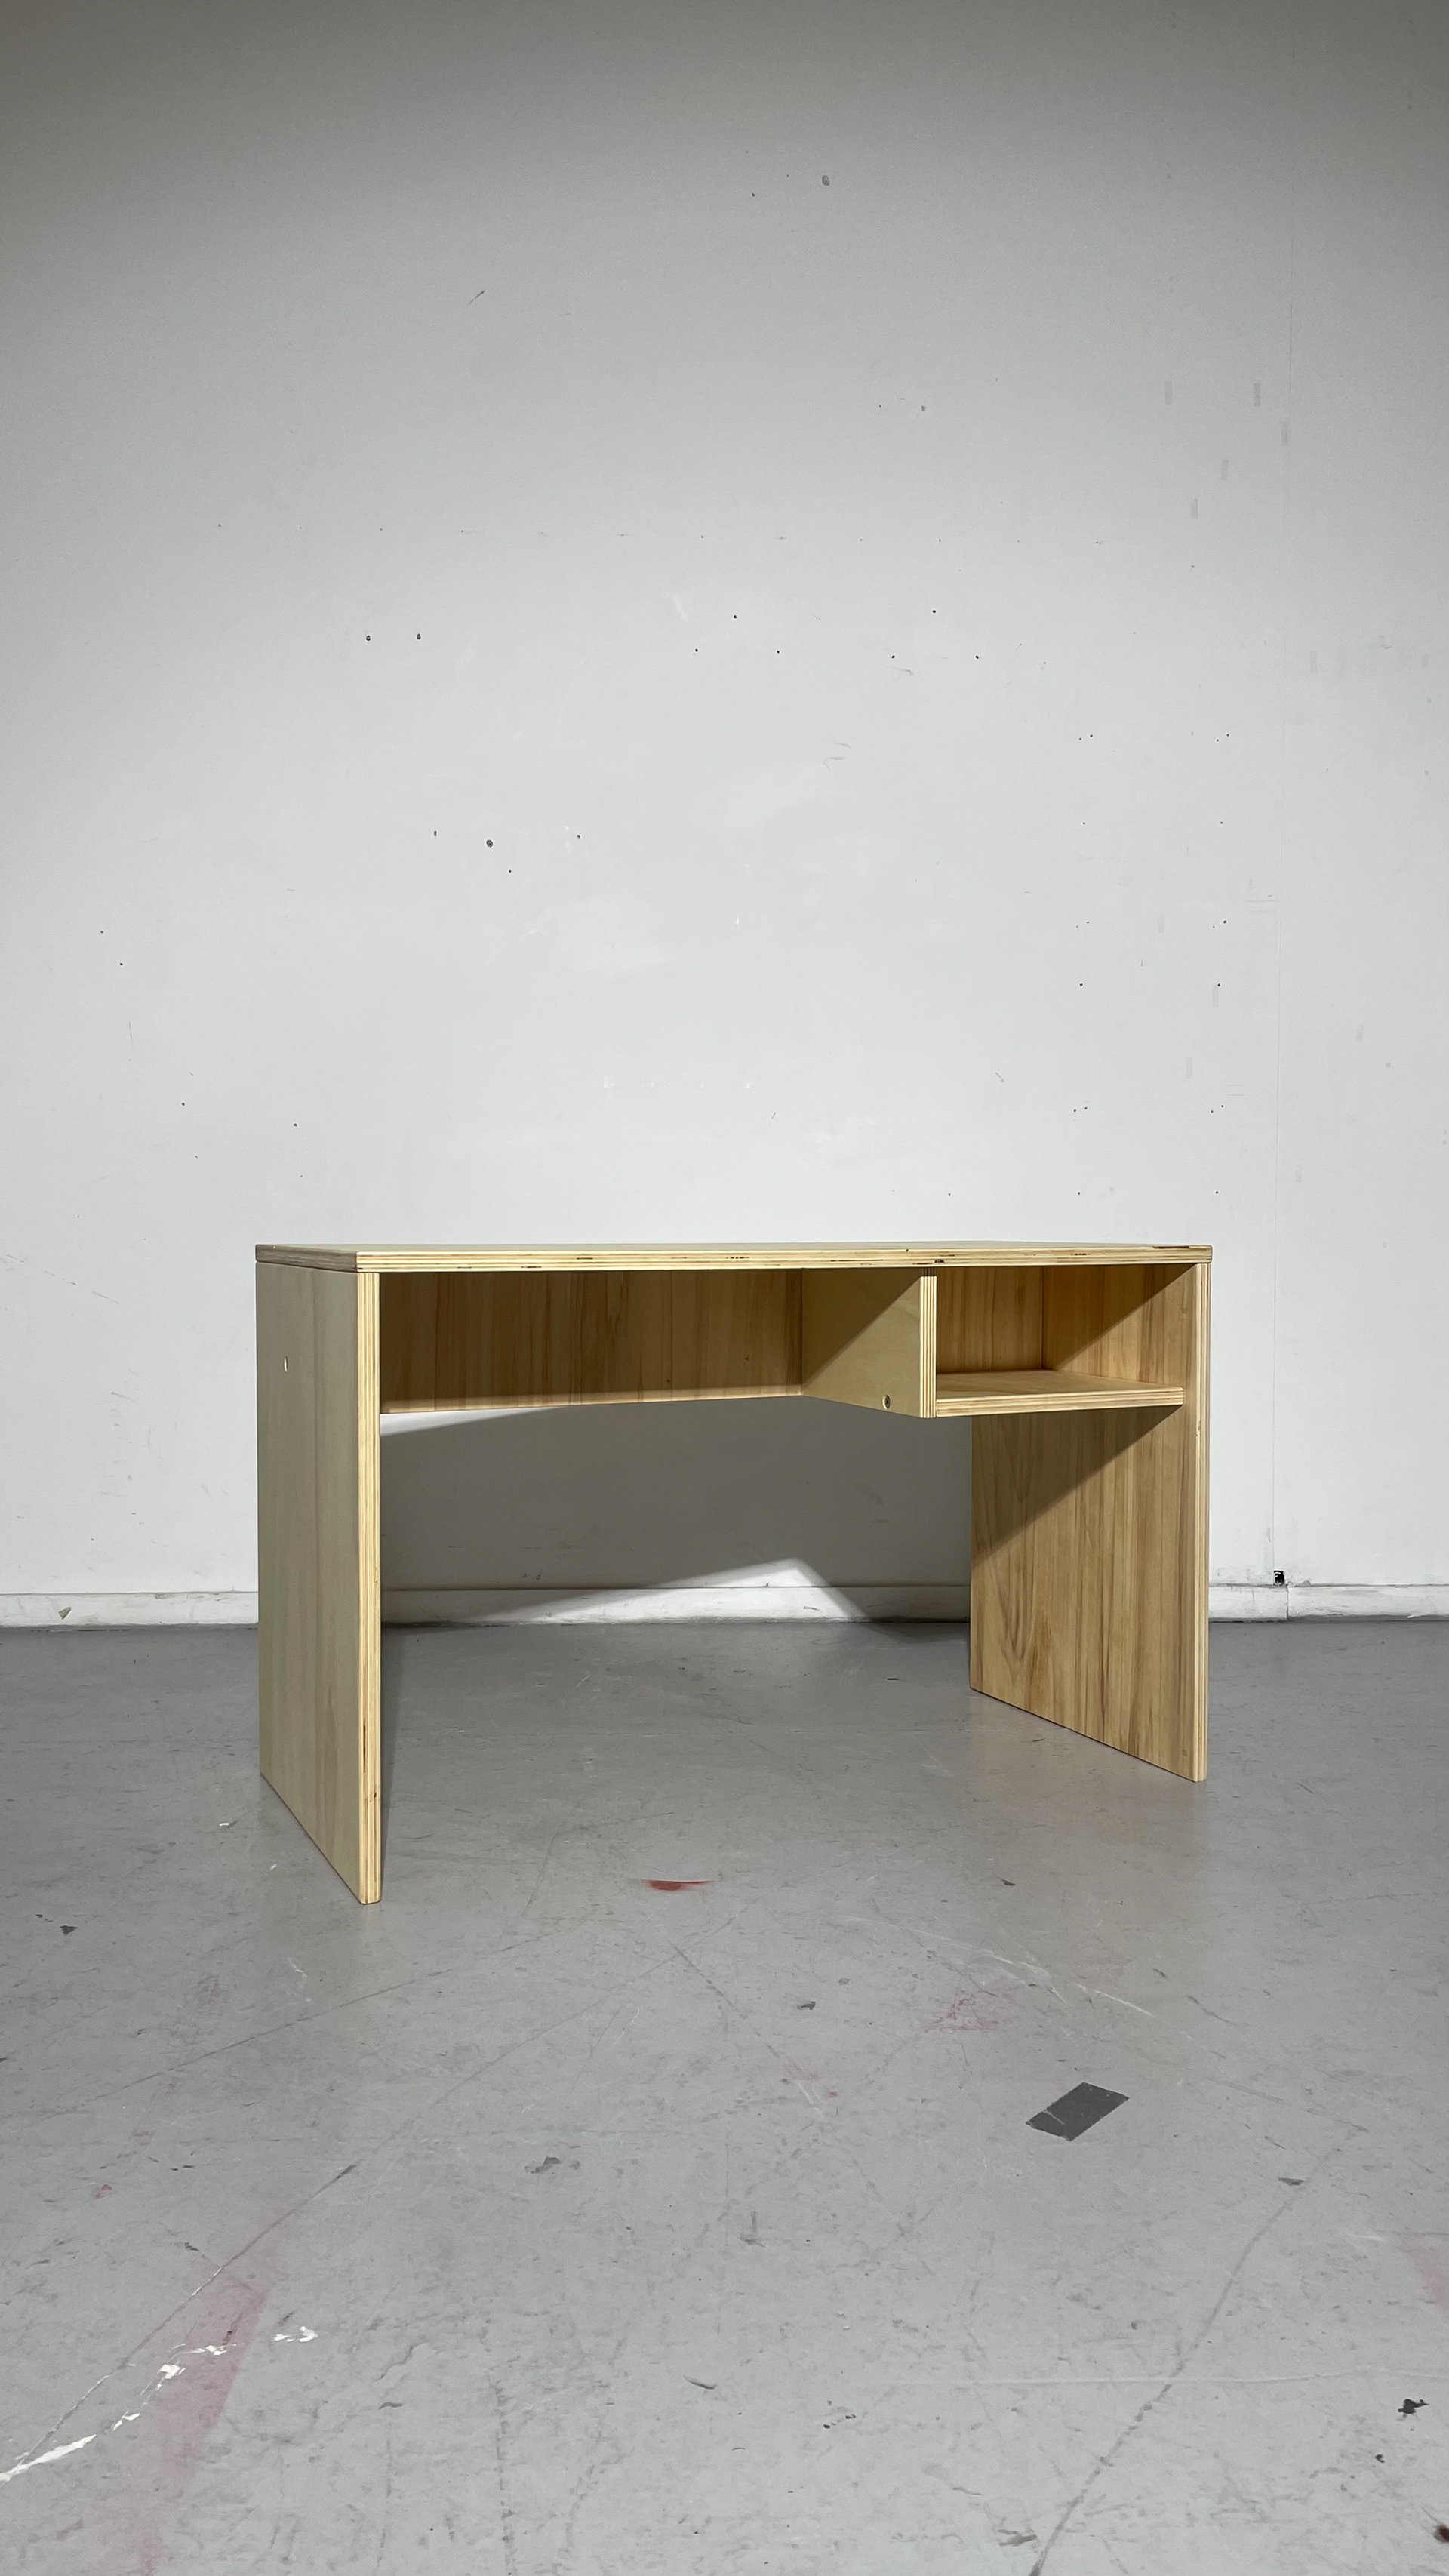
Finished Desk - Finish Choice - Accuracy - Loss of original Aesthetic
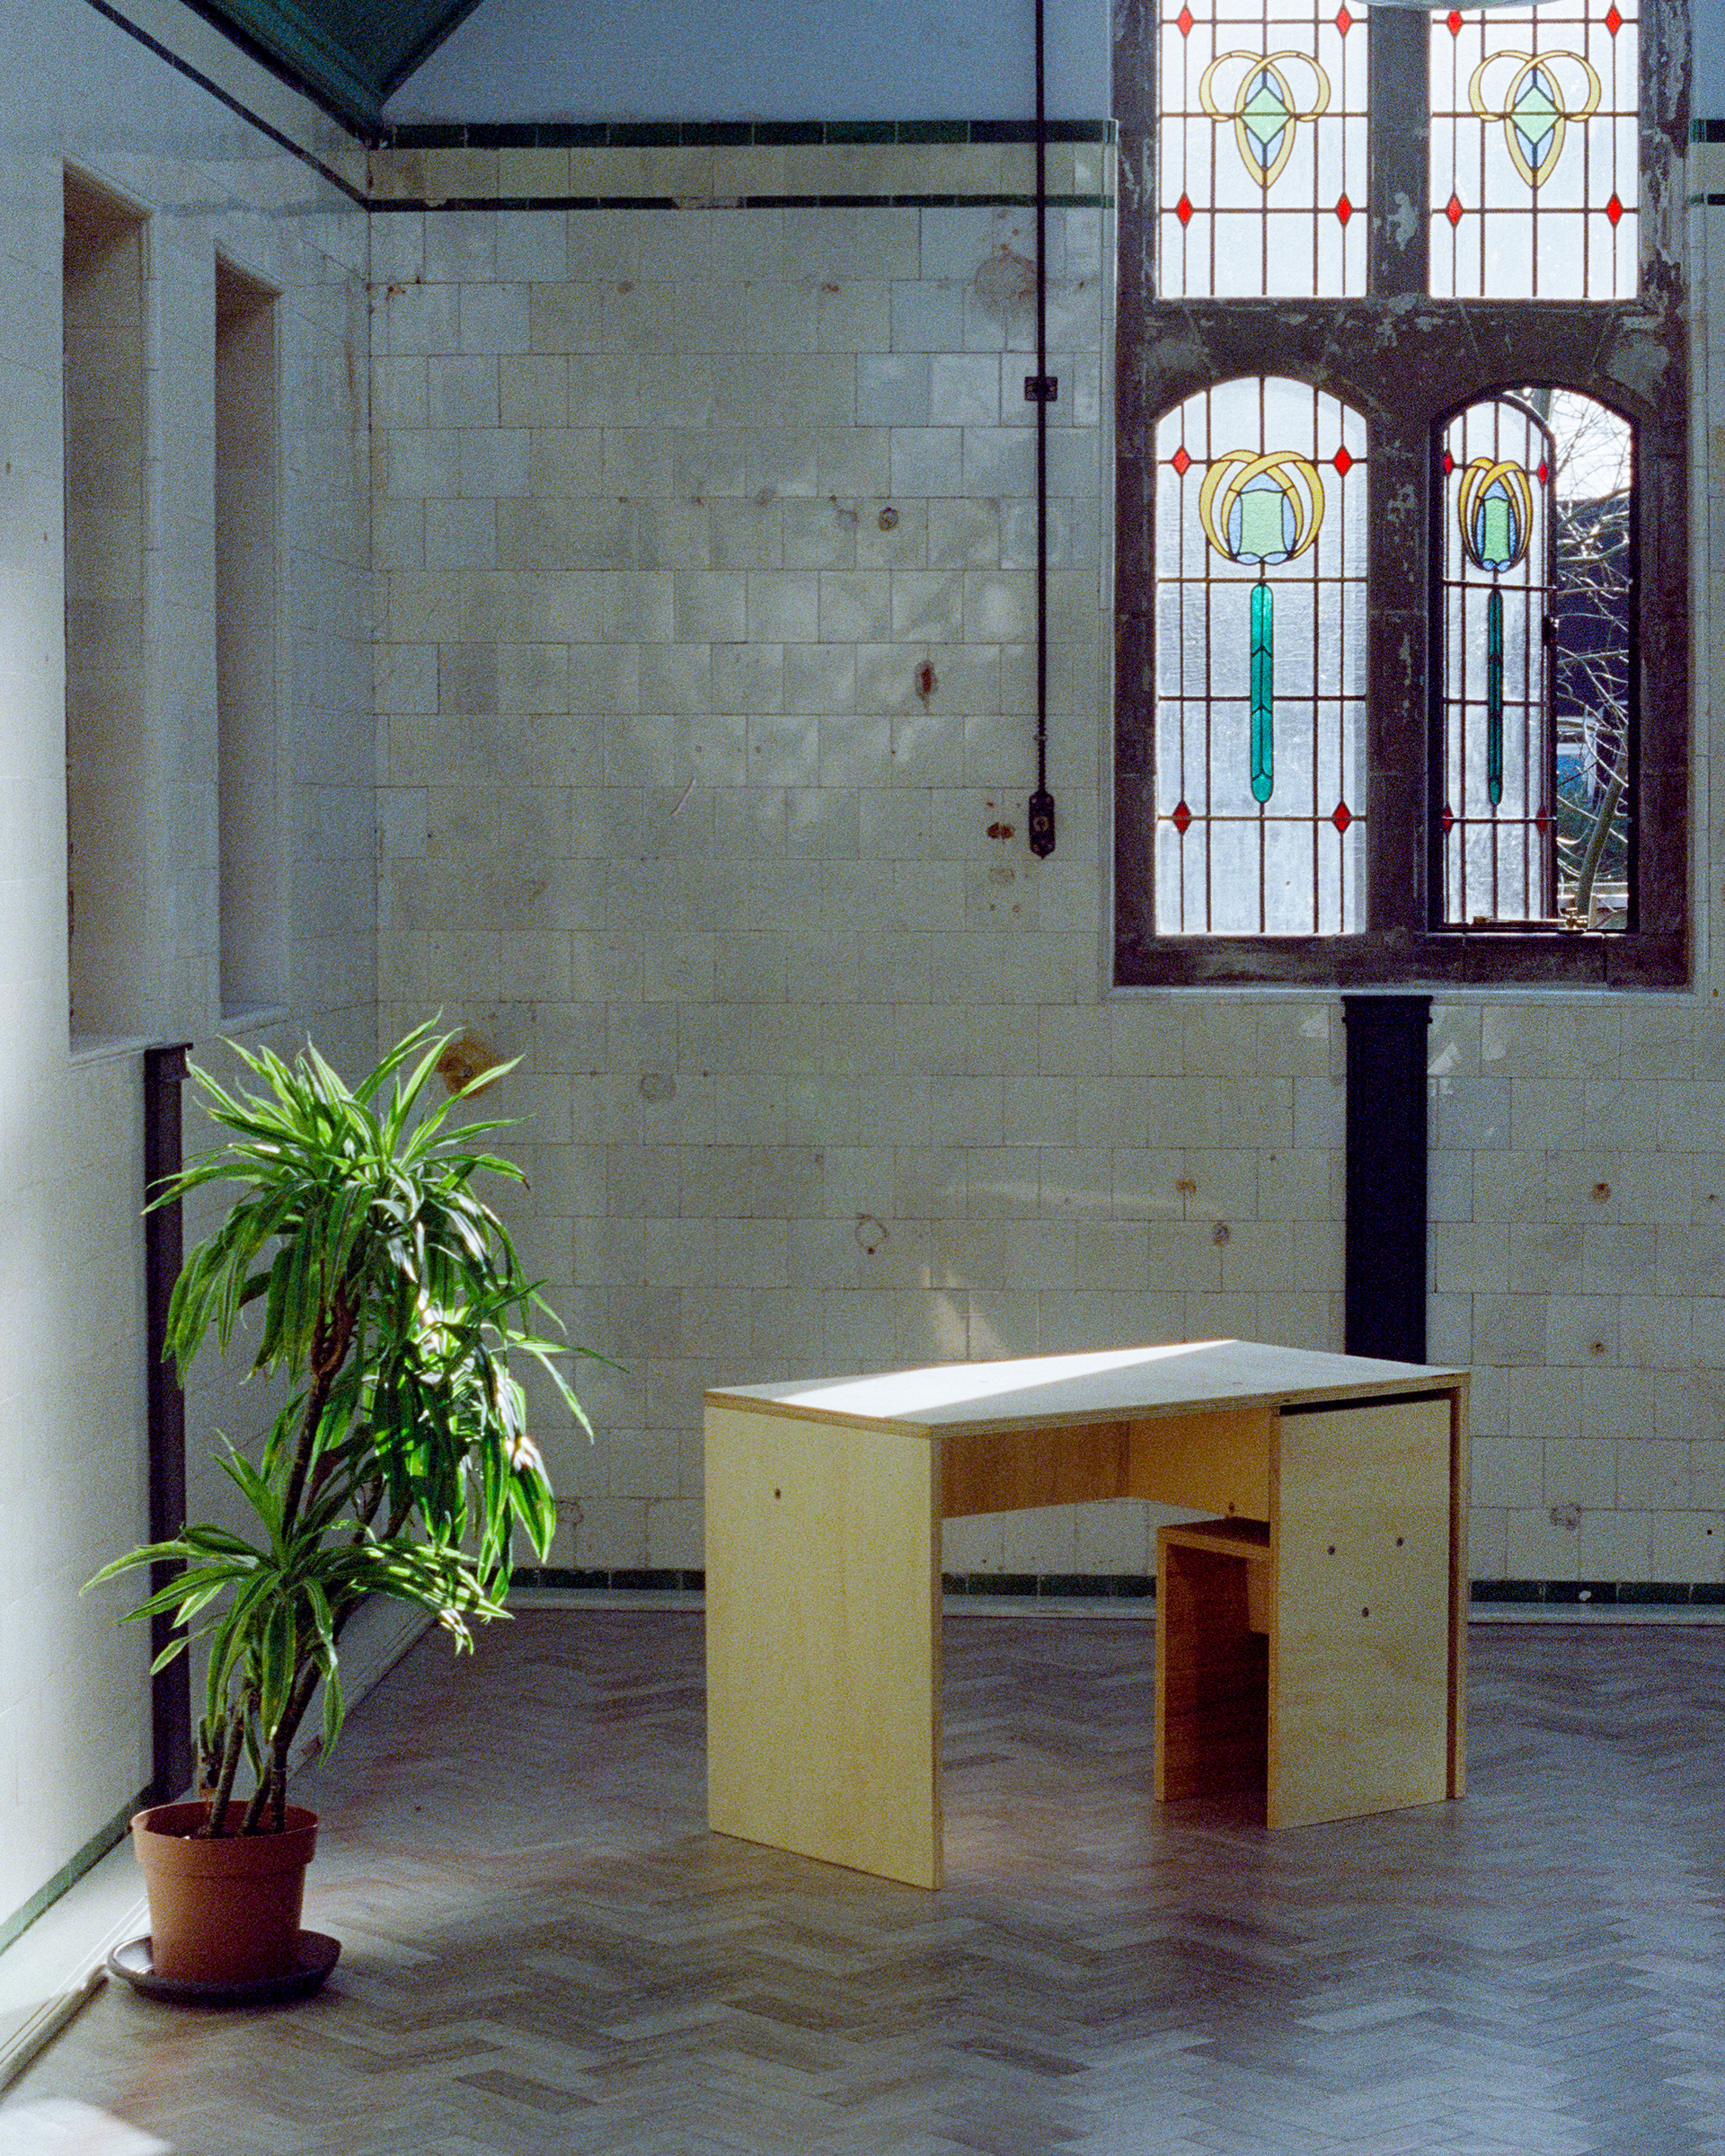
So here's the final object, sanded, finish applied and ready to use. I ended up choosing danish oil for the finish opposed to my preferred Osmo oil but after testing on various samples I found that even when sanded to 240-360 grit the Poplar plywood did not respond well to the Osmo, it left no real finish on the surface and appeared to be very pourers and almost dry looking once fully cured. Instead the danish oil when applied to a 120 grit surface left a smooth feeling finish with a pleasing texture, with using danish oil theres a slight yellow shift but in natural and whiter light this doesn't show all that much thanks to how light the poplar faced ply is.
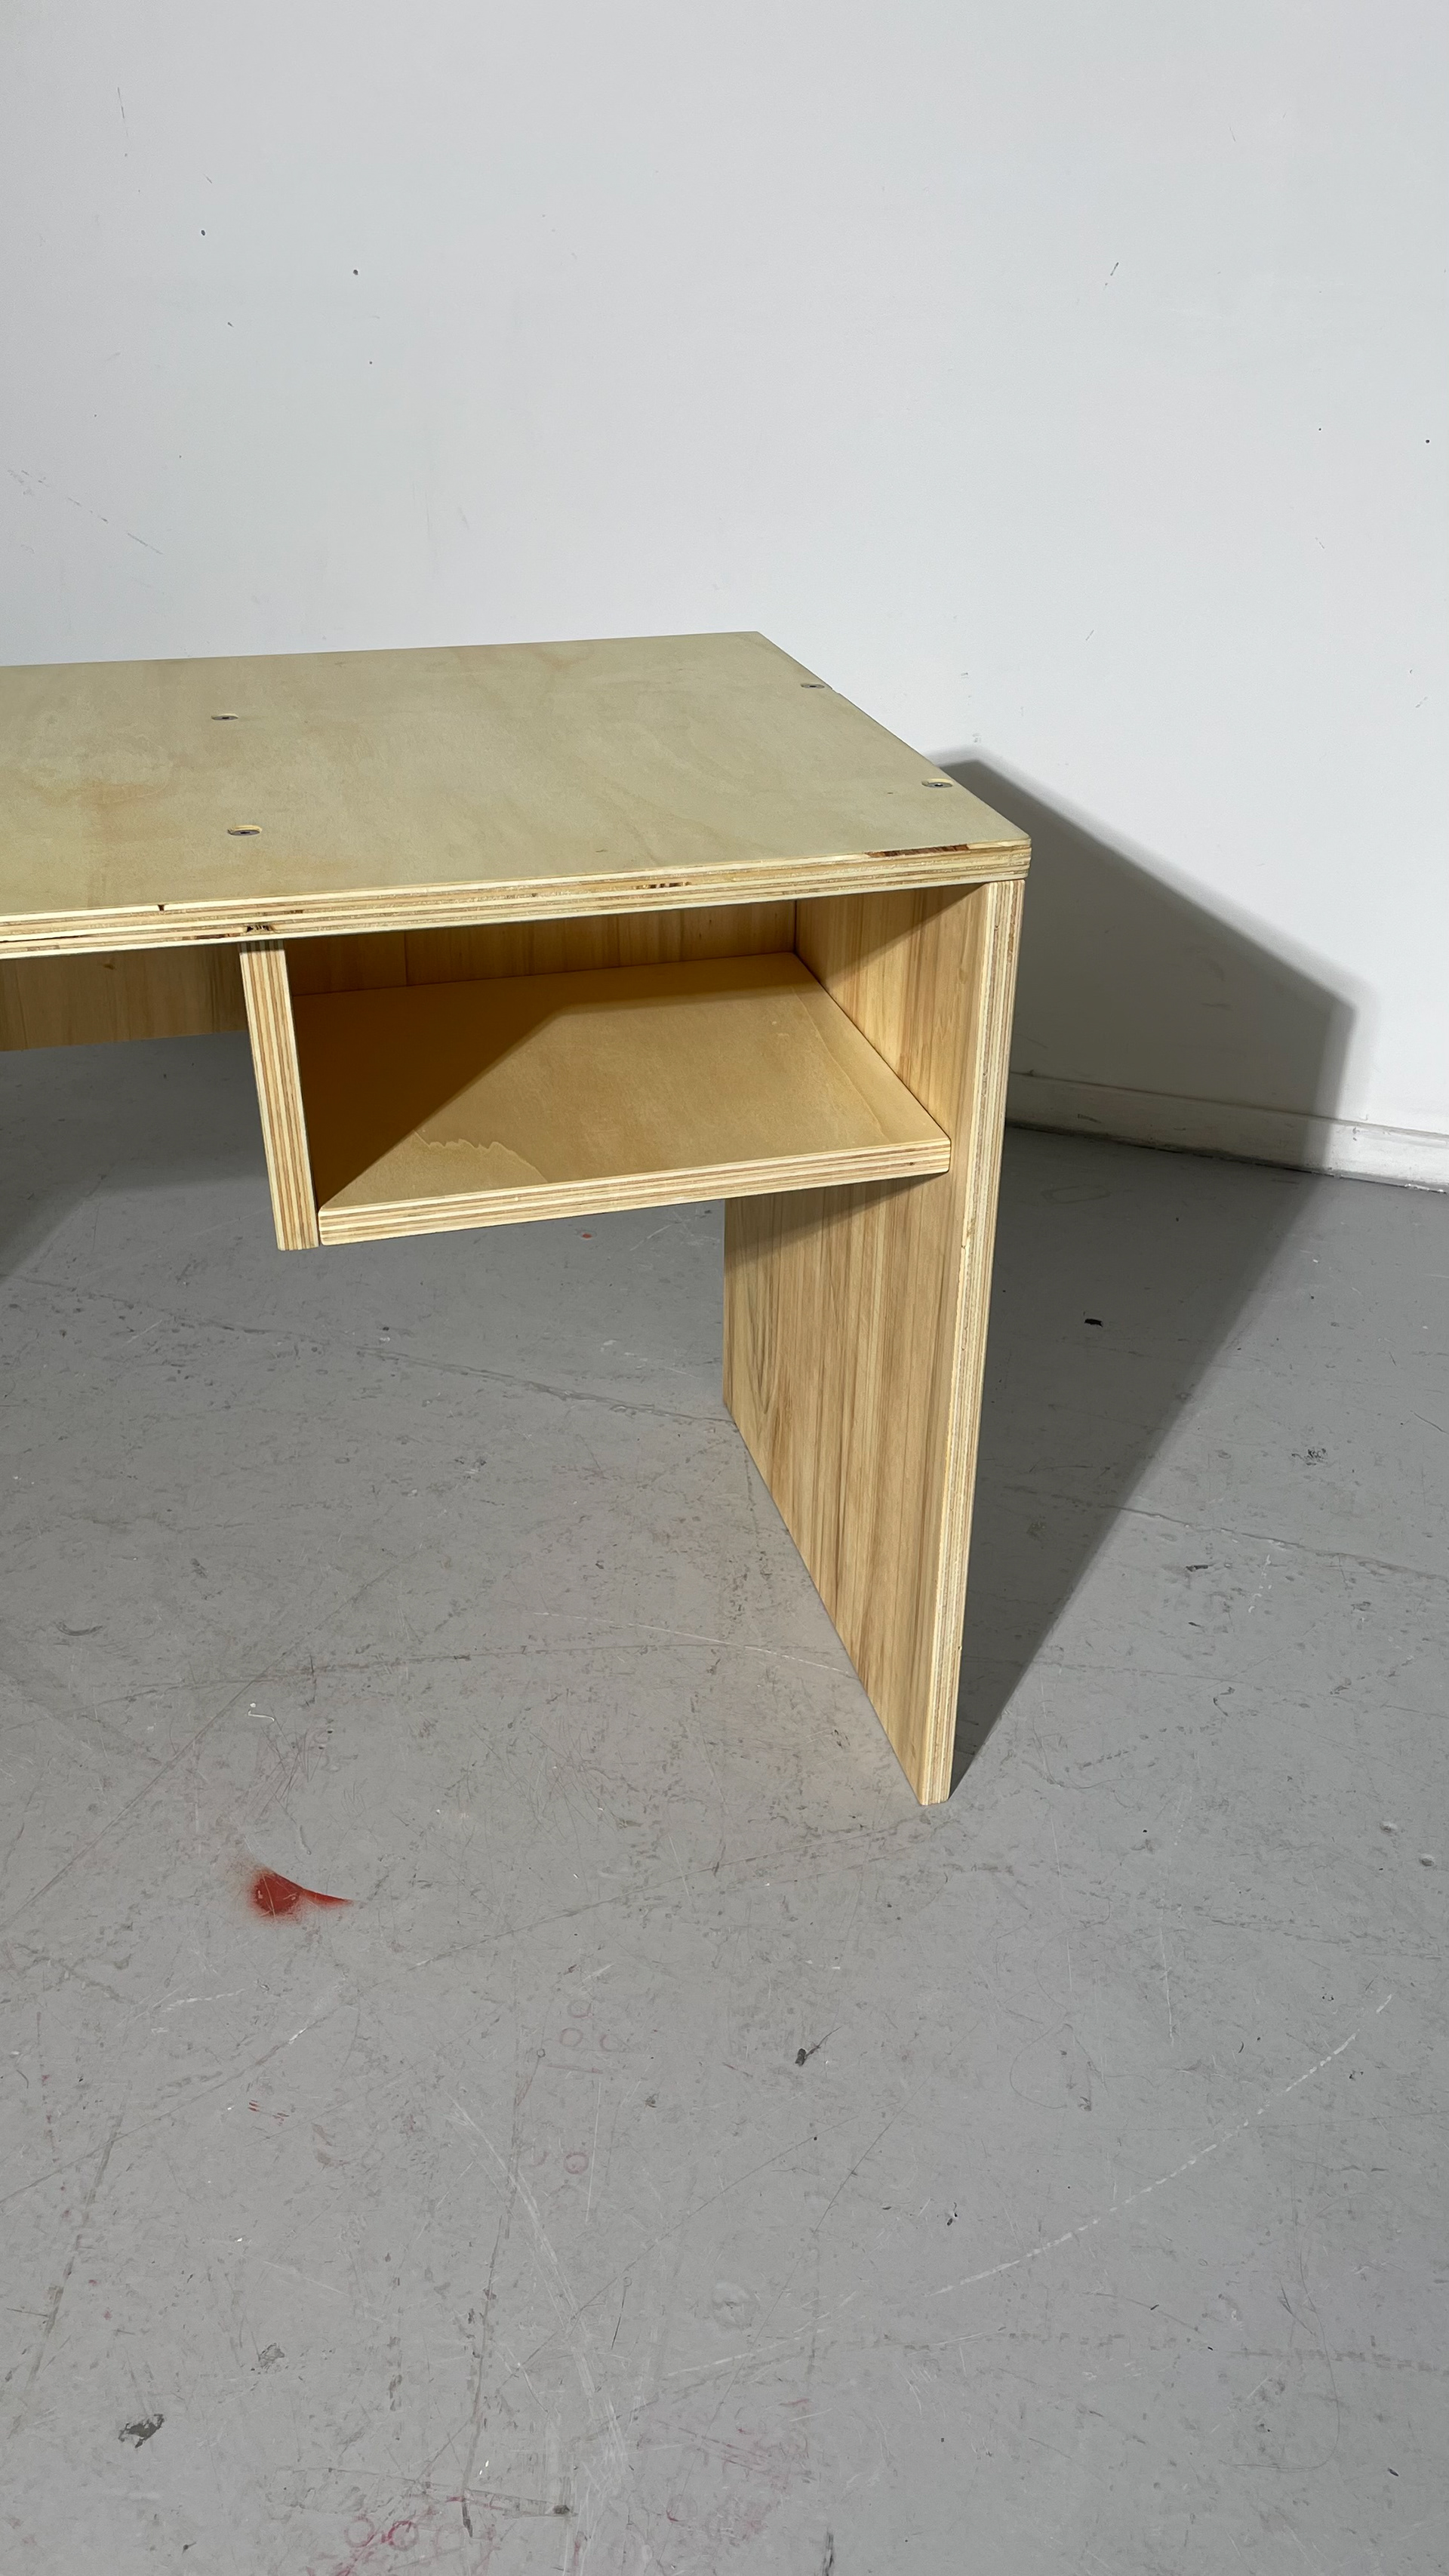
I also managed to finish the desk in time for my tutorial with Geoff the following day which meant getting good solid feedback before finishing this part of my project with a matching stool/chair. - Geoff's feedback as usual was constructive and helped me to confront some of the things I was perhaps willing to ignore given my bias to something I've created. Overall the feedback was positive in that I've successfully pushed forward with my making but there is lots I still have to archive. First was the overall finish of the table, specifically the depth to which the bolts had been countersunk, although not a obstacle to use they sit 1.5-2mm below the ply surface which just bring the object down in its exception in an observes mind. Second and in a similar vein as the last point was how the edges of all the panel edges had been rounded over to such an extent that in the cubby for example small channels where joint meet had been formed. This inherently isn't a bad thing as it improves the users feeling while handling the loose panels and reduced the chance of chipping edges which occur quite easily on manufactured boards, but aesthetically again it just brings the object down in the mind of an observer. Lastly Geoff questioned if the table had perhaps lost some of the intention behind it, that through refinement and design decision I'd lost the obvious connection to the industrial fitting and materials which I'm trying to get the users to experience, to this point I'm unsure if I have gone to far or if the desk is simply to simple?
Objectively theres a lot less stainless steel visible in this design and it's something I hope to confront through interviews with users and putting together videos which communicate to a much wider audience what the desk is all about. I'll also aim to improve the technical aspects of the design which Geoff raised on the partnering chair.

John Ruskin Research - Touchstones - Division of Labour - Technological Revolution
In an effort to understand my want to analyse and elevate the industrial materials used today, I've found myself considering who else in history wanted to redefine and elevate materials in their own period. The obvious answer to me is the Arts and Crafts movement which has been part of my design education since secondary school, although I'll be the first to admit I've never had much interest in researching the key players much until now. I understand that the movement had many contributors but for this initial piece of research I found an excellent documentary by Peter Fuller on both William Morris and John Ruskin.
The movement and it's characteristics [from the perspective of John Ruskin]: First of all, and a key pillar, is the faith and belief that the hand of God was in all things natural and the appreciation of the divine natural forces is paramount. Second was the 'touchstones for the natural world.' Ruskin found refuge at Brantwood (in the lake district), Venice and in the Alps seeking out these 'touchstones' and importantly developing a 'key connection between the quality of a society and the quality of the art which it produces.' Thus feeding into the last chapter covered in the section dedicated to Ruskin, which is his views on labour. I find this extract from The Stones of Venice, The Nature of Gothic best encapsulates the insight I'm excited by:
'The great civilised invention of the division of labour, only we give it a false name. It's not truly the labour that is divided but the men, divided into mere segments of man, broken into small fragments and crumbs of life. So that all the little pieces of intelligence that is left in a man is not enough to make a pin of a nail but exhausts itself in making the point of a pin and the head of a nail.'
To put my feelings on this research simply, I feel my practice and ones similar to it are born from a similar overall feeling that Ruskin had towards the industrial revolution but mine is a reaction the influence of the technological revolution. Within these three points I've summarised above I can draw modern day equivalents, instead of seeing the hand of God in the material world around me I recognise the scientific and manufacturing endeavours associated with them. Instead of Brantwood and the Apls I find touchstones within the inner city from construction zones to building infrastructure. And lastly while recognising the arguments Ruskin made remain relevant I choose to develop a practice which both engages and revolts against the disconnection from materials being accelerated by the technological revolution.
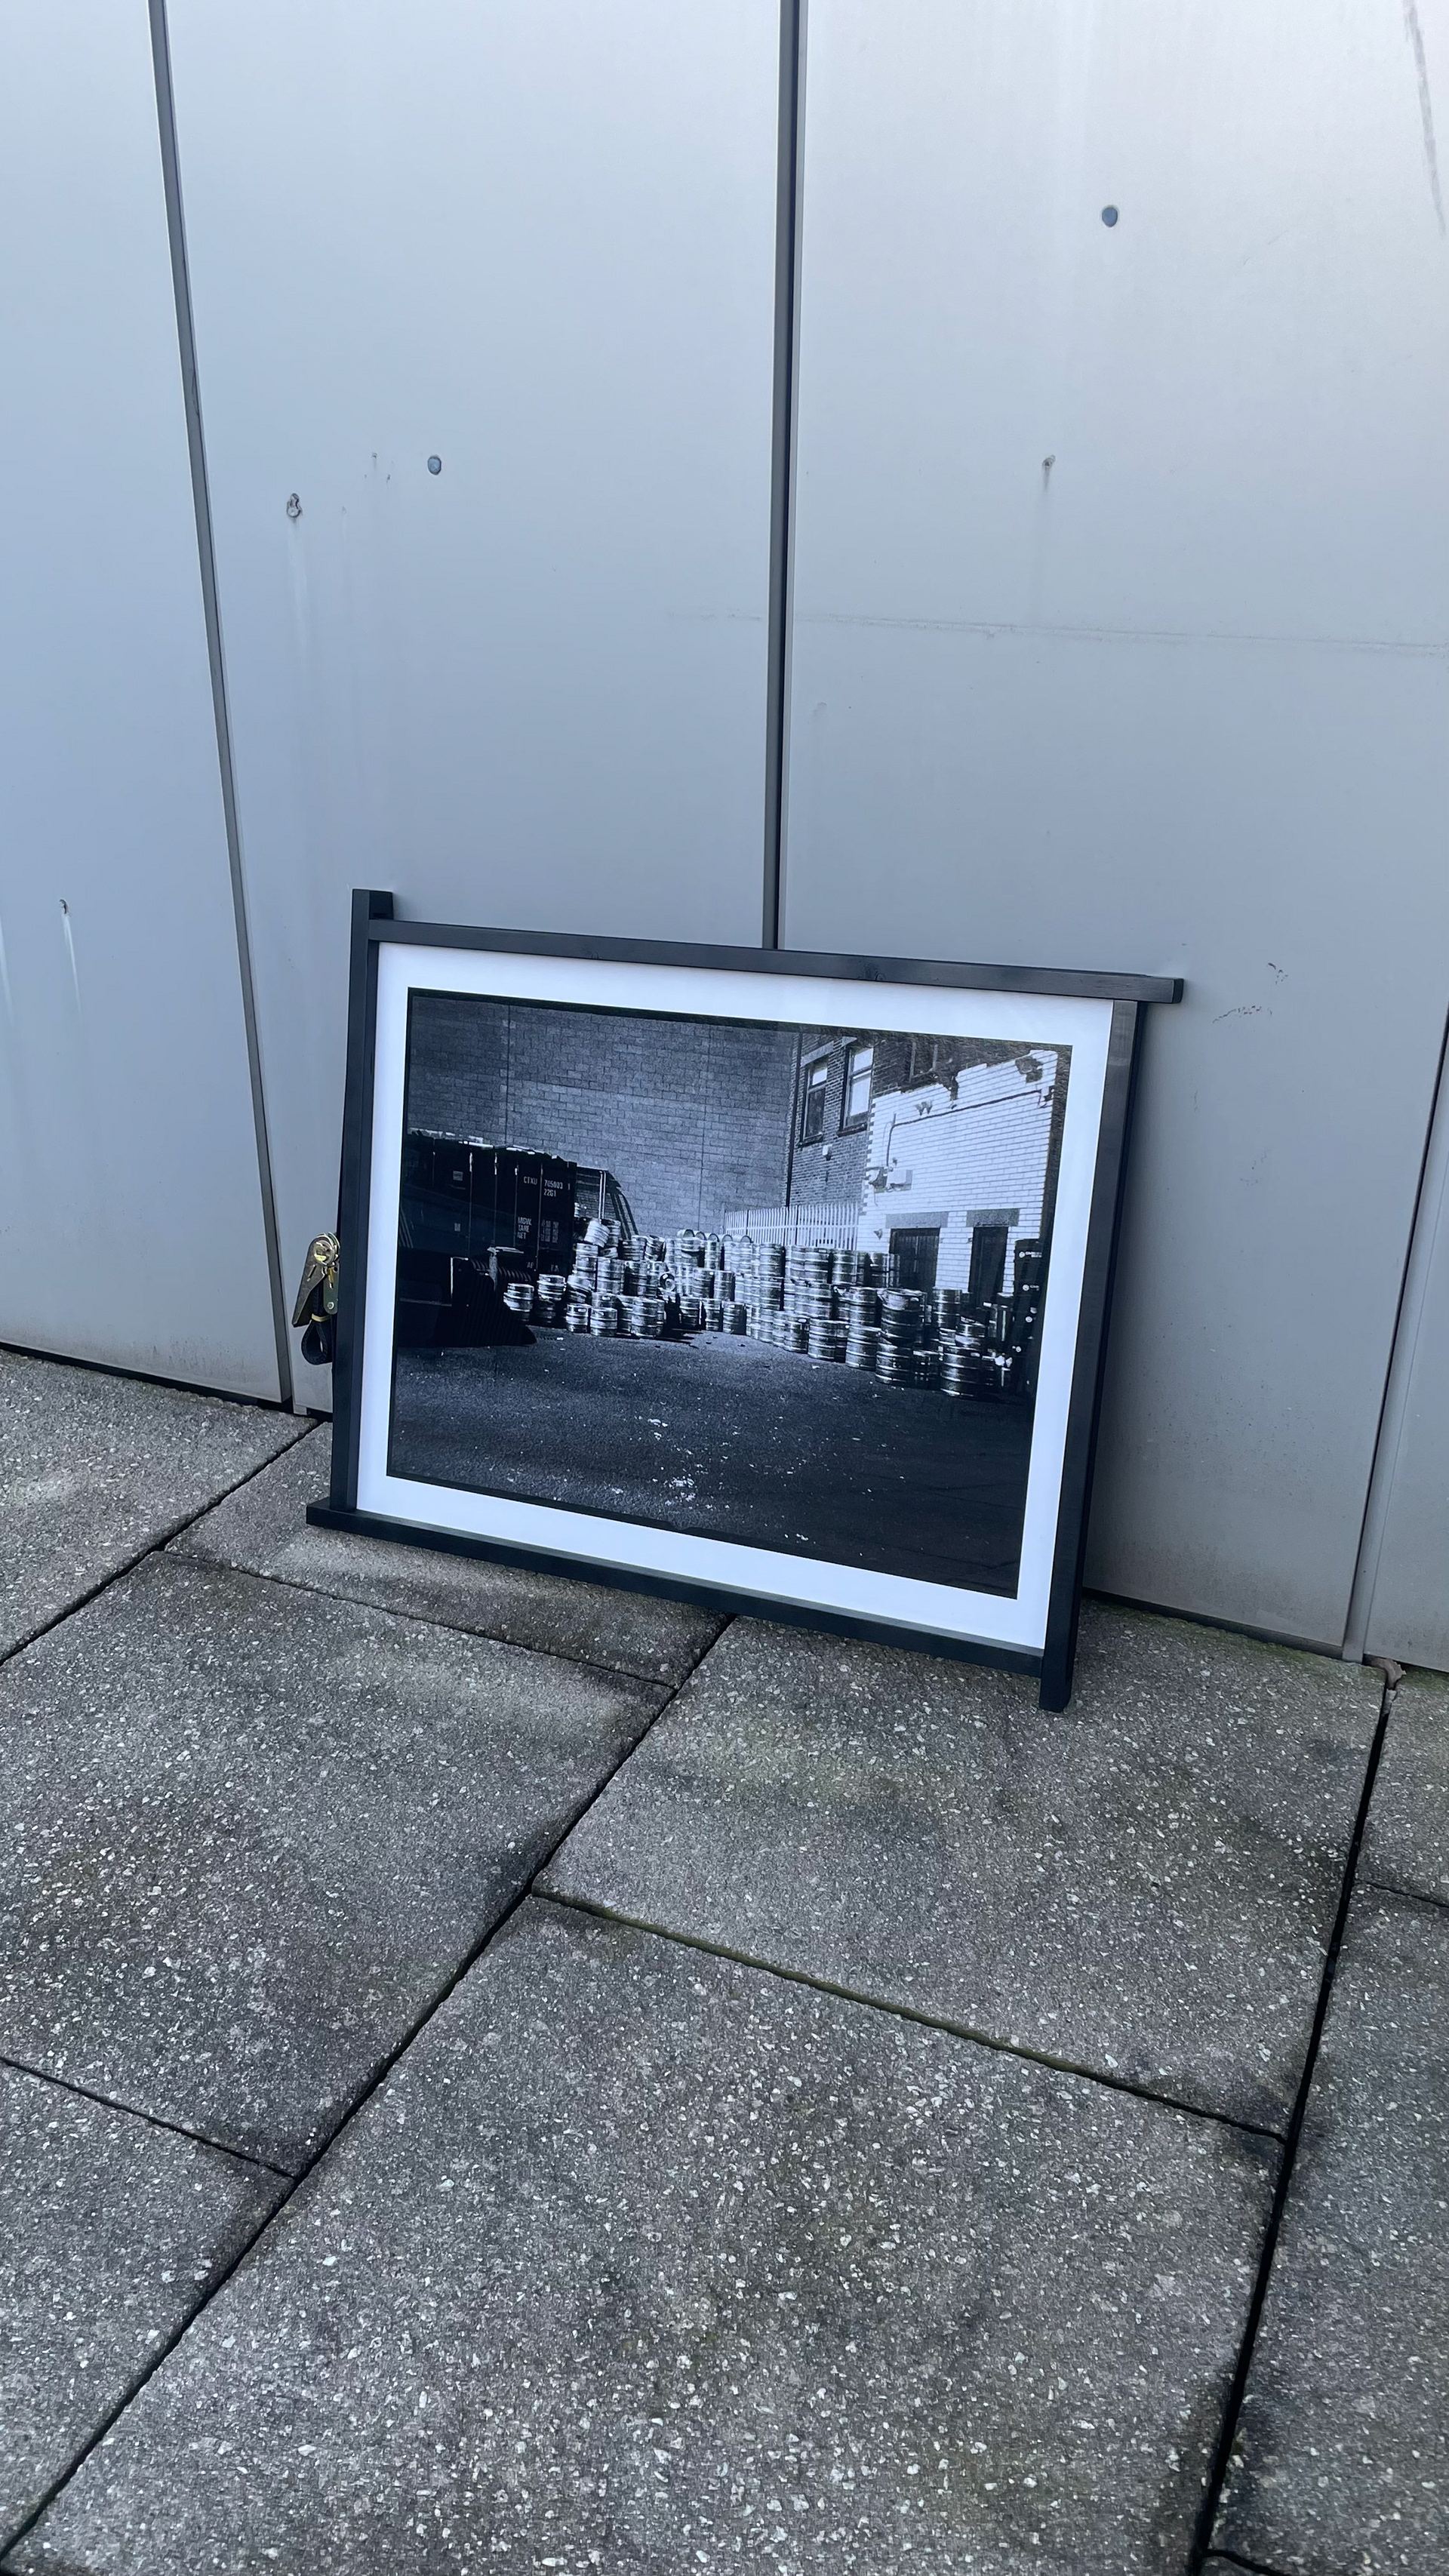
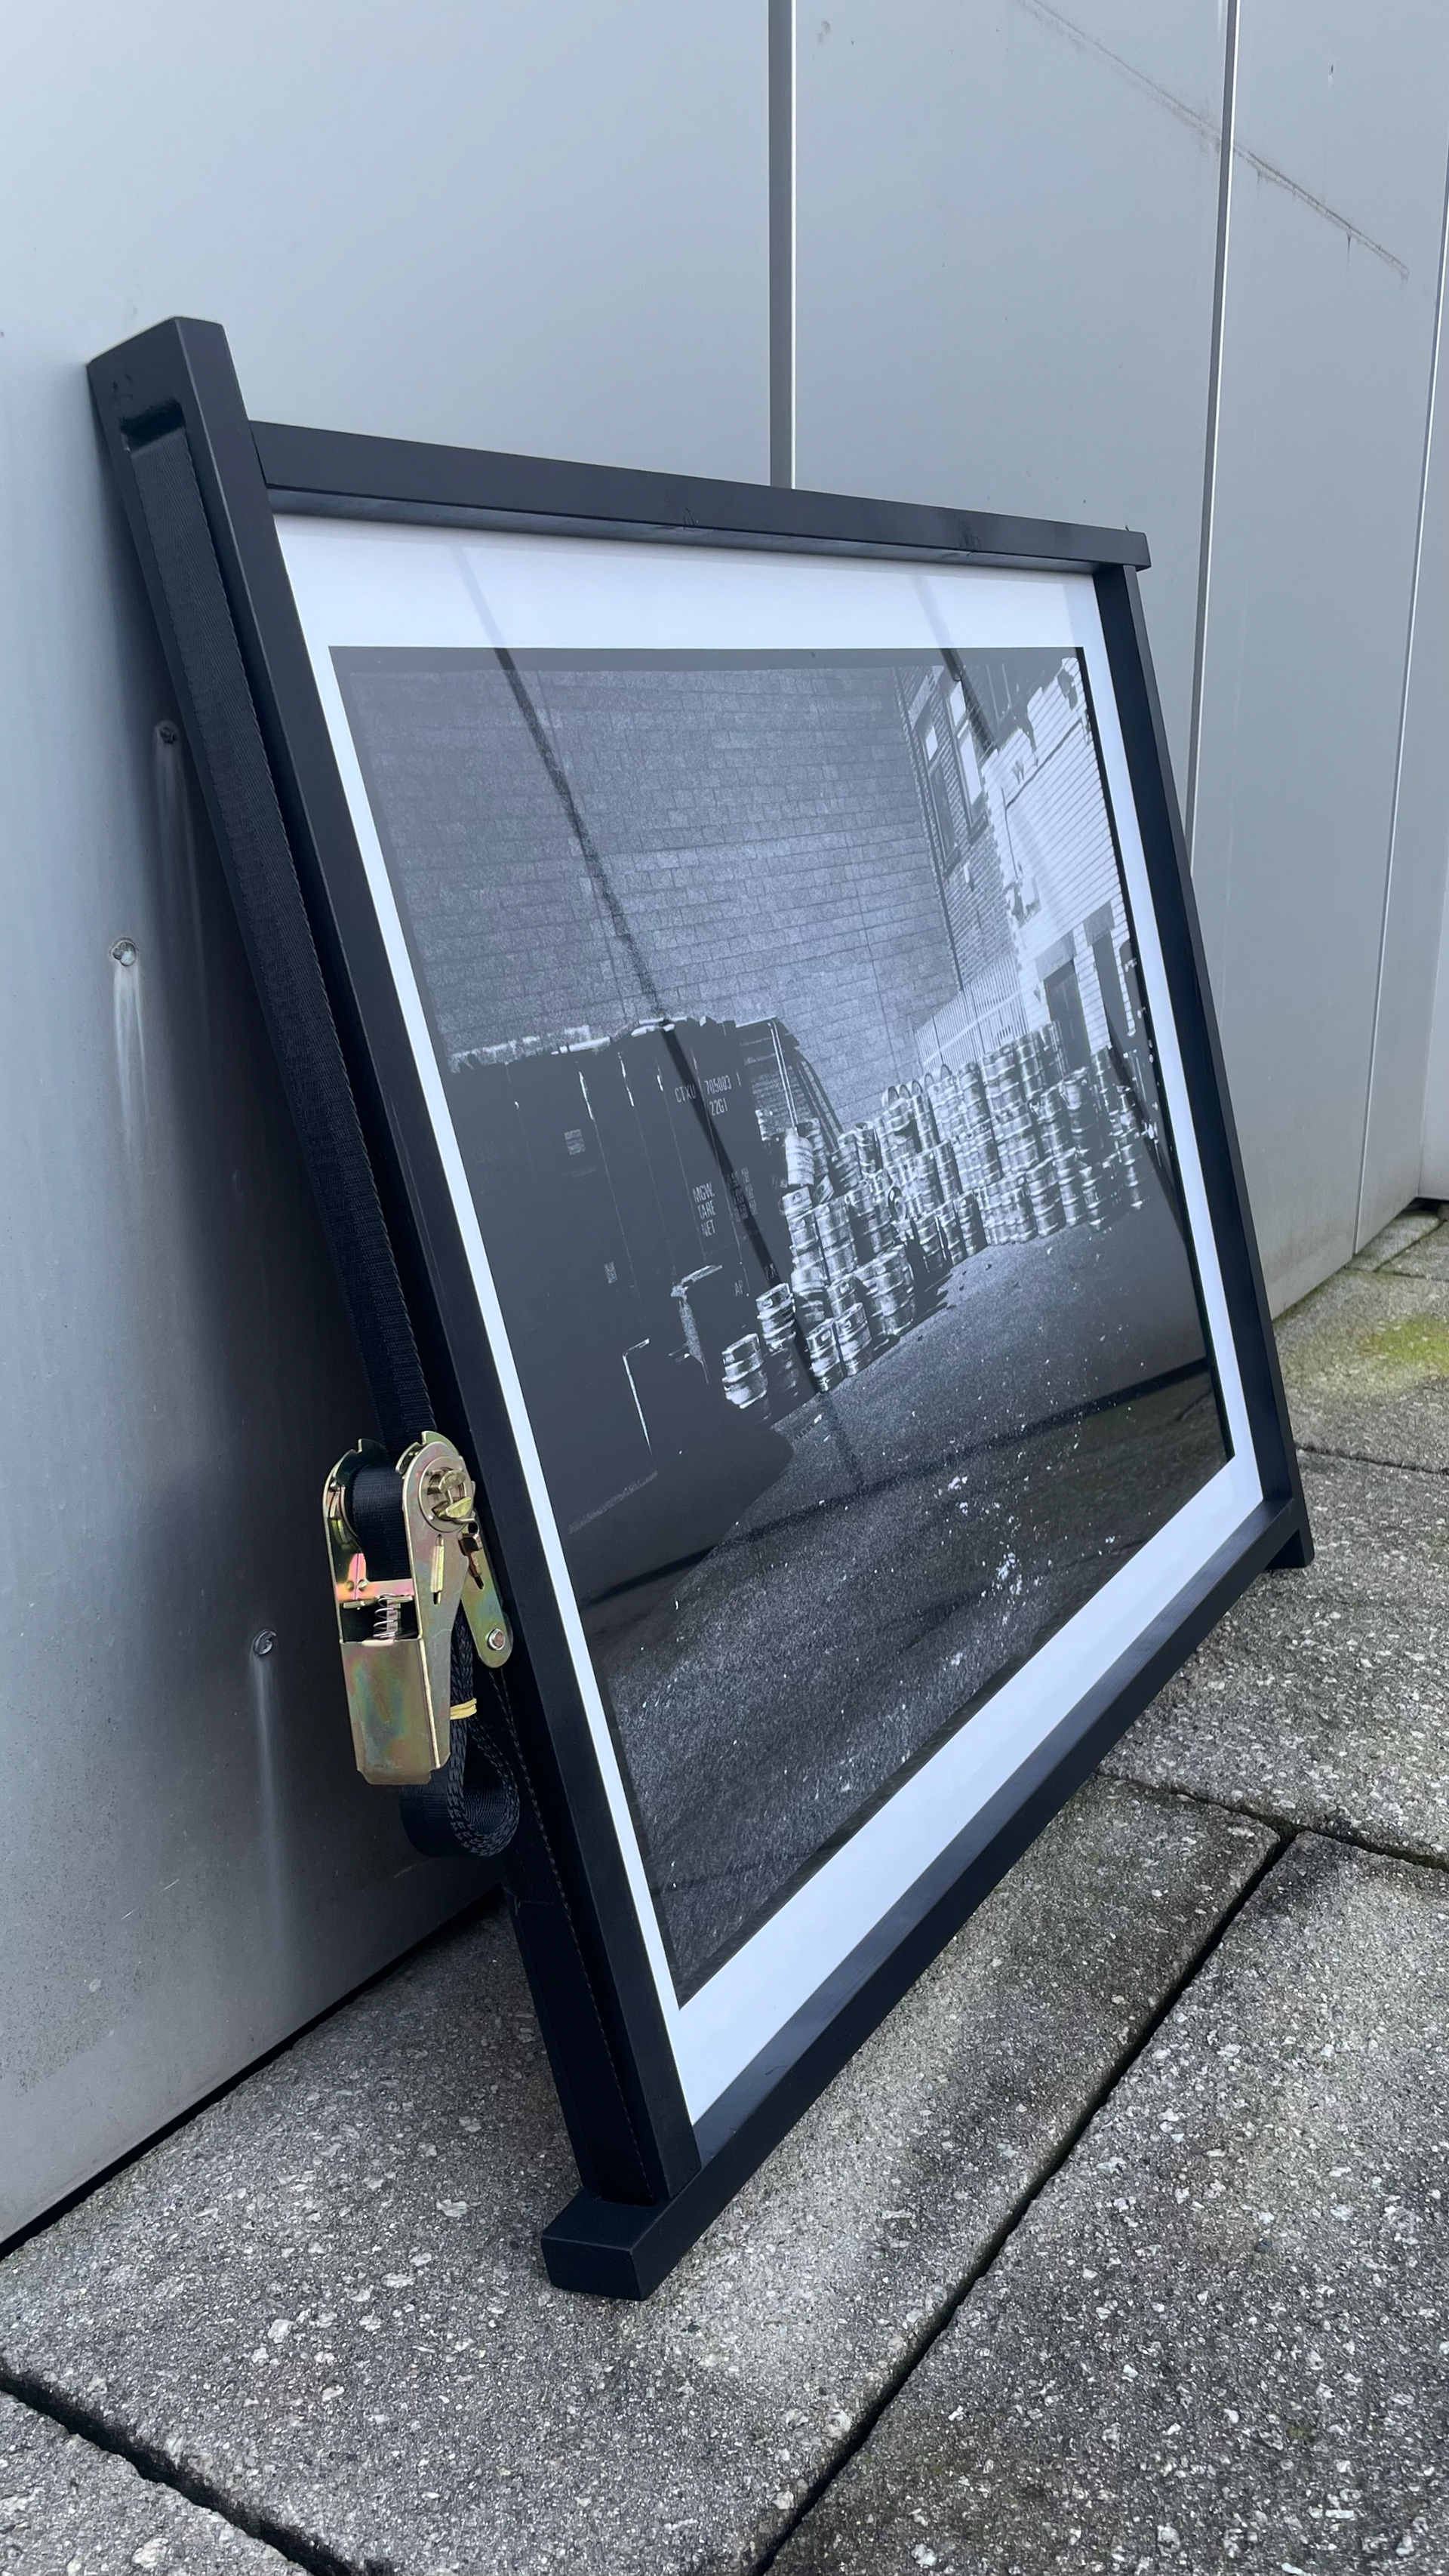
Successful Application of Ratchet Strap Joint
A quick side-note after that rather long section of research and reflection. The ratchet strap mechanism I explored in Unit X was largely abandoned despite it being liked by a fair few people through instagram, this was due to my feeling that the mechanism had been explored quite thoroughly within contemporary design and I feared hitting a ceiling if I pursued it further. But being able to live with the table has firstly generated a few commissions for similar sized side tables as people who first liked the table have seen it in person and also meant I've been able to reconsider its context and apply it to a photo print series I've been working on for the last year or so. More prints are soon to follow and I hope the city landscape and portraits continue to marry up with the frames as nicely as they do in this example.


Improved Accuracy
As part of refinement between making the desk and chair I've tried to test the exact depth to drill the countersink so that the bolt head will sit exactly lush with the ply surface, previously I had drilled to 5mm (the depth of the bolt head) but as the bolt is tightened the soft ply compresses and causes the bolt to sit slightly lower that the surface. The two holes above have been drilled to 3.5mm and 2mm depths and then a bolt tighten into the hole. As shown above the 3.5mm hole sits flush with the surface, but before sanding so I would aim to drill countersinking to a depth of 4mm and apply additional pressure to the pillar drill.
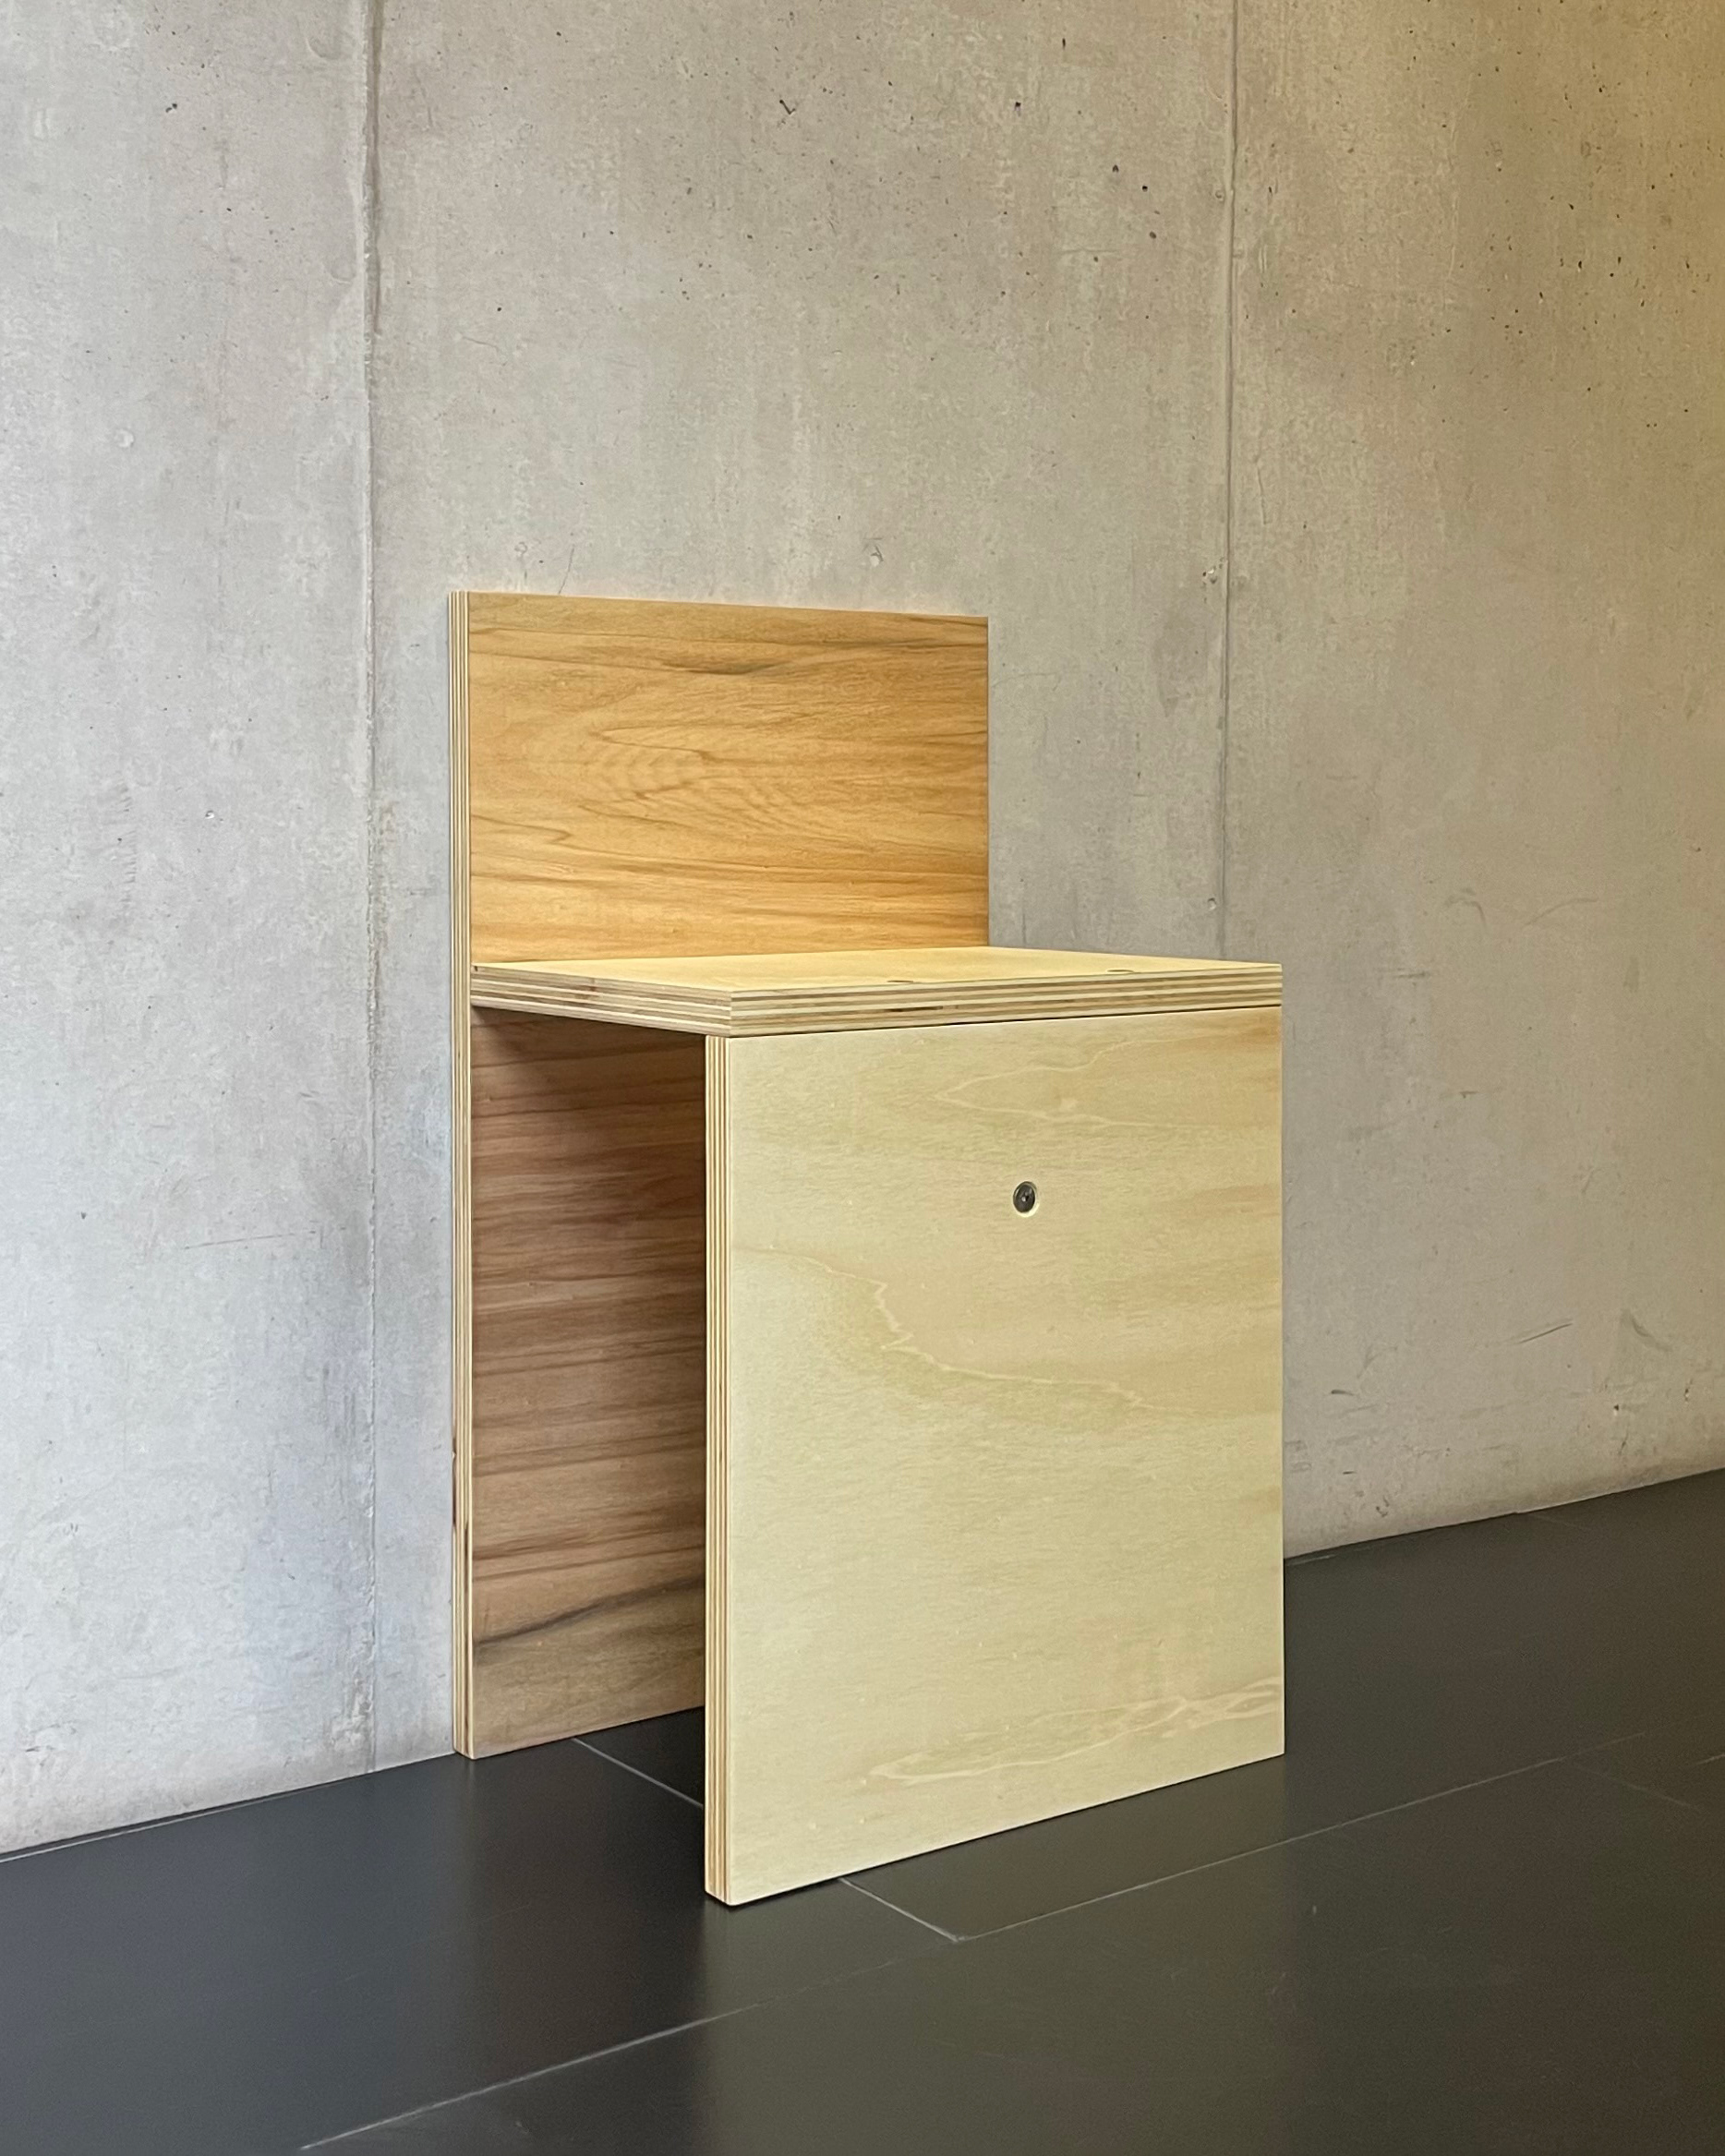
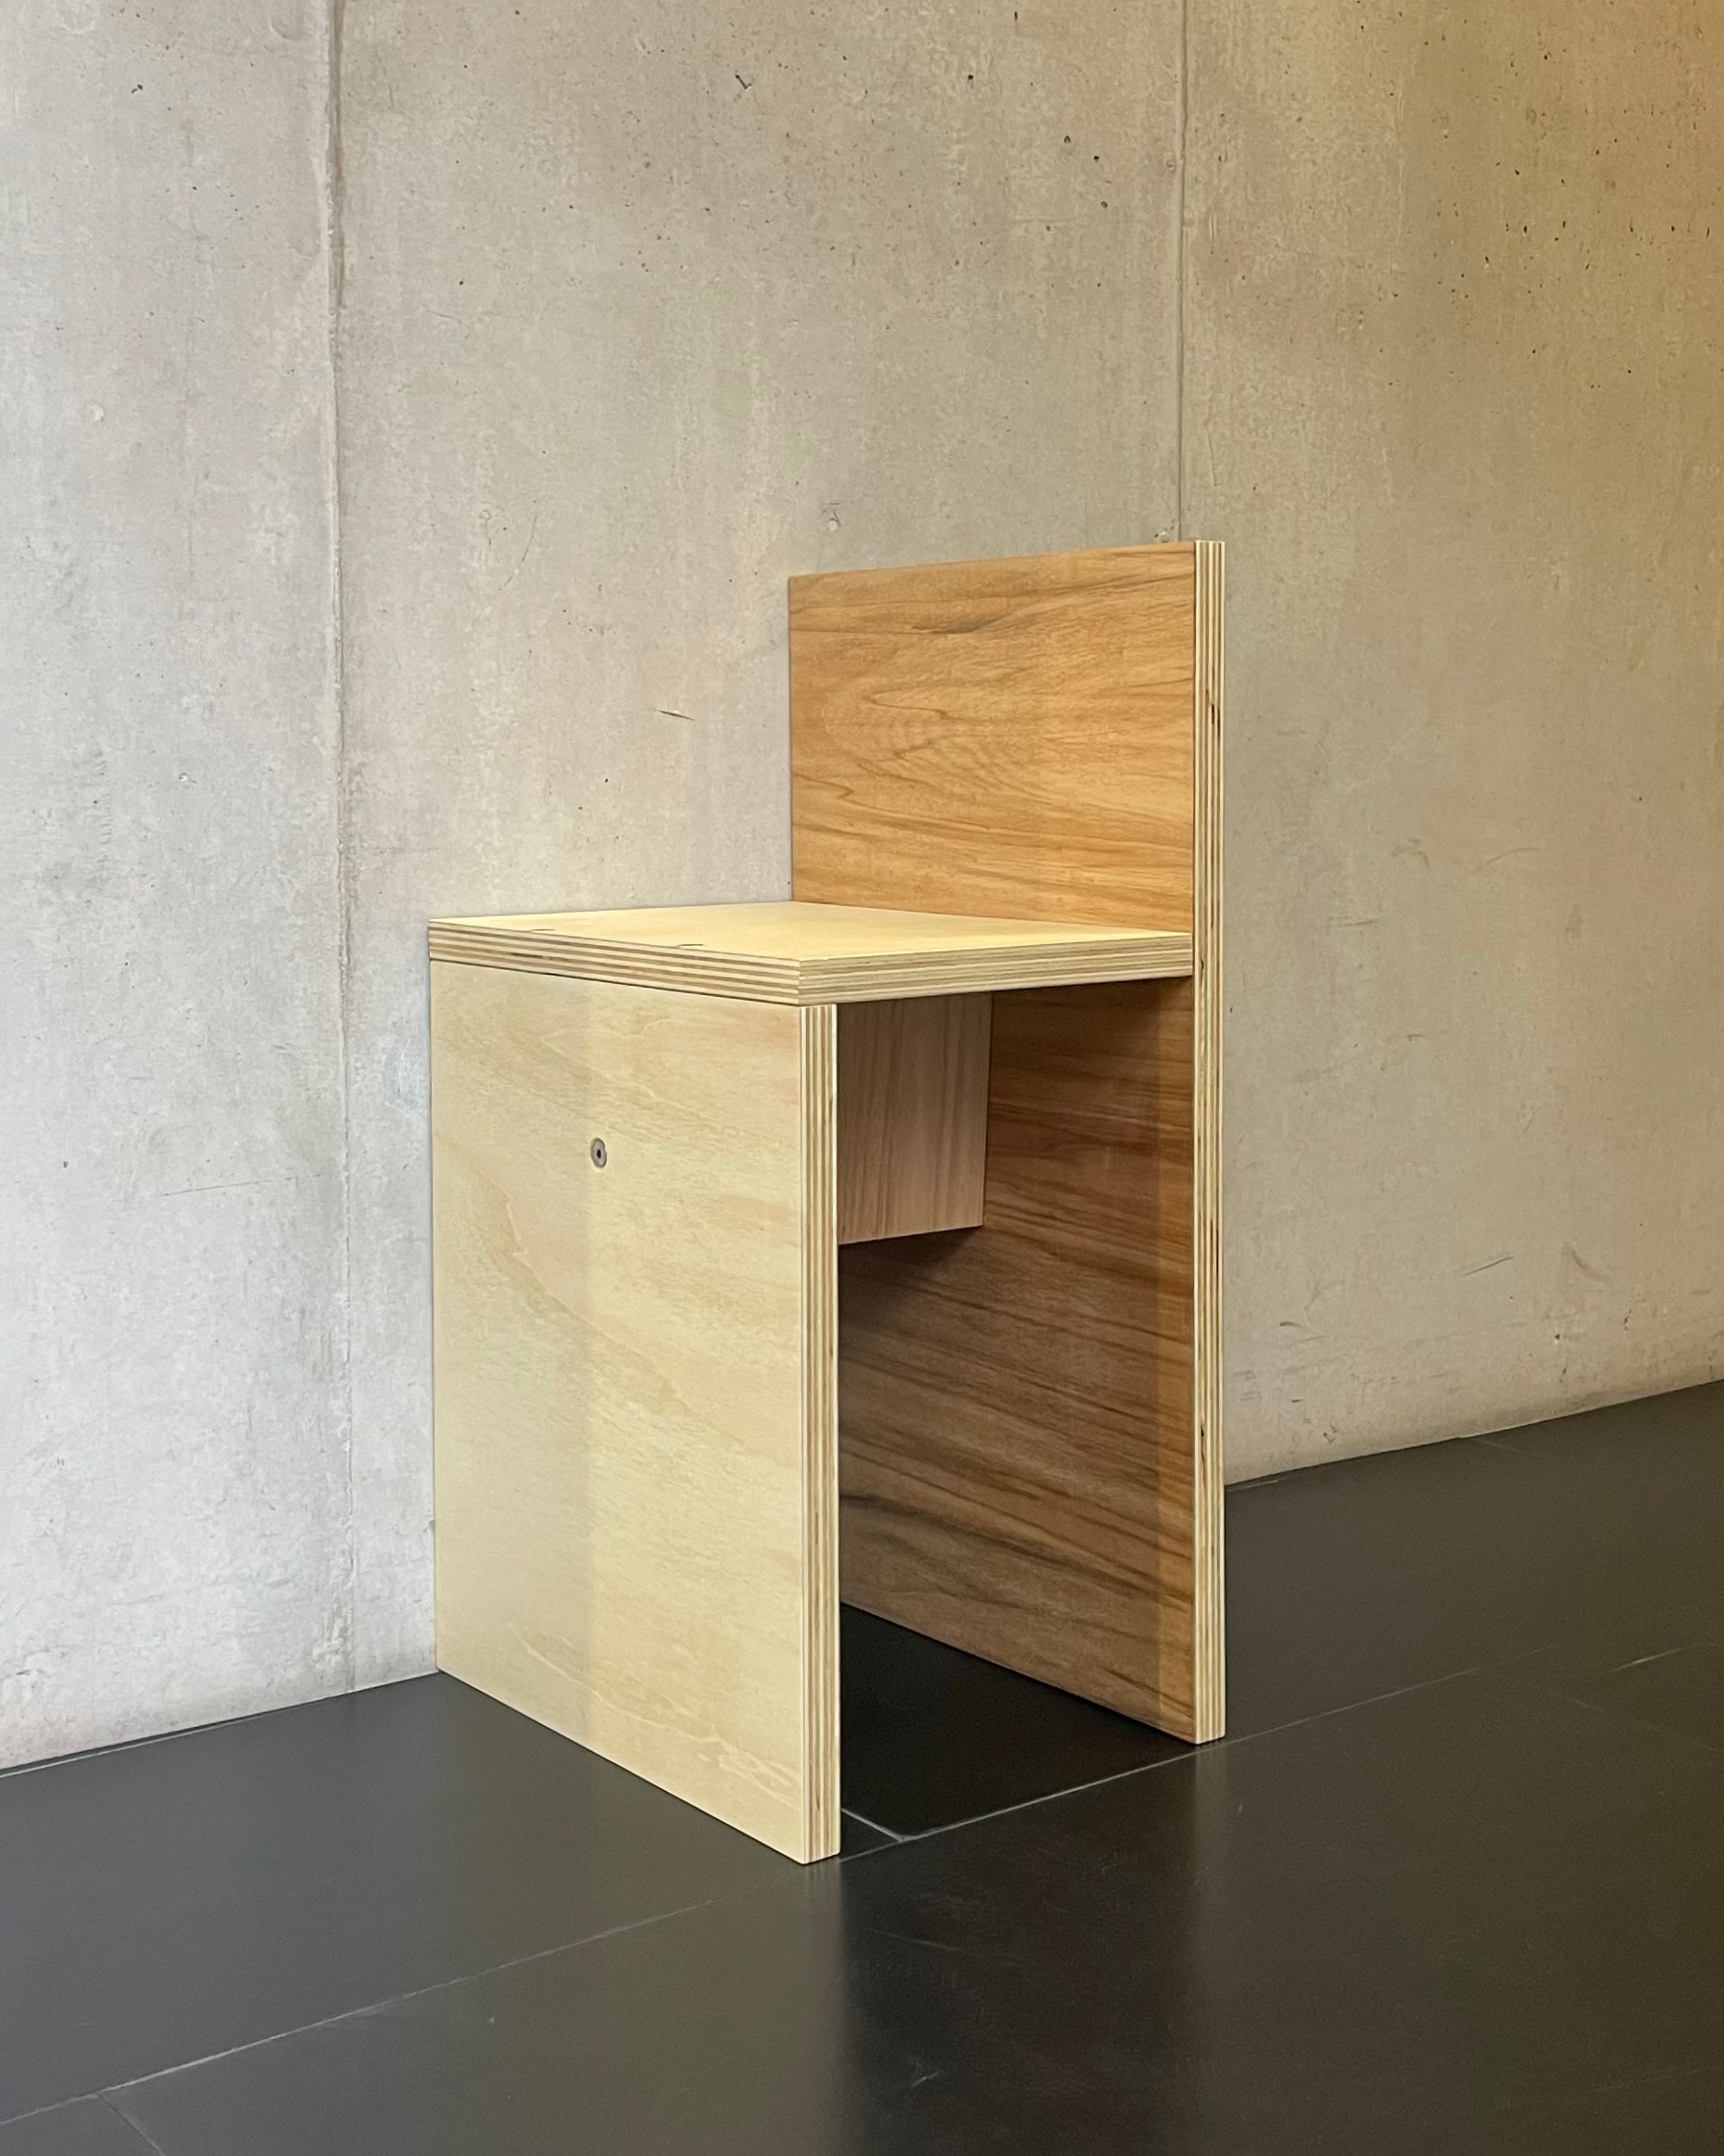
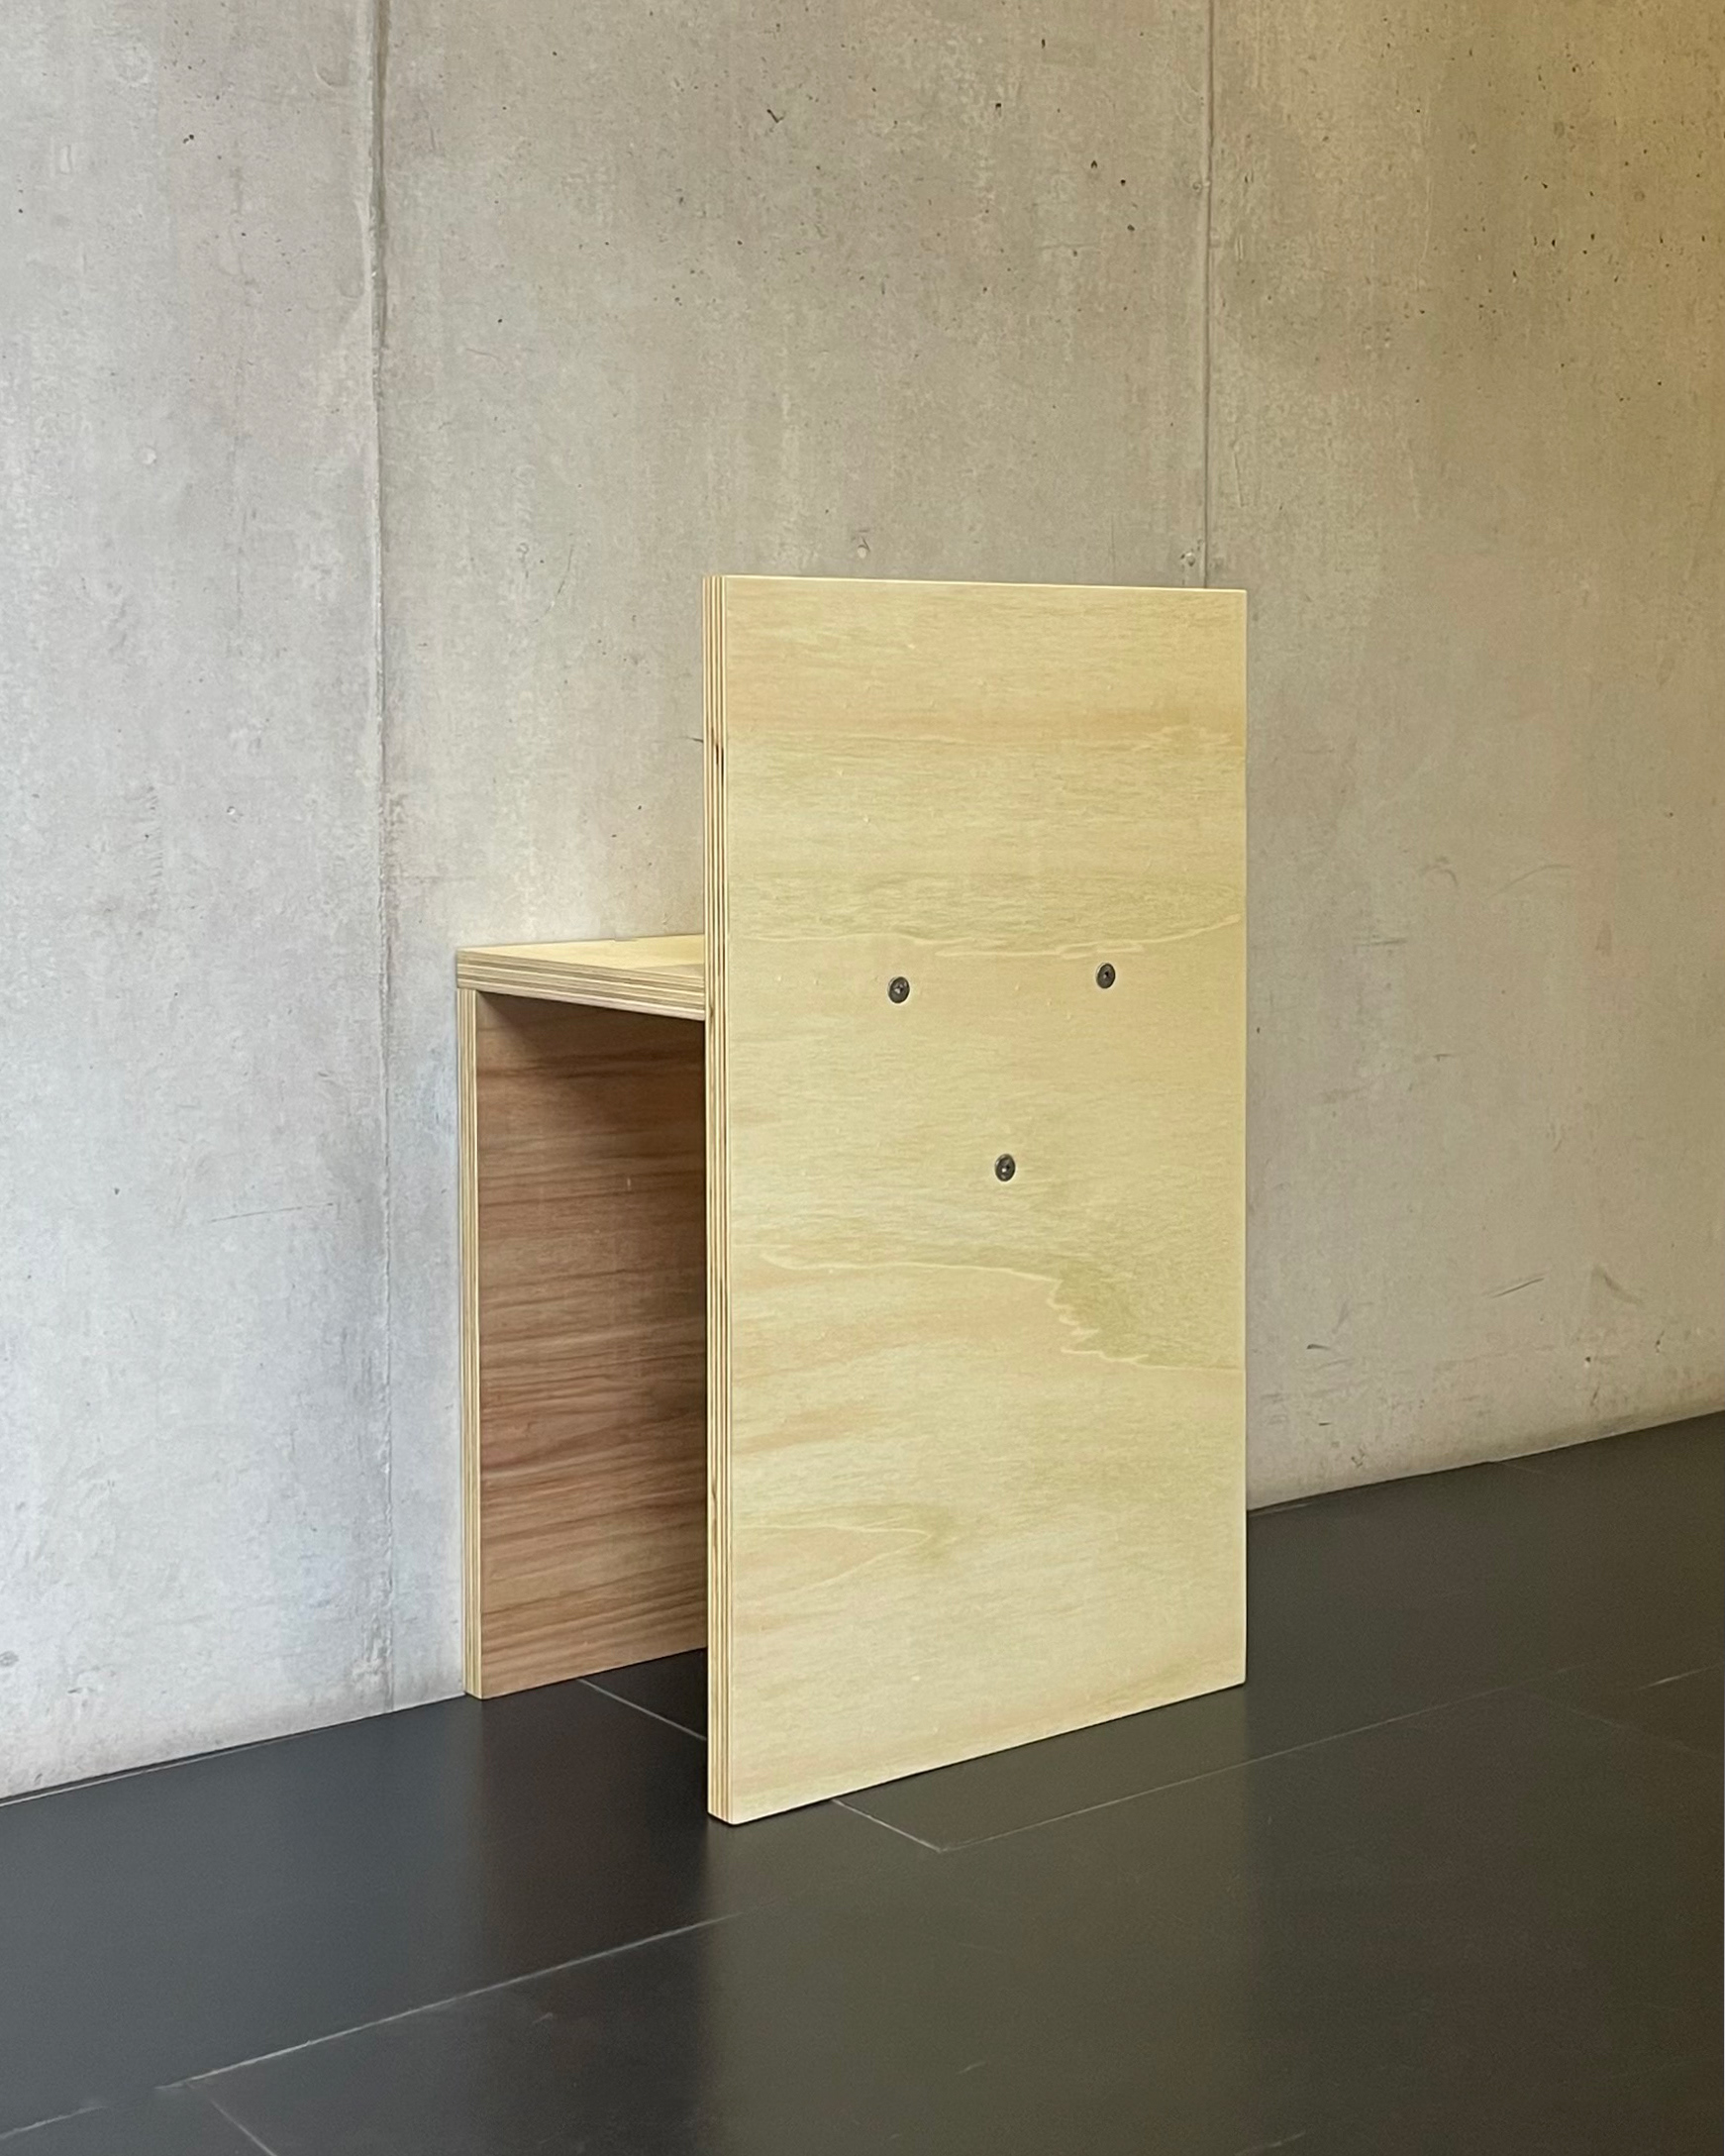
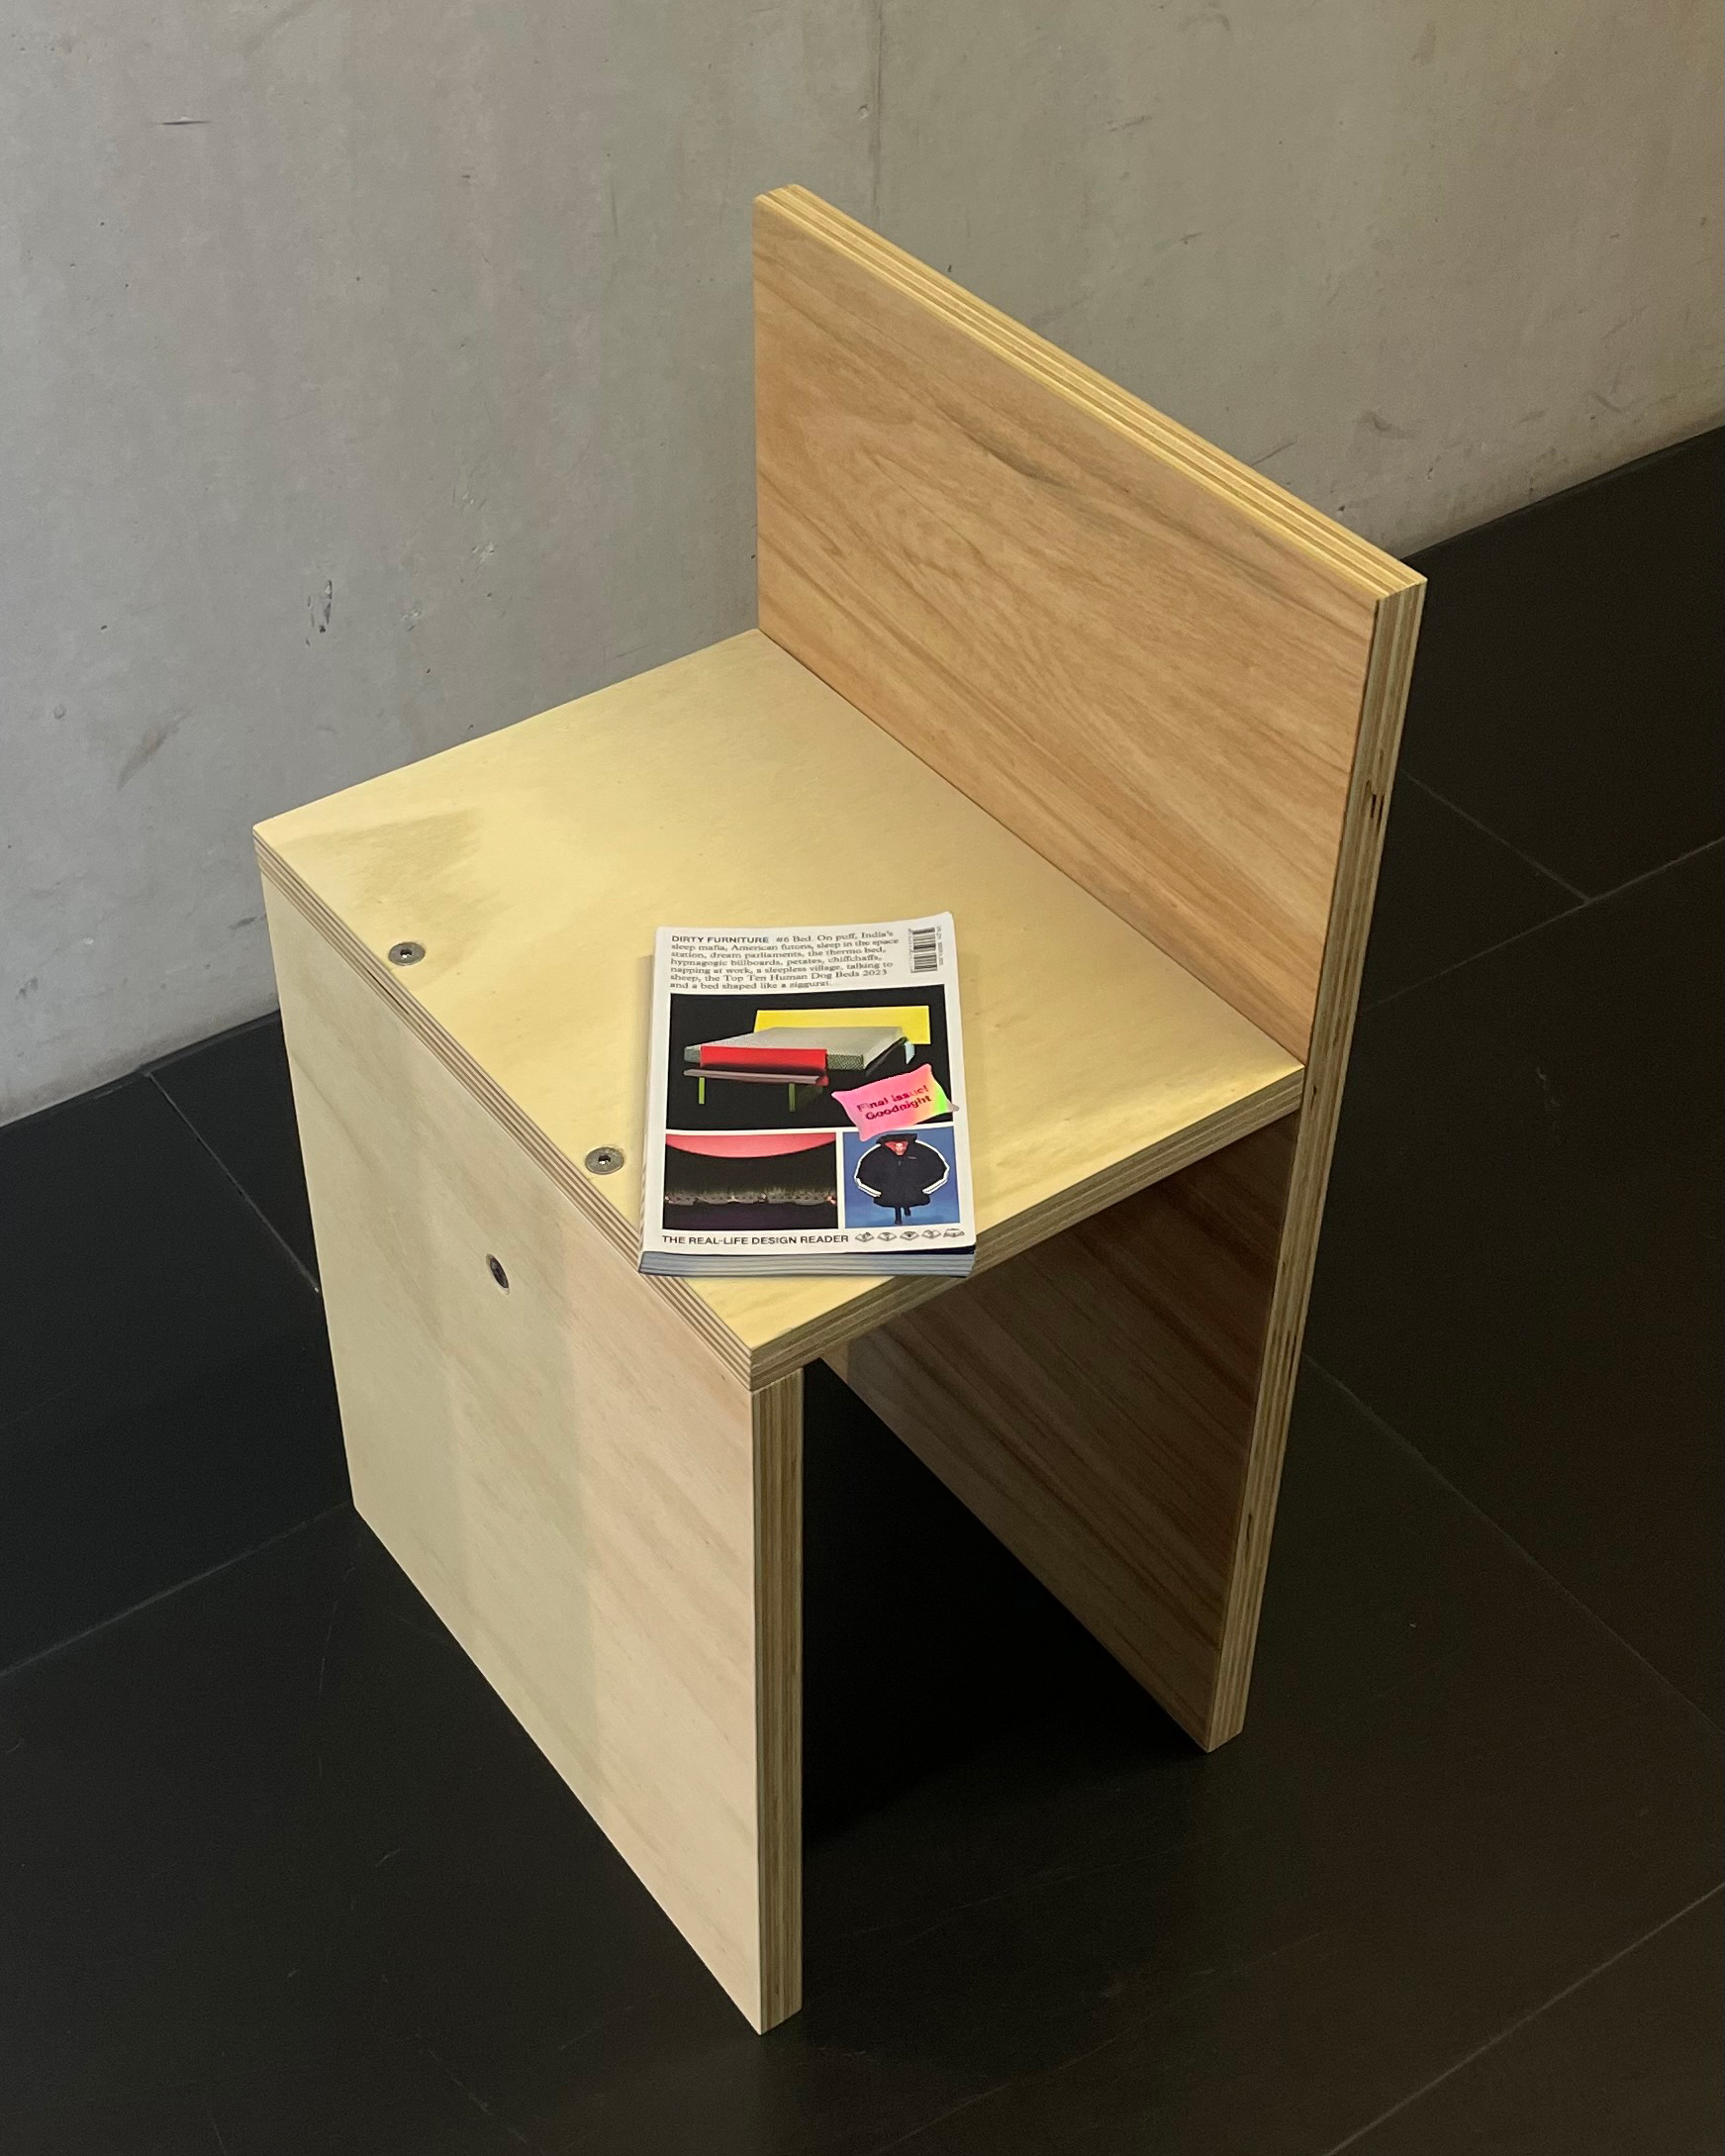
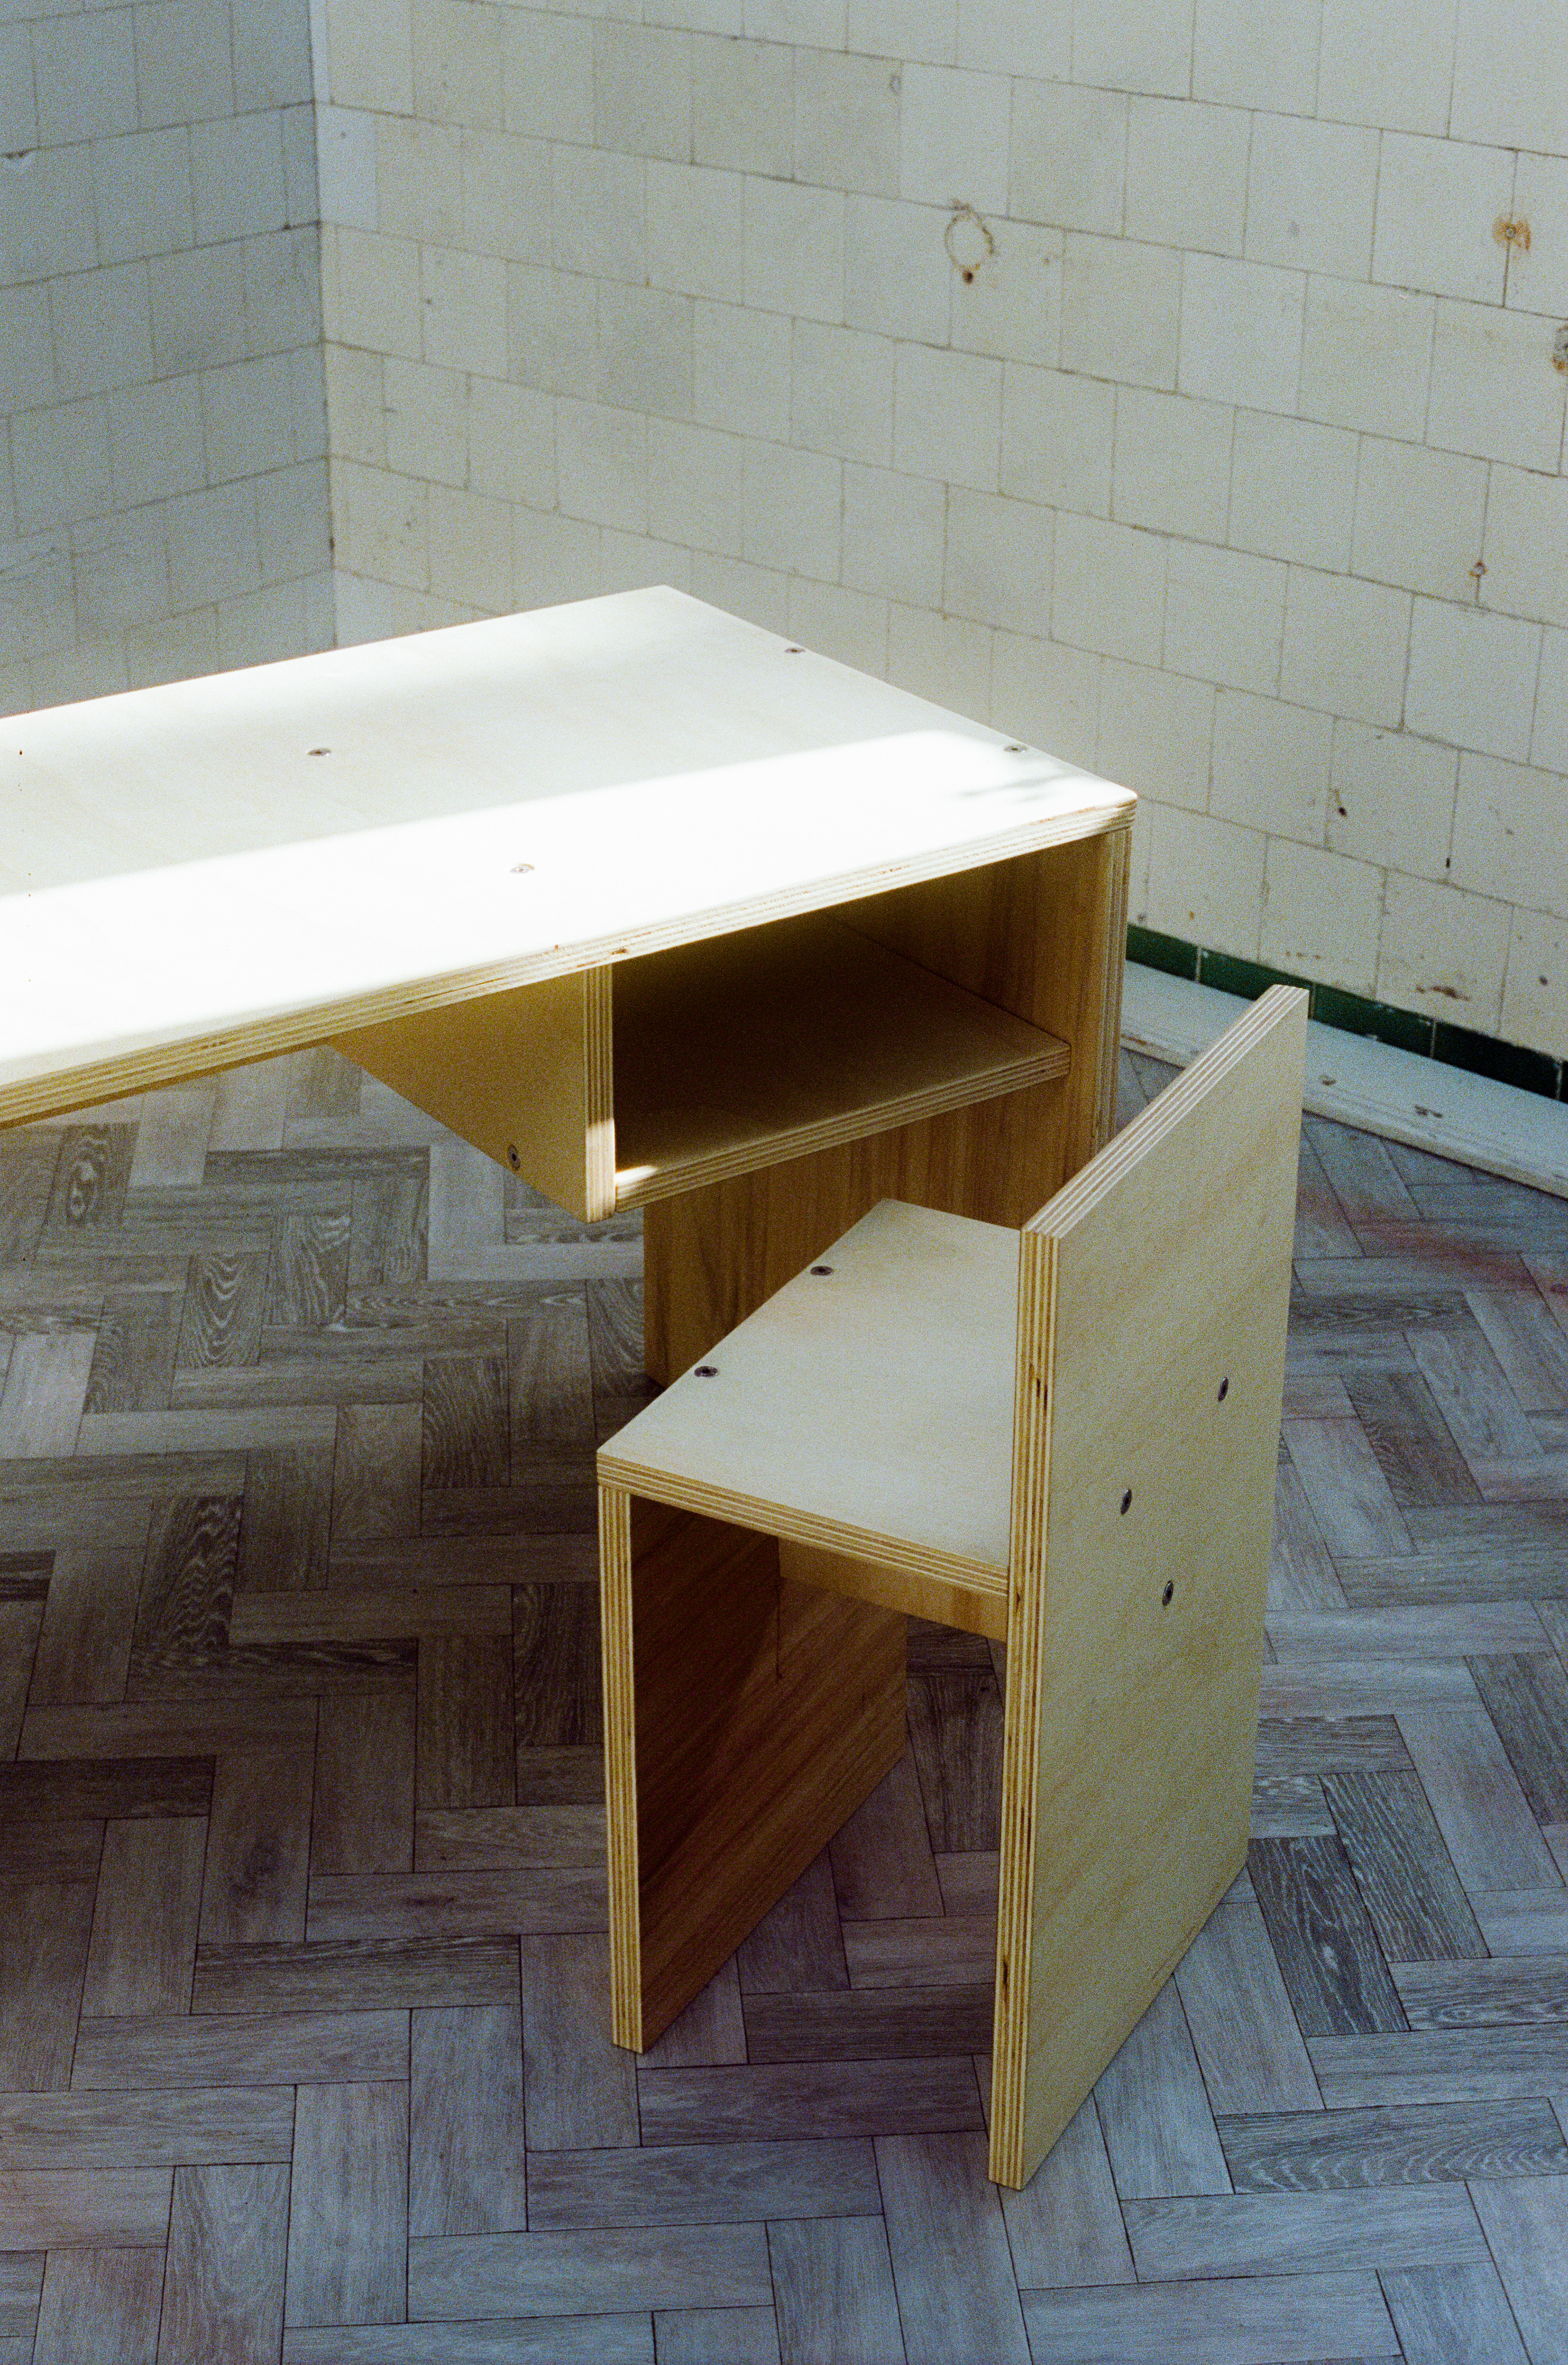
So here is the finished chair. Constructed to pair nicely with the desk and offer a comfortable seating solution while working for short-medium periods of time. Continuing from the previous point I've drilled all countersunk holes to 4mm which has meant that all bolts now sit smoothly against the surface, but as the material is being compressed the two bolts on the seat top have split the top layer of ply. Thankfully the splits have not fully detached but with use I'm sure they will, this issue seems to be caused due to the bolt holes being so close to the edge of the board. Although I want to blame the lack of depth of the countersink I believe this issue could have been caused by the bolt position simply being to close to the edge and instead the seat joint should match the back and enter horizontally.
Other than the bolt issues, the overall finish has been refined with this chair. Edges aren't sanded as much so that channels between boards are not caused, the danish oil finish is applied much more evenly. When placed with the desk though an optical illusion does make the bolts on the back appear to be misaligned which is frustrating but I'm unsure how it might be counteracted, perhaps replacing the third bolt attaching the support with a dowel might help?
To gain an overall sense of the success of the desk and chair I'm arranging for people to come build the system. The session will be recorded and released through social media to further this research.
Vertical Gallery - Cost - Design - Timeline
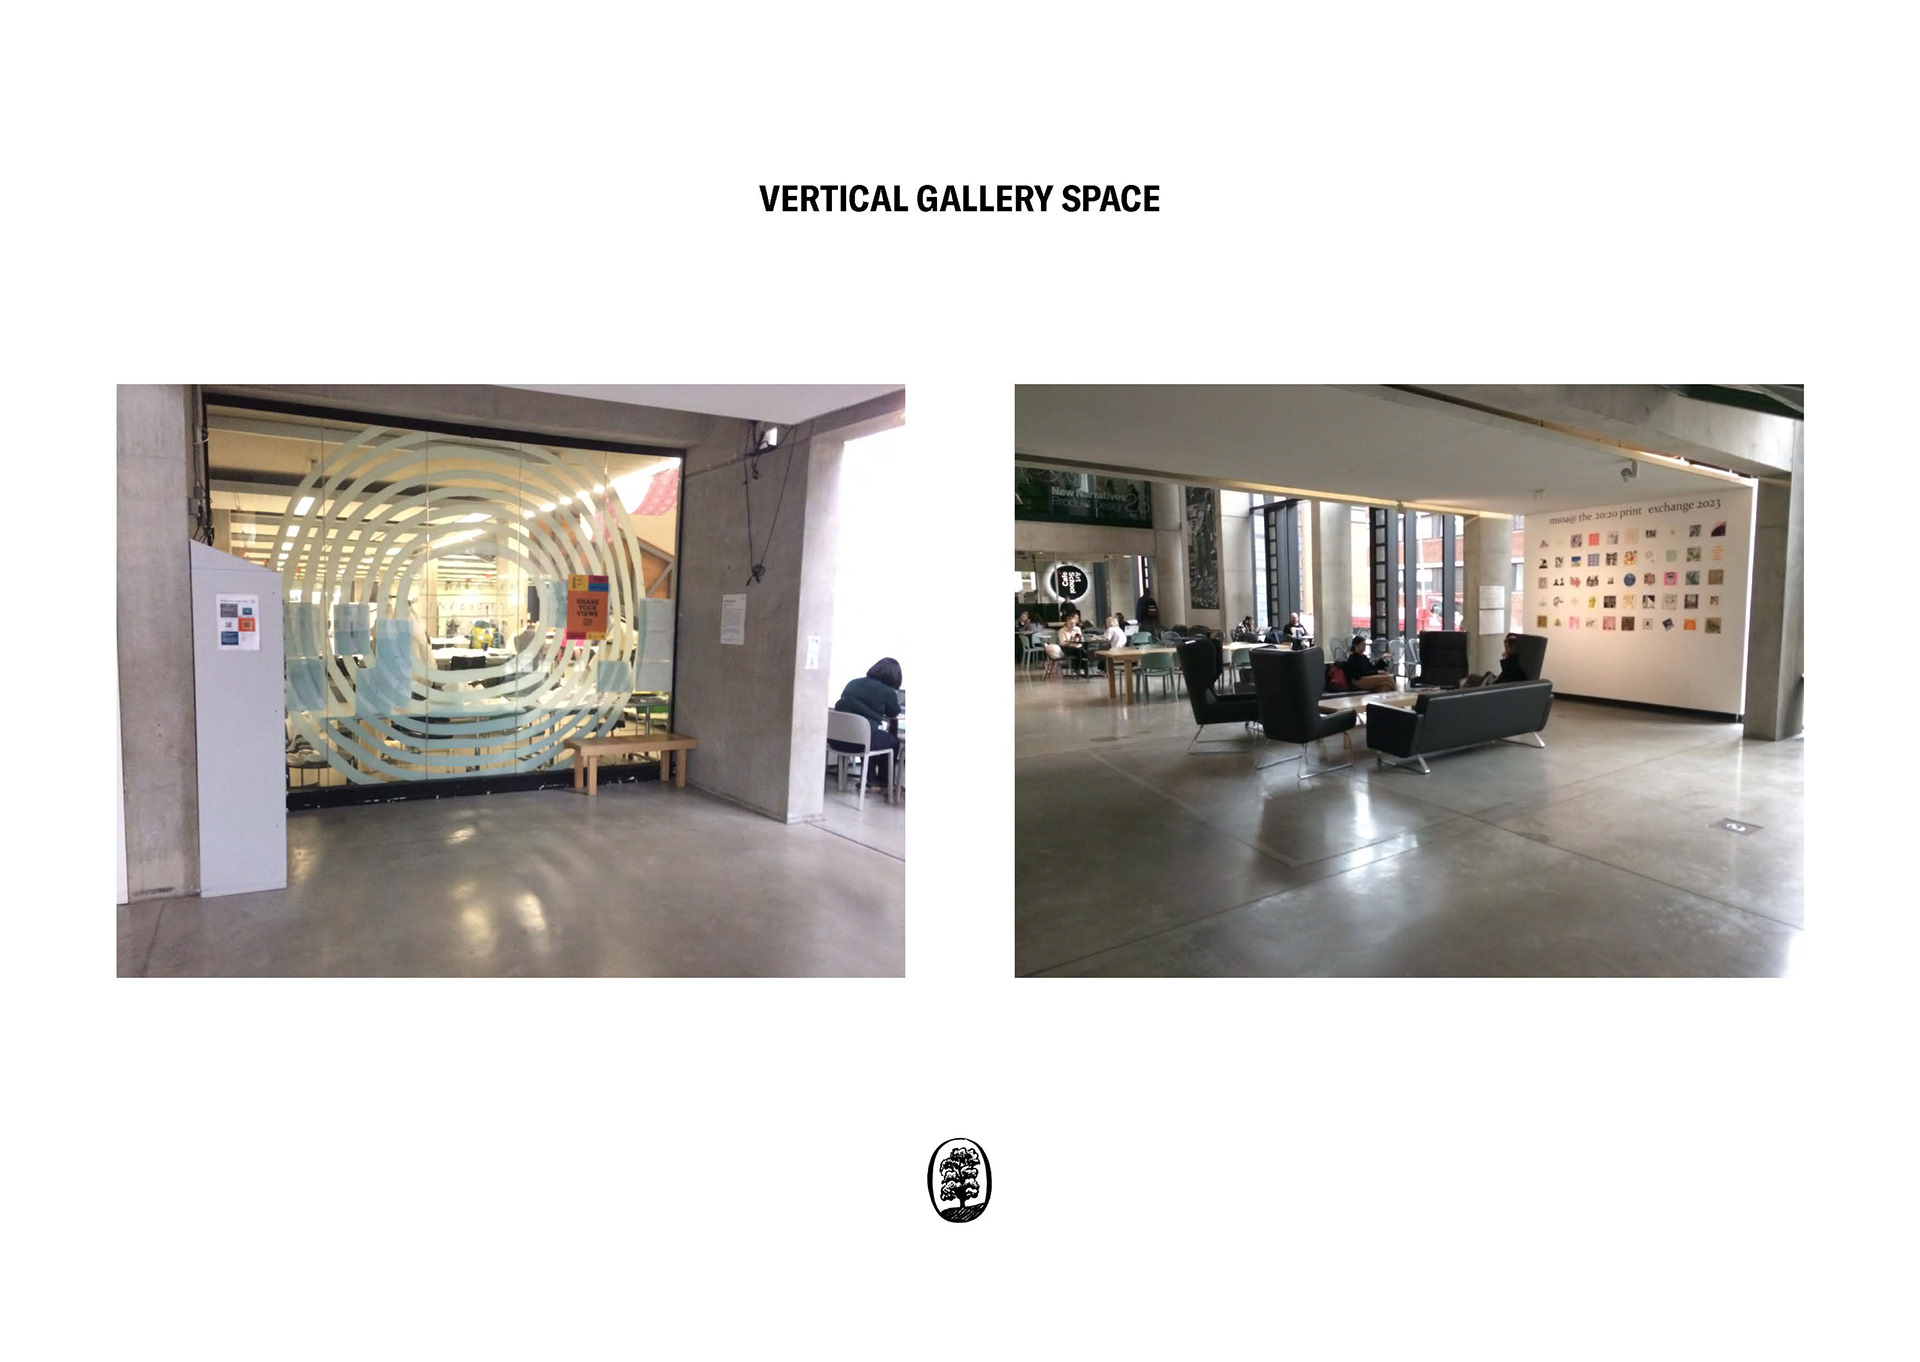
After being successfully shortlisted for the vertical galley commission I prepared for the presentation stage where I had to communicate the idea to the selection panel. Excluding a few slides, above is what I've communicated as being the foundation for my project. A collection of stools and benches made using the successful insert nut and bolt joint, to be placed in one of the main gathering areas on the ground floor. The details of this proposal that I mentioned in my presentation but I haven't put above are cost, materials and timeline for making as these items I had a preference but was quite flexible on.
Material: given that the budget for this project would come from the university I wanted to be quite ambitions and choose Velchromat MDF. It's colour and finishing properties have interested me since handling a small piece while at Altogether Otherwise and while thinking about this opportunity it made sense to push myself to work with something new.
Cost: As part of the proposal we had to break down the cost and included a 10% contingency. My costs are £700 [3 boards of Velchromat] + £100 [bolts and insert nuts] + £50 [finishes and testing] + £90 [10% contingency].
Timeline: I'd except to have some design and testing before finalising the deliverables and for that I'd give myself two weeks and then from there another two weeks for making to allow for wait times with cutting and working in a slow methodical manner. Given the other project I'd have on at the same time and workshop opening times I would design in the week starting on the 18th March. Prototype on the week of the 25th March and because I'm away on the 1st-5th April I would be making the collection from the 8th-19th April. This two week making period can be moved to the most appropriate time so that its ready for the degree show but all design, prototyping and materials must be completed and ordered ASAP.
If I'm successful in the process I think It would .....
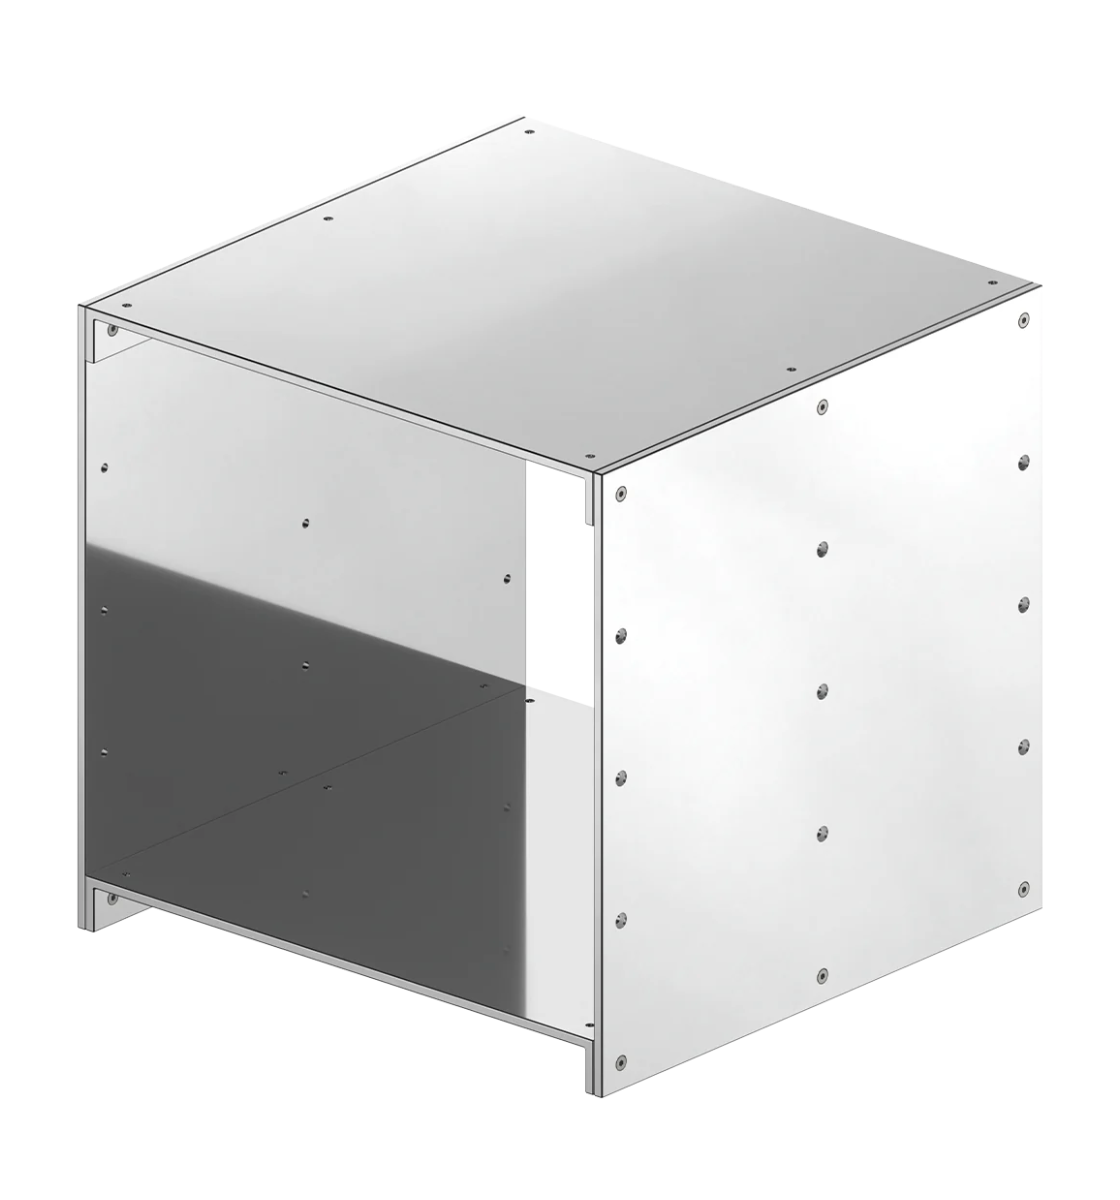
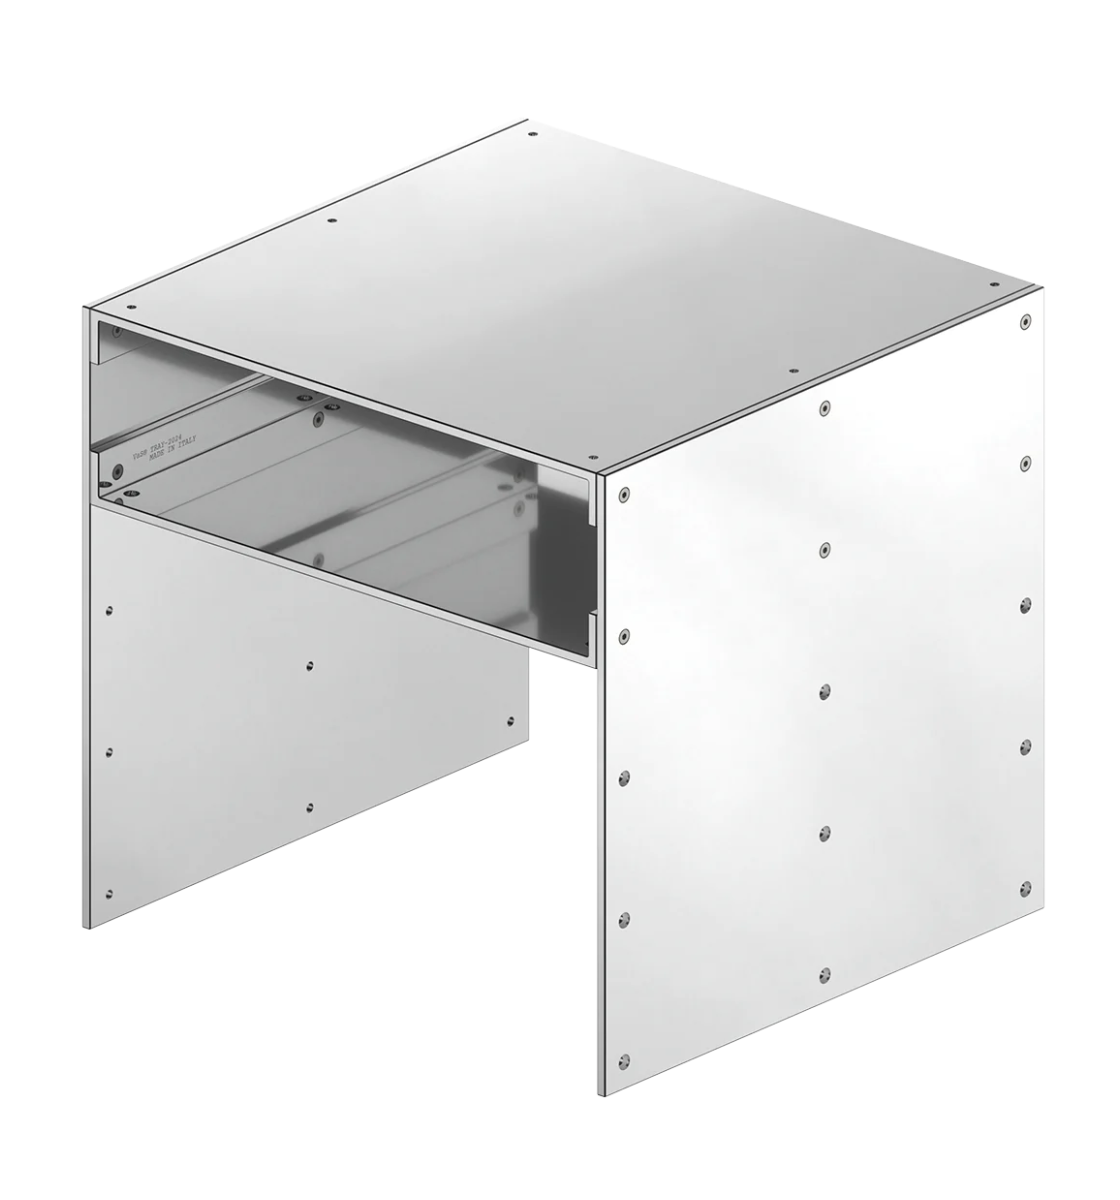

Variable System Interview - Path to Success - Investment
Now this is exciting!!! I managed to get a call with Alexander Szpakowski the designer of Variable System as seen above. This modular home-wear system is made from 14" square sheets of aluminium and constructed using simple nuts and caps which sit flush to the surface. Unlike the other designers I've researched for this project theres not much existing coverage of Alexander so I was eager to discover more about his journey to designing these pieces as well as the specific information about how the system came about.
To my surprise Alex called on his drive into work in Dallas, where he works with his business partner at Bonnet an architecture and design studio. He began by explaining that while initially studying architecture he couldn't connect with the course so transferred to Graphic Design and minored in Business which helped with the next stage of his career in New York. After working as a freelance graphic designer Szpakowski developed an e-commerce bed sheet business which became a full-time job and eventually led to the sale of the business. Alex indicated that although this period was successful he had lost the passion for the projects and wanted to find something new.
The Variable System project exists because of Alexander's passion for the project, he gave no other insight into why the project exits apart from that he really wants to be doing it. This becomes clearer as we discussed the influences and investment into the project how to get it to the point its at now. As someone who making system based furniture Deiter Rams is of course a central source of inspiration, as well as aesthetically Donald Judd both of which I feel Alexander uses as year stick to measure how successful the product is. In terms of investment the time alone is sort of eye watering - 1.5 years from conception to present, thats not even covering the monetary cost which considering the Italian manufacturing and attention to detail is not to be downplayed. It was exciting to hear how honest Alexander was about the progress of the project so far, he appreciated to work and time he still needs to commit to bring the product further forward.
The interview with Alexander has highlighted the inevitable truths that without full and sustained commitment to projects they really cant be excepted to get very far. In relation to this project I can draw a couple lessons I have to keep in mind. First being to always try and explore the processes available to get the best suited to the desired outcome. Second is the clarity and simplification of ideas so that the outcome isn't confusing.
Withington Baths Video - Planning - Lessons - Outcomes
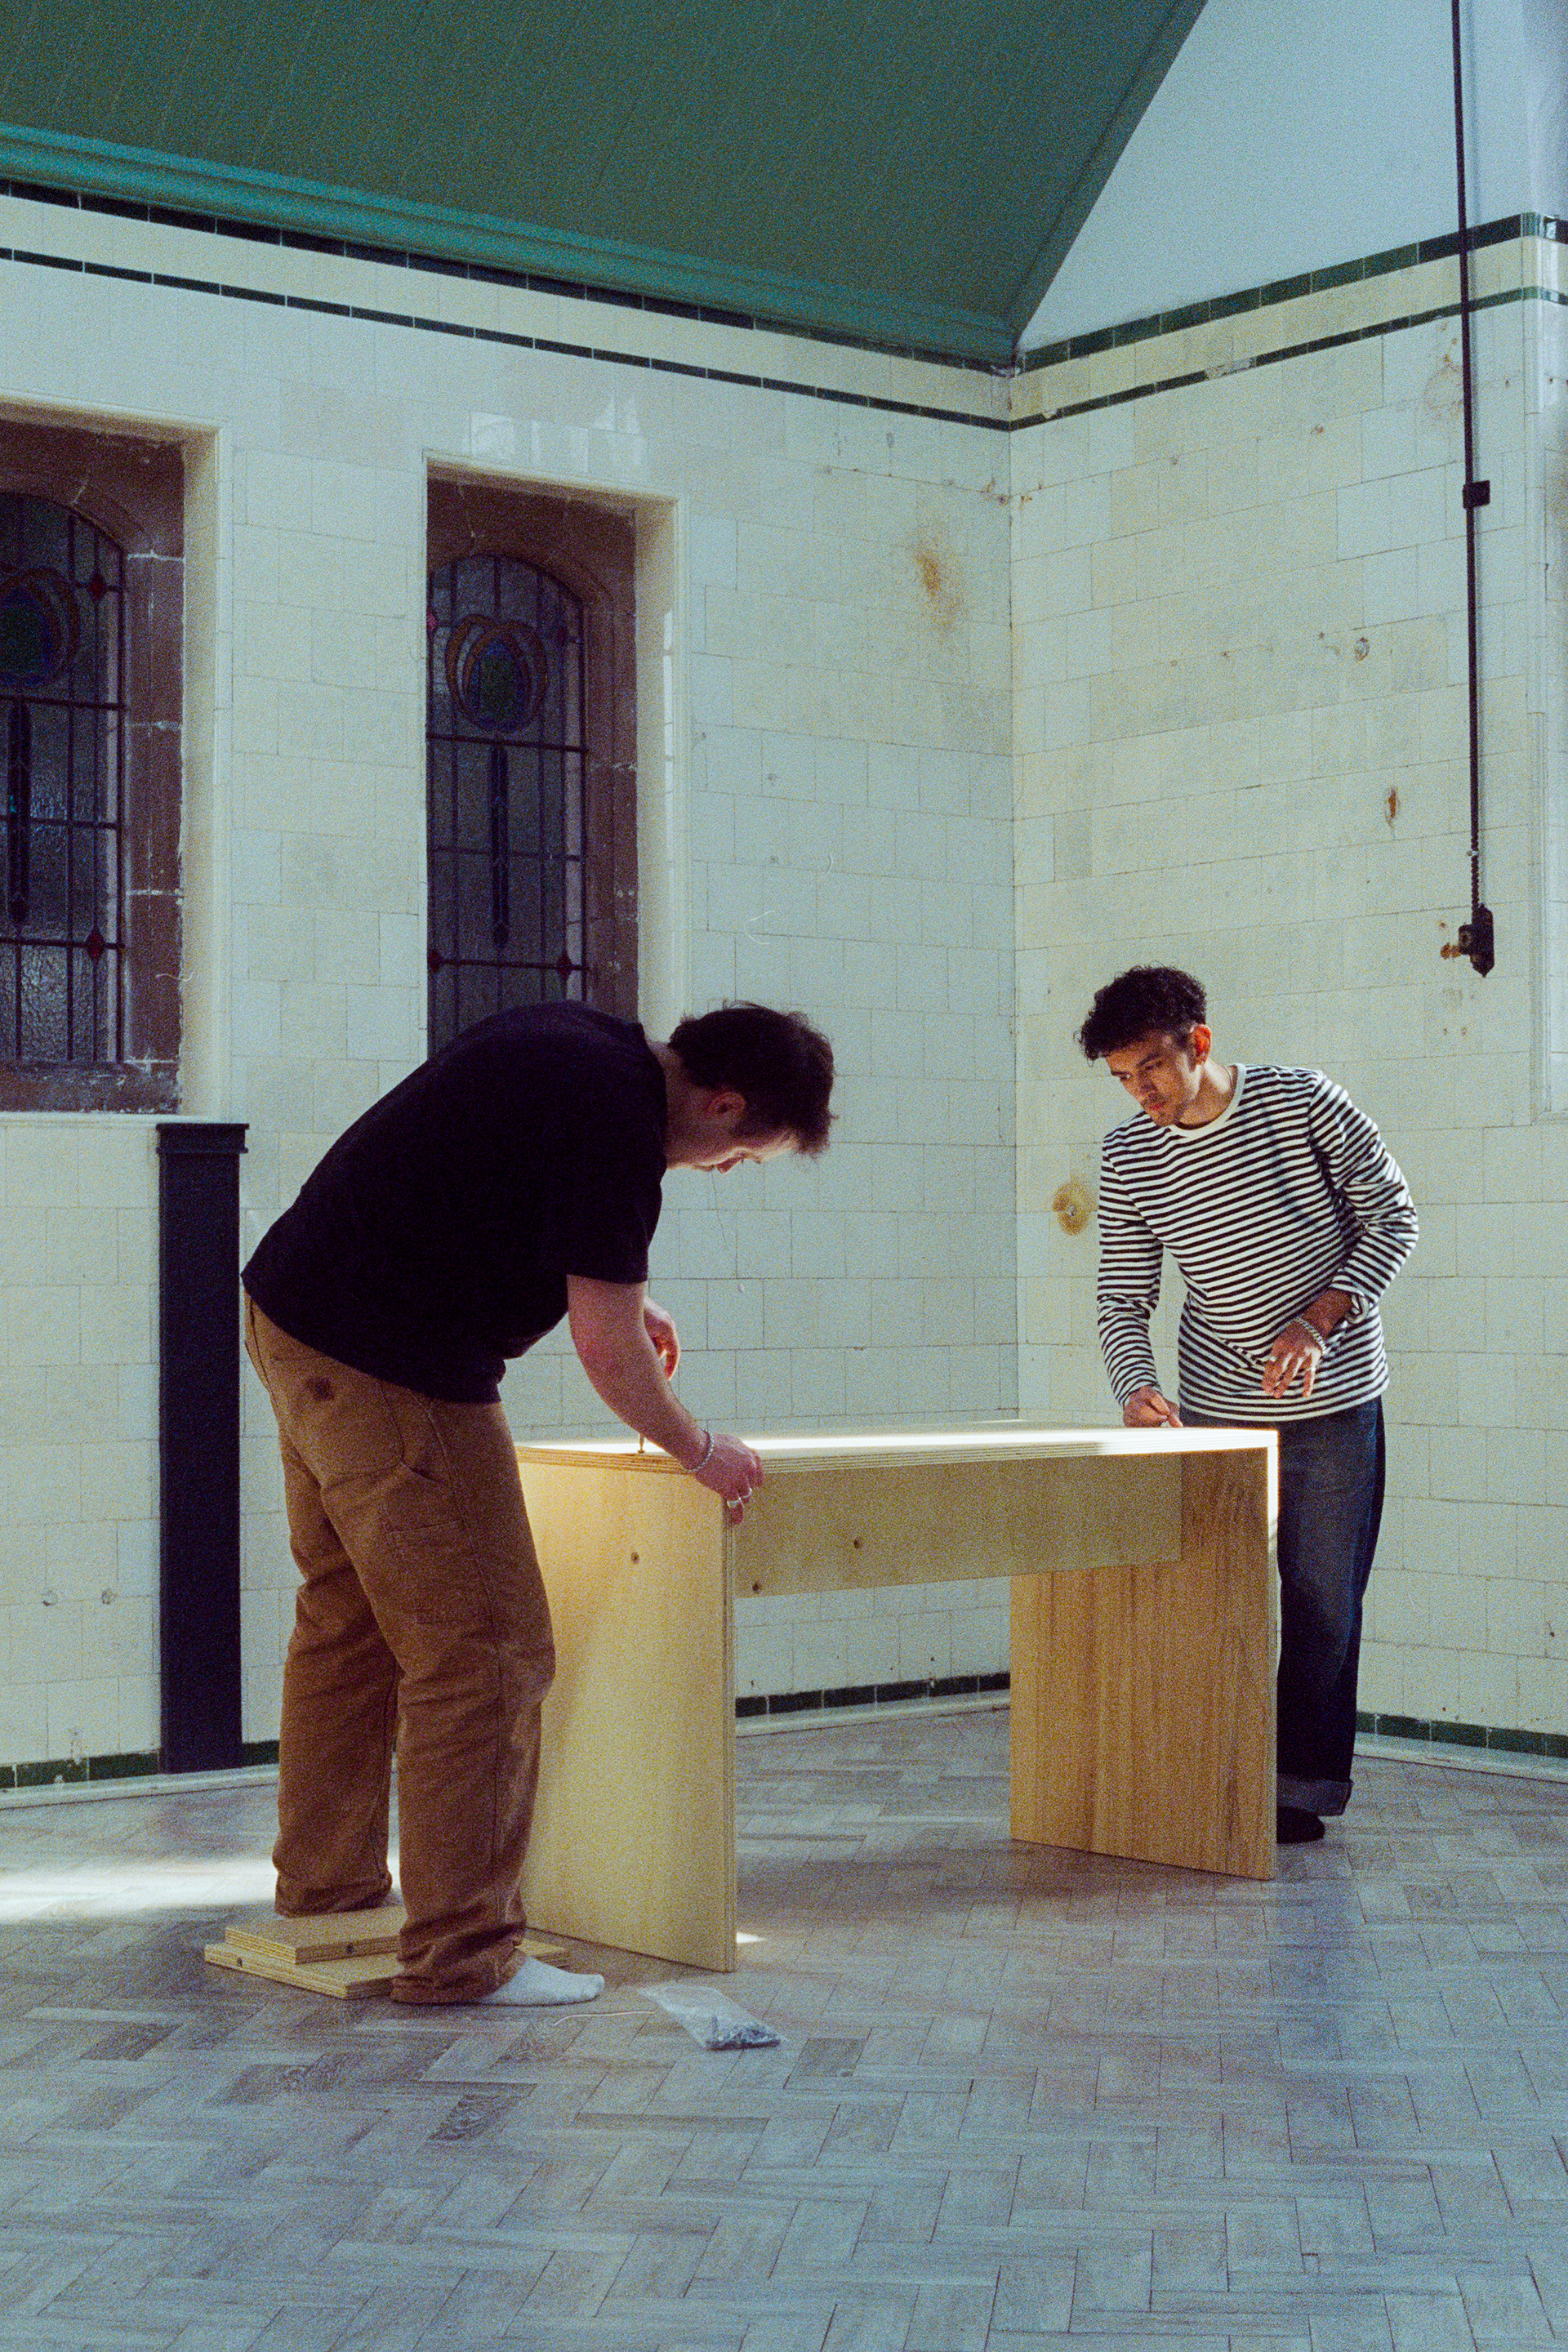
To examine how successful my self-commissioned desk and chair combo was at bringing people closer to the everyday materials I arranged for a few friends to come and assemble the furniture. The link to the video produced from this shoot can be found here.
The planning for this shoot was actually more stressed than normal, logistically I'm quite used to arranging shoots and people so location, plan for the shoot and people had been sorted well in advance but I hadn't fully thought through the movement of such large pieces [the furniture was moved while deconstructed]. I had to arrange for the boards to be moved both from uni and then to the location. Next time I'm planning on shooting such big pieces I'll have to ensure a vehicle or trolley has been arranged.
Outcomes from the afternoon I'd excepted where comments on the lack of ergonomic consideration with the chair, a clear sense of fulfilment from the participants and hopefully some conversation around the broader subject of material use. All of these did occur but I couldn't have anticipated the feedback on the bigger topic I was trying to tackle, Louis [on the right above] had some really interesting comments on how I should investigate how each individual person sees industrial materials and use that to guide my designing and making process. I feel that this is probably a good inflection point in my project where I could go down a rabbit whole of figuring out the many possible configurations industrial materials can take but I don't feel thats the correct path in this project. I've developed a way of working with the insert nuts which puts and emphasis on the industrial without screaming it. When thinking back to how David Clarke spoke about how these things are special to me, that has to be at the heart of how I'm choosing materials/fittings. Louis is correct in that I have to understand what makes things special to people, I think that can lead to more design decisions based on not only my feelings to a material but a better understanding of other peoples.
Successful Vertical Gallery - Testing Velchromat - Finish
So I've been commissioned by the vertical gallery team [Katie Egan + Amanda Cangelosi] to create a selection of seating for the degree show. The initial idea and budget has been reduced in size from a public seating area to a small collection of benches. My total budget was £400 but I successfully pushed for a slightly larger budget to allow for the few unknowns ie; cost of velchromat boards.
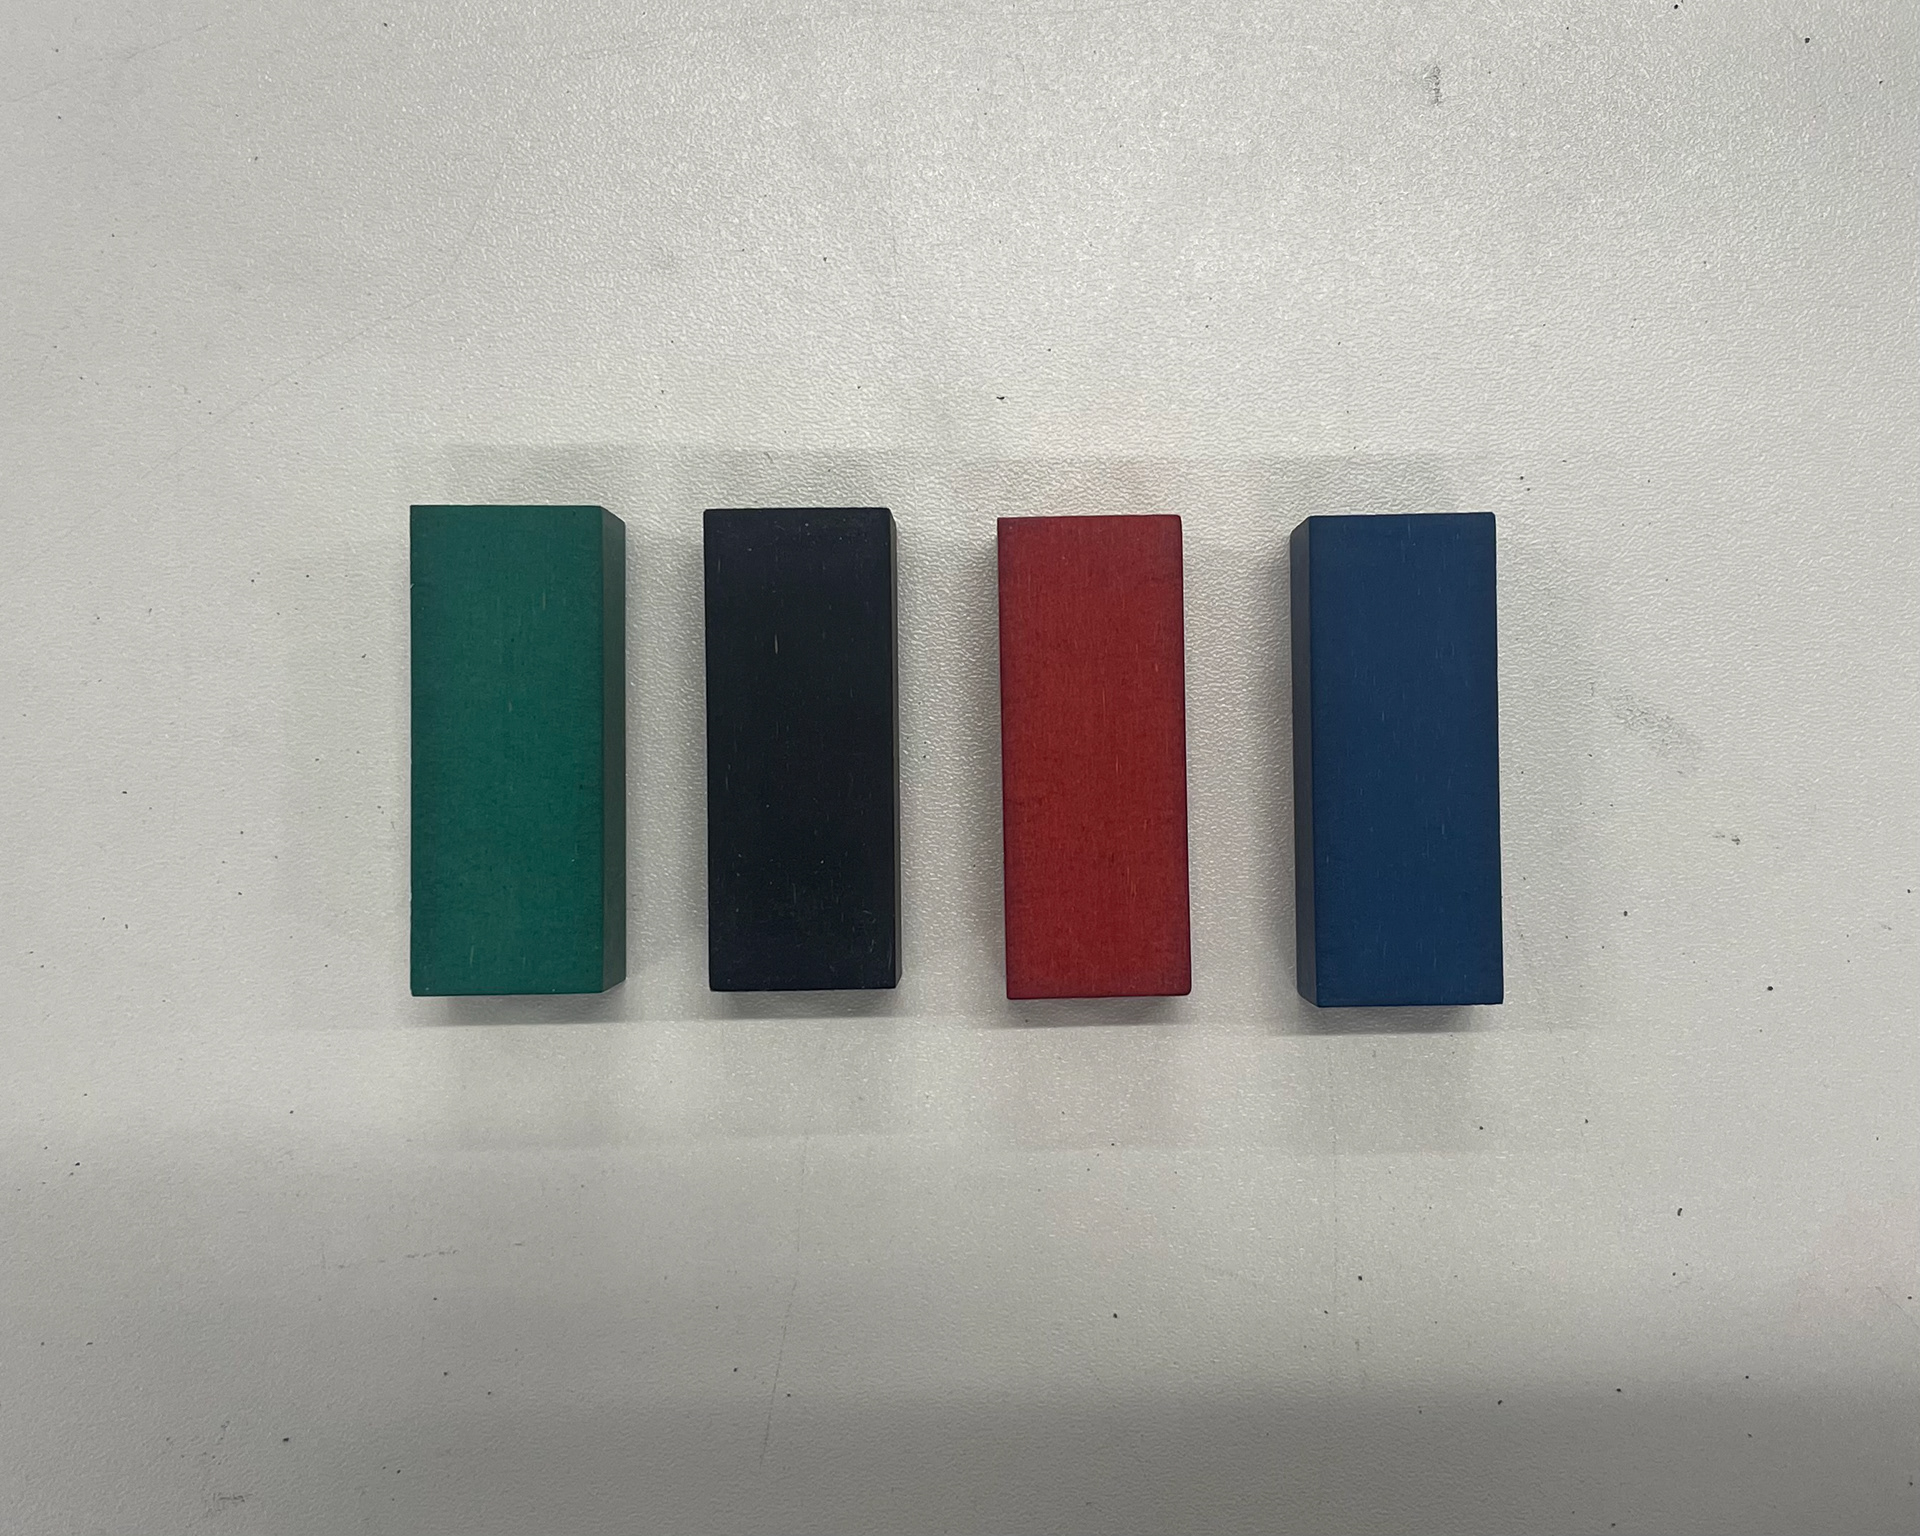
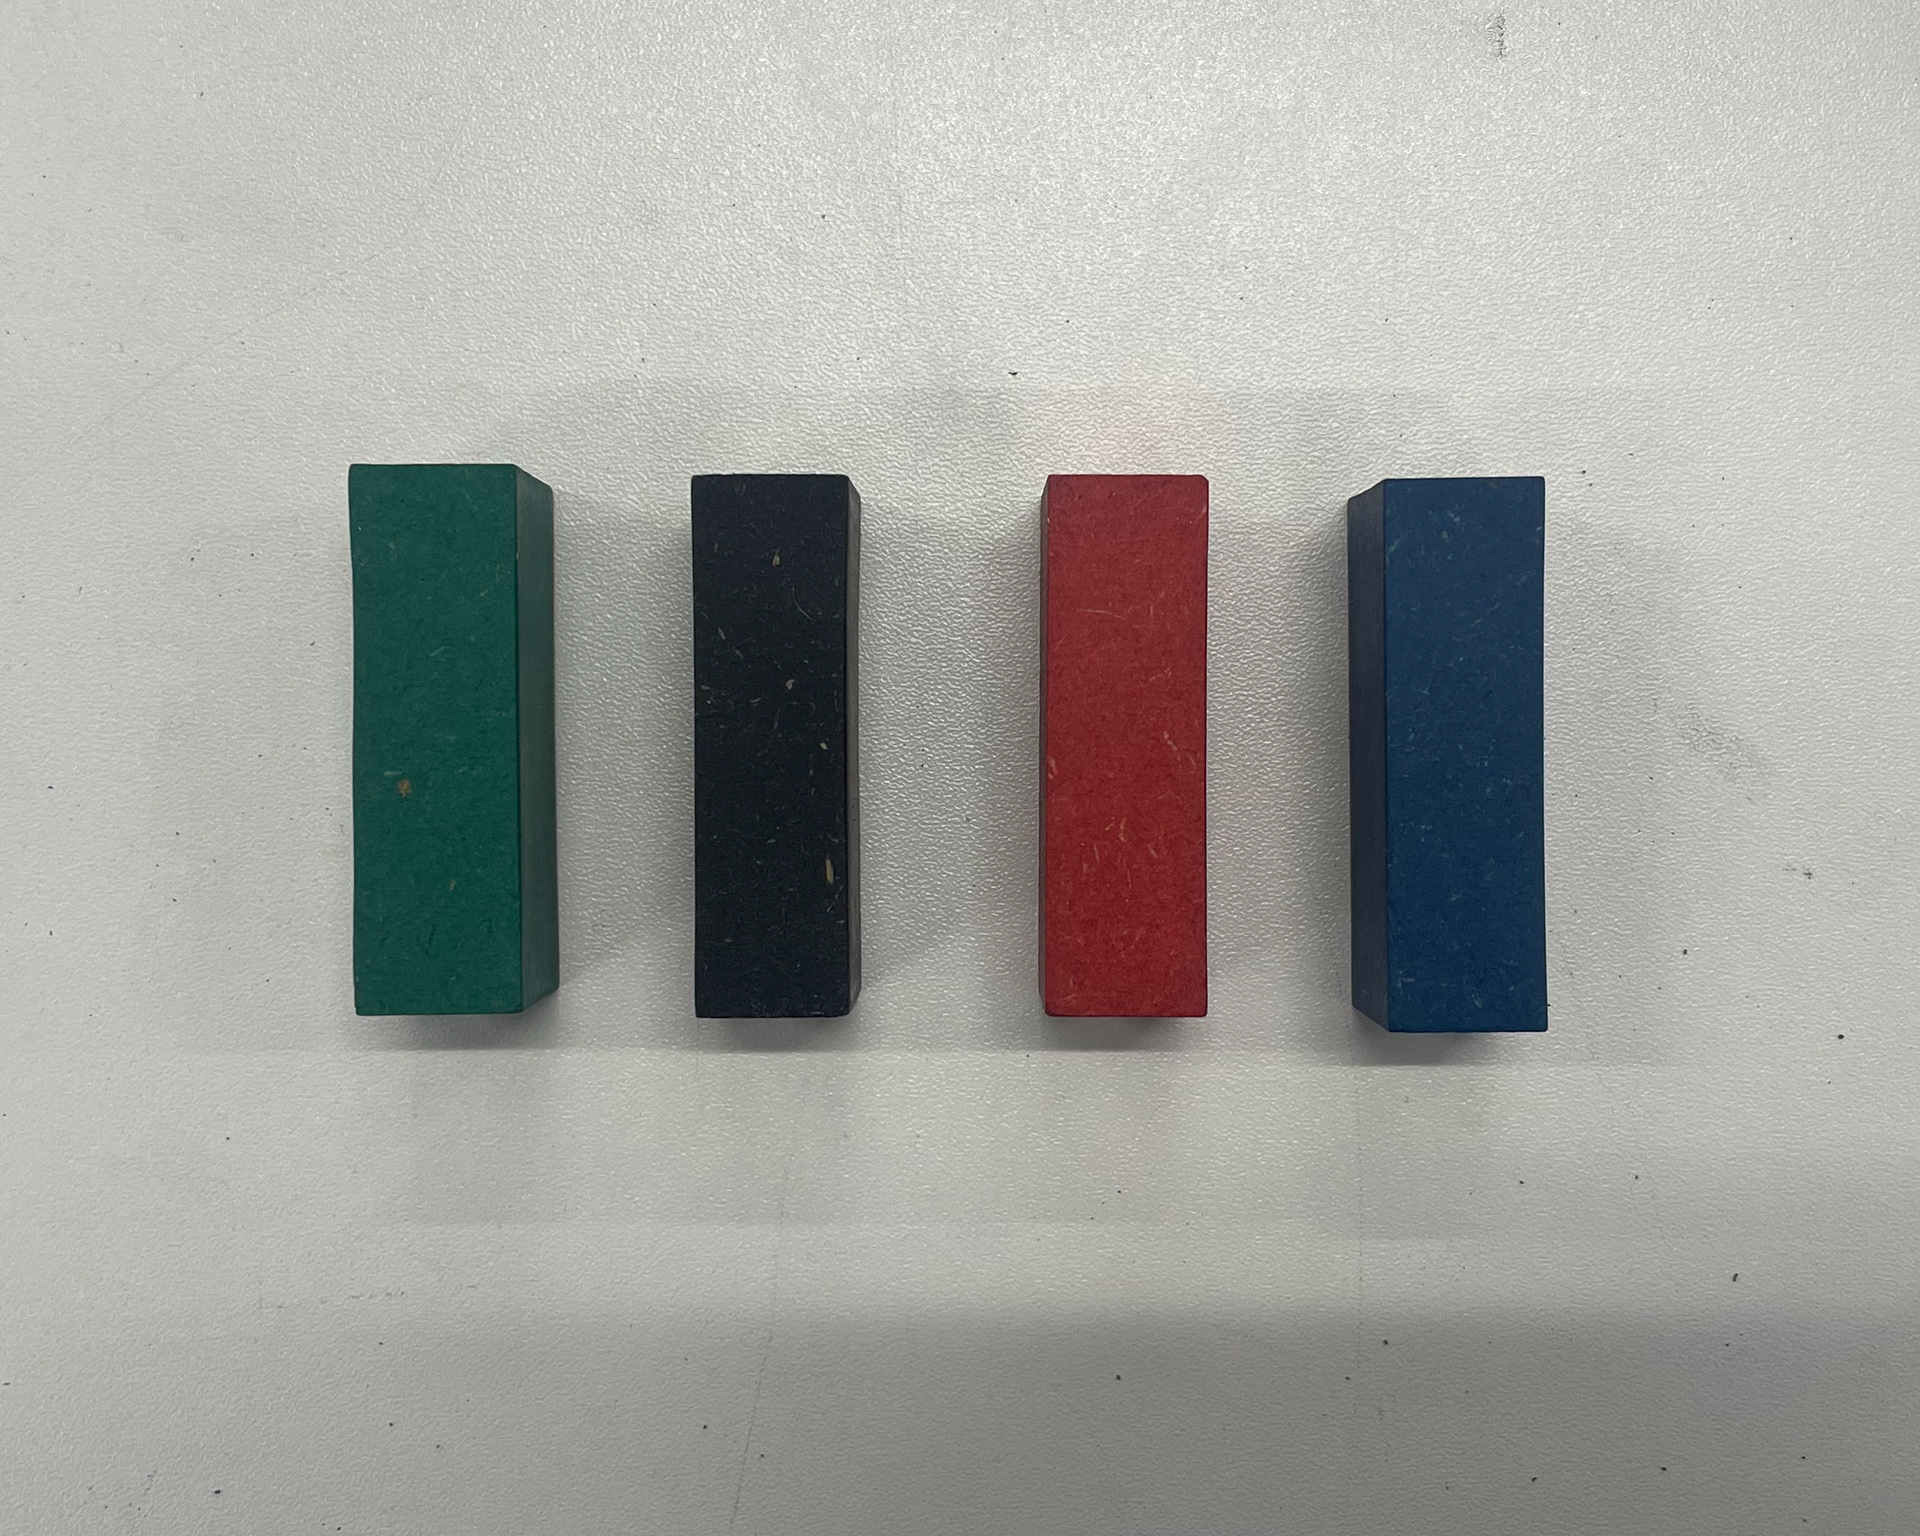
Before I get into everything in detail though I had to get my hands on the material to see how to behaves and to dial in the potential finish. As seen above I've got a selection of colours all sanded to 400 grit and finished using OSMO oil. Going forward I believe the best choice for the vertical gallery commission is the green and blue. The black also interests me a lot the idea of working with larger sheets with the pops of silver from the bolt heads really sticks in my mind.

William Morris [Left] - A Clearer Direction for the Project
I found the time over weekend to finish the two part documentary on both Ruskin and Morris. I hadn't paid as much attention to the second part dedicated to Morris and again I've only got myself to blame because his work and ideas are perhaps more relevant and practical than those of Ruskin.
Holding similar beliefs on the industrial revolution and the attack on nature but opposed in political views Morris was a much more practical person than Ruskin in my eyes and was more accurate in his attempts to counter was he saw as being wrong with the world.
In terms of design Morris believed and what I'd like to carry in to my design is that you should 'have nothing in your house which you do not know to be useful or you do not believe to be beautiful.' Also of interest are how is socialist ideals intersect with his work. Stating that the work created must have an ornamental or aesthetic value even when considering socialism.
In my head this is different from my approach up to now. Instead of putting the political message directly into the work, and that becoming its whole being Morris proposes to the work has to remain in the framework of a political goal but has no bounds other than that.
How does this relate to my project? My work isn't really political its just something I feel helps me to align with a bigger goal. Generally speaking I feel that I'm trying to archive a collection of work which challenges the rise of the technological revolution through the reconnection to materials and production, but that just not going to happen. It's such a large topic that I'll struggle to get to grips with it and instead I feel a better option would be to refocus my idea back on the standard and the special. People connection to those words and to the material/objects they associate with them.
Referencing existing furniture - dimensions
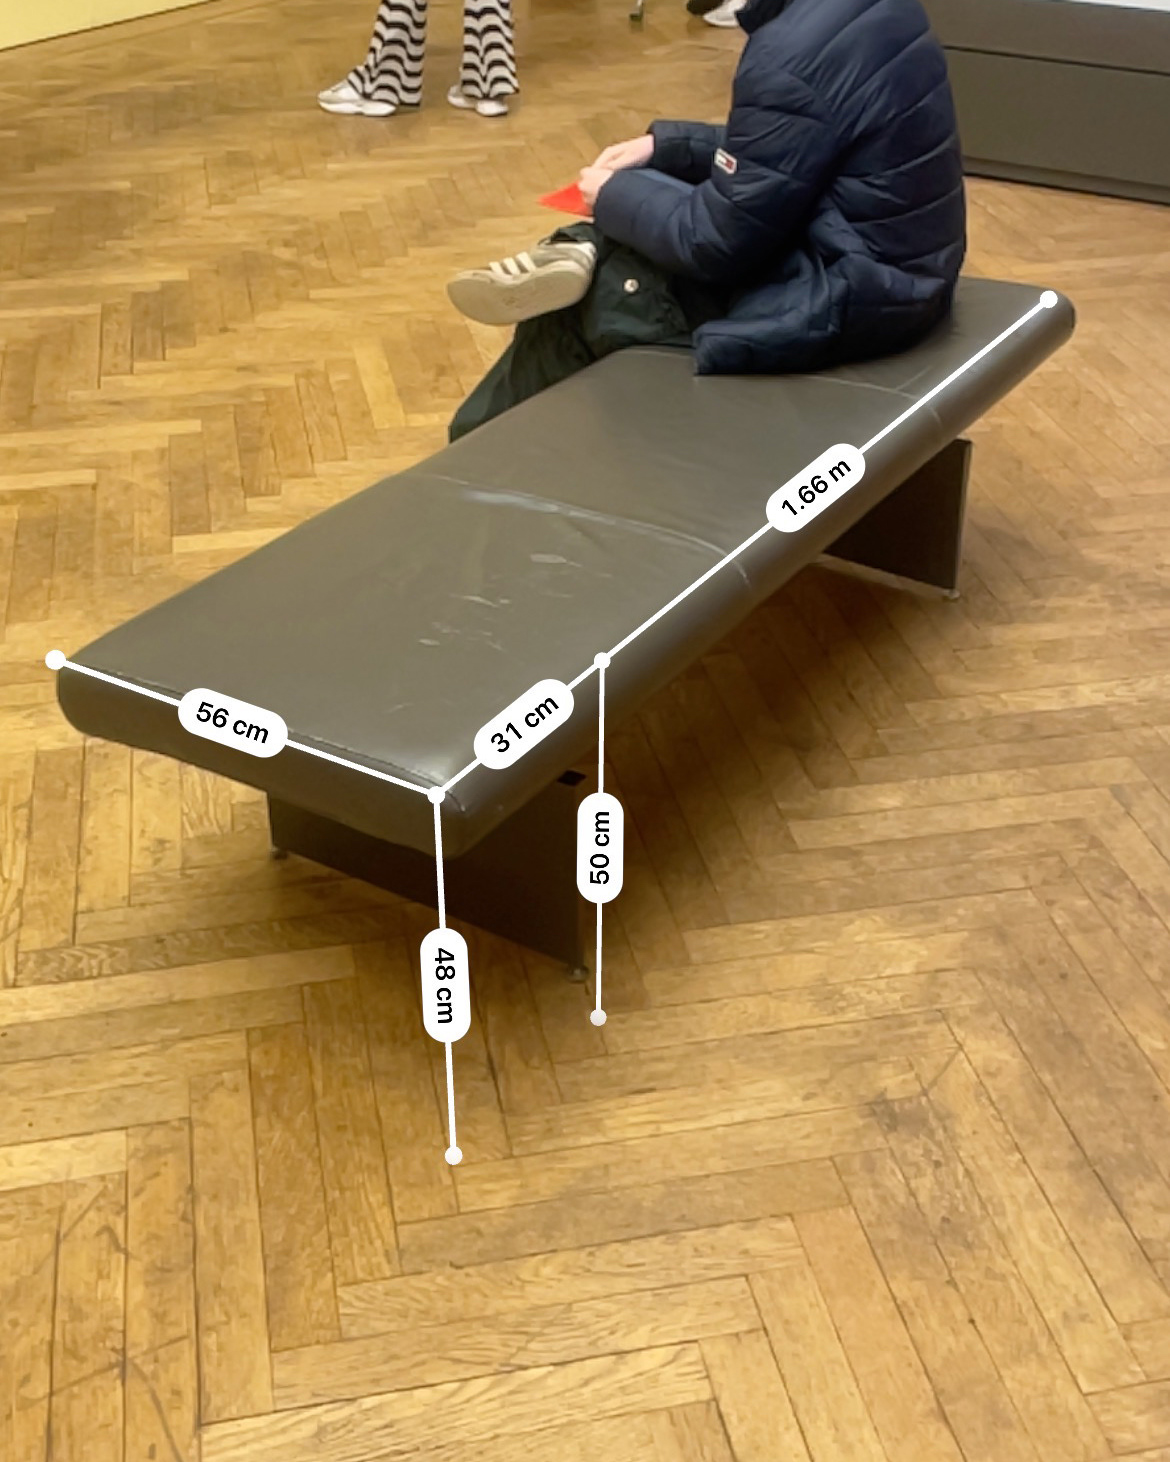
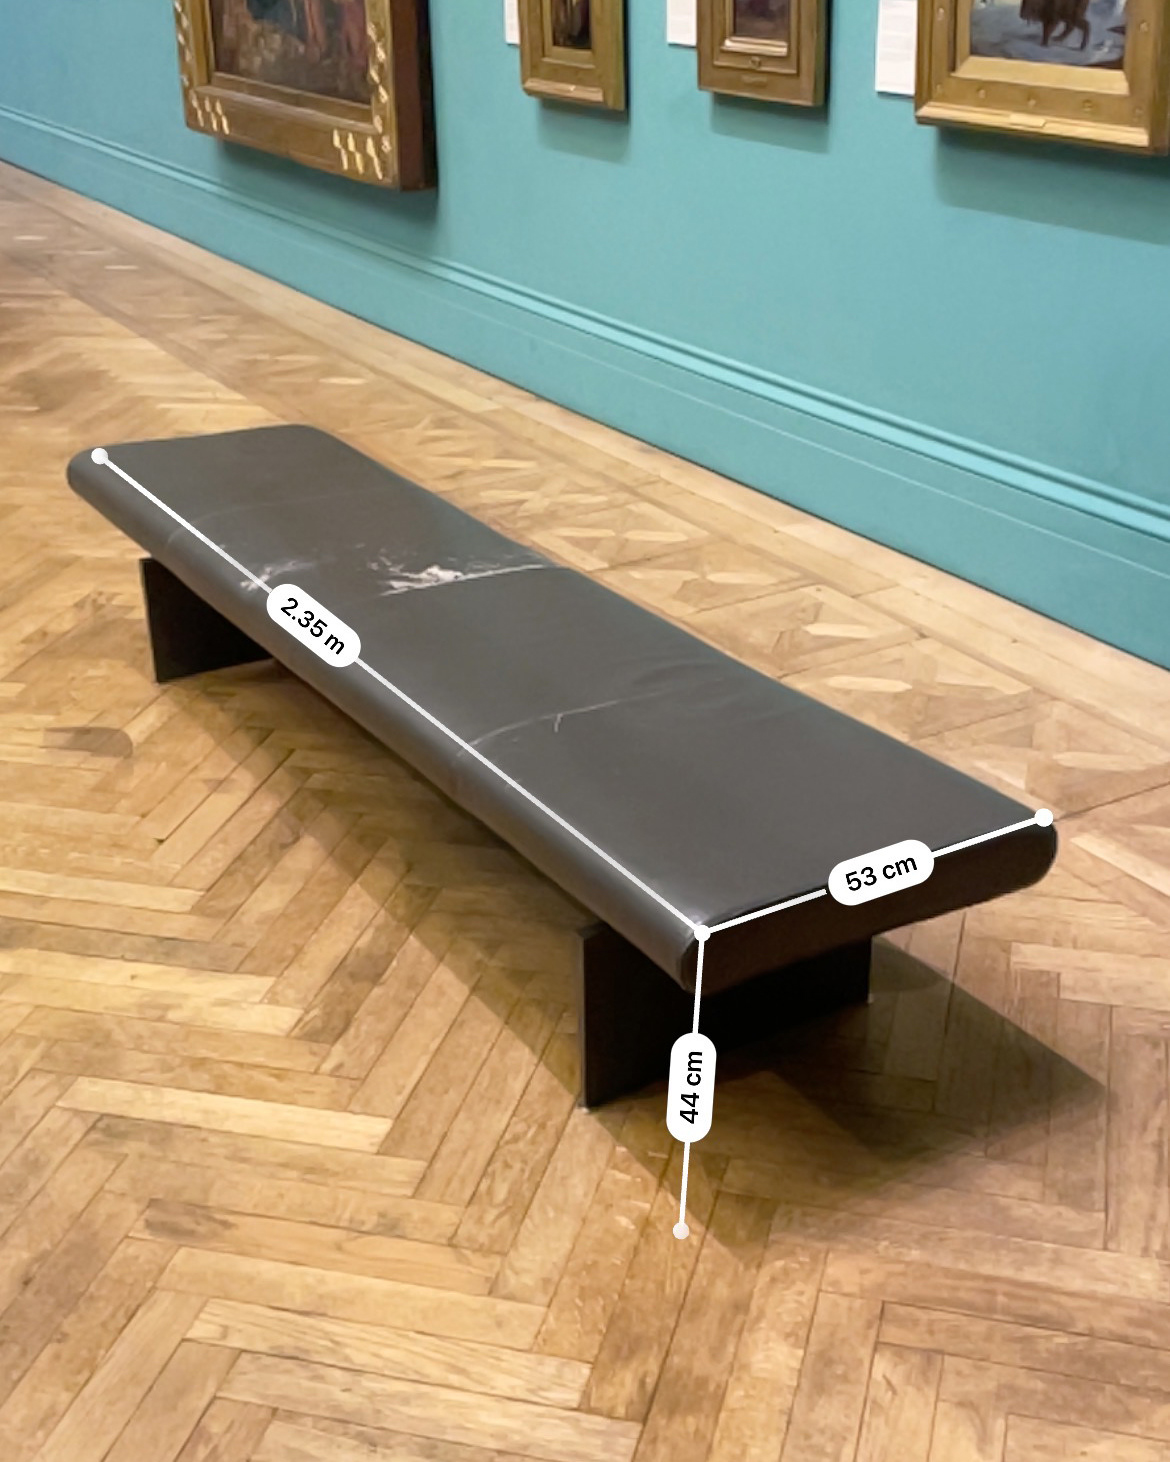
One of the main things I've struggled with so far with furniture is getting the right scale and ergonomics for the pieces I'm designing. So for the vertical gallery commission for which it's vital that the pieces are the collect dimensions I went all over town to discover what seating dimensions are most commonly used and which looked the best.
I've got no plans to upholster the benches as they're not intended for prolonged use but most city centre food venues or pubs made use of hard top benches which can be in use for short to medium periods of time so I have no worries about that. In the pictures above is one of the most striking examples of seating I could find, these just feel institutional and are so well designed for the space they're in. Dotted all over the Manchester Art Gallery these benches, which featured in two sizes that I saw, had a perfect balance to them. For me the the key is how far the legs sit in from the short edge, its just spot on and in terms of material choice contrasted nicely to to the wood floors and complimented the sand blasted glass flooring in the other area it was used.
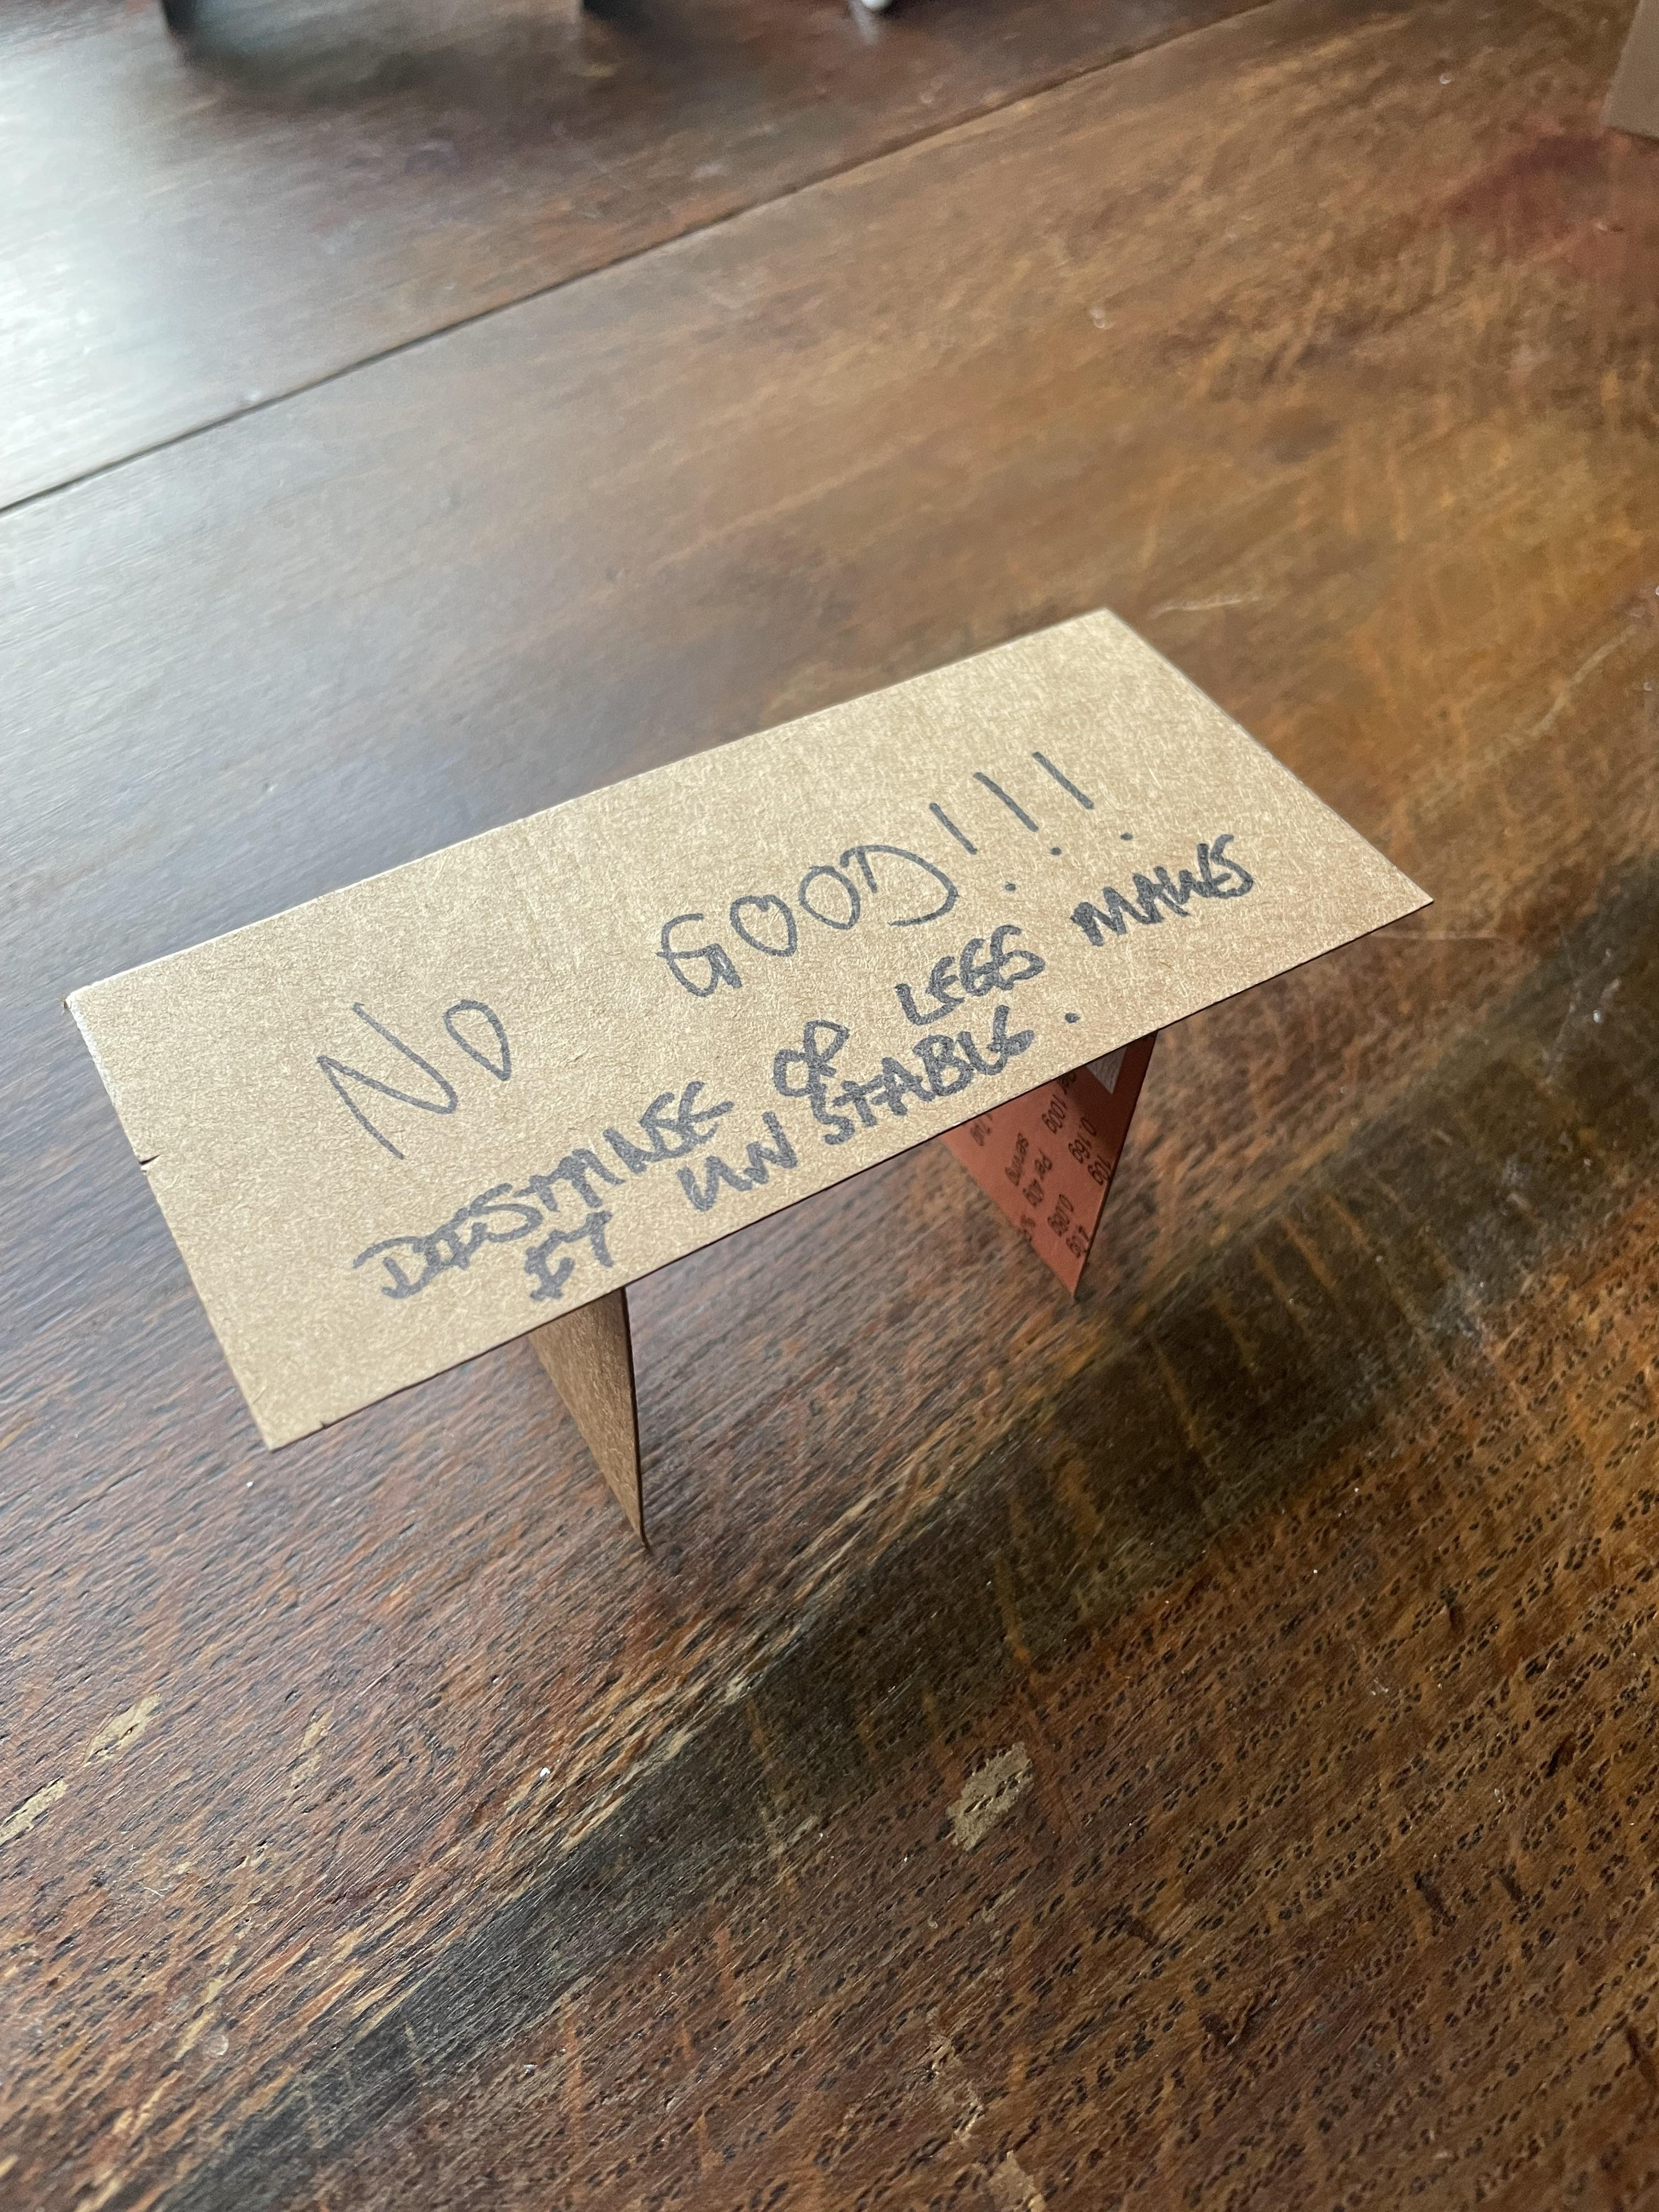
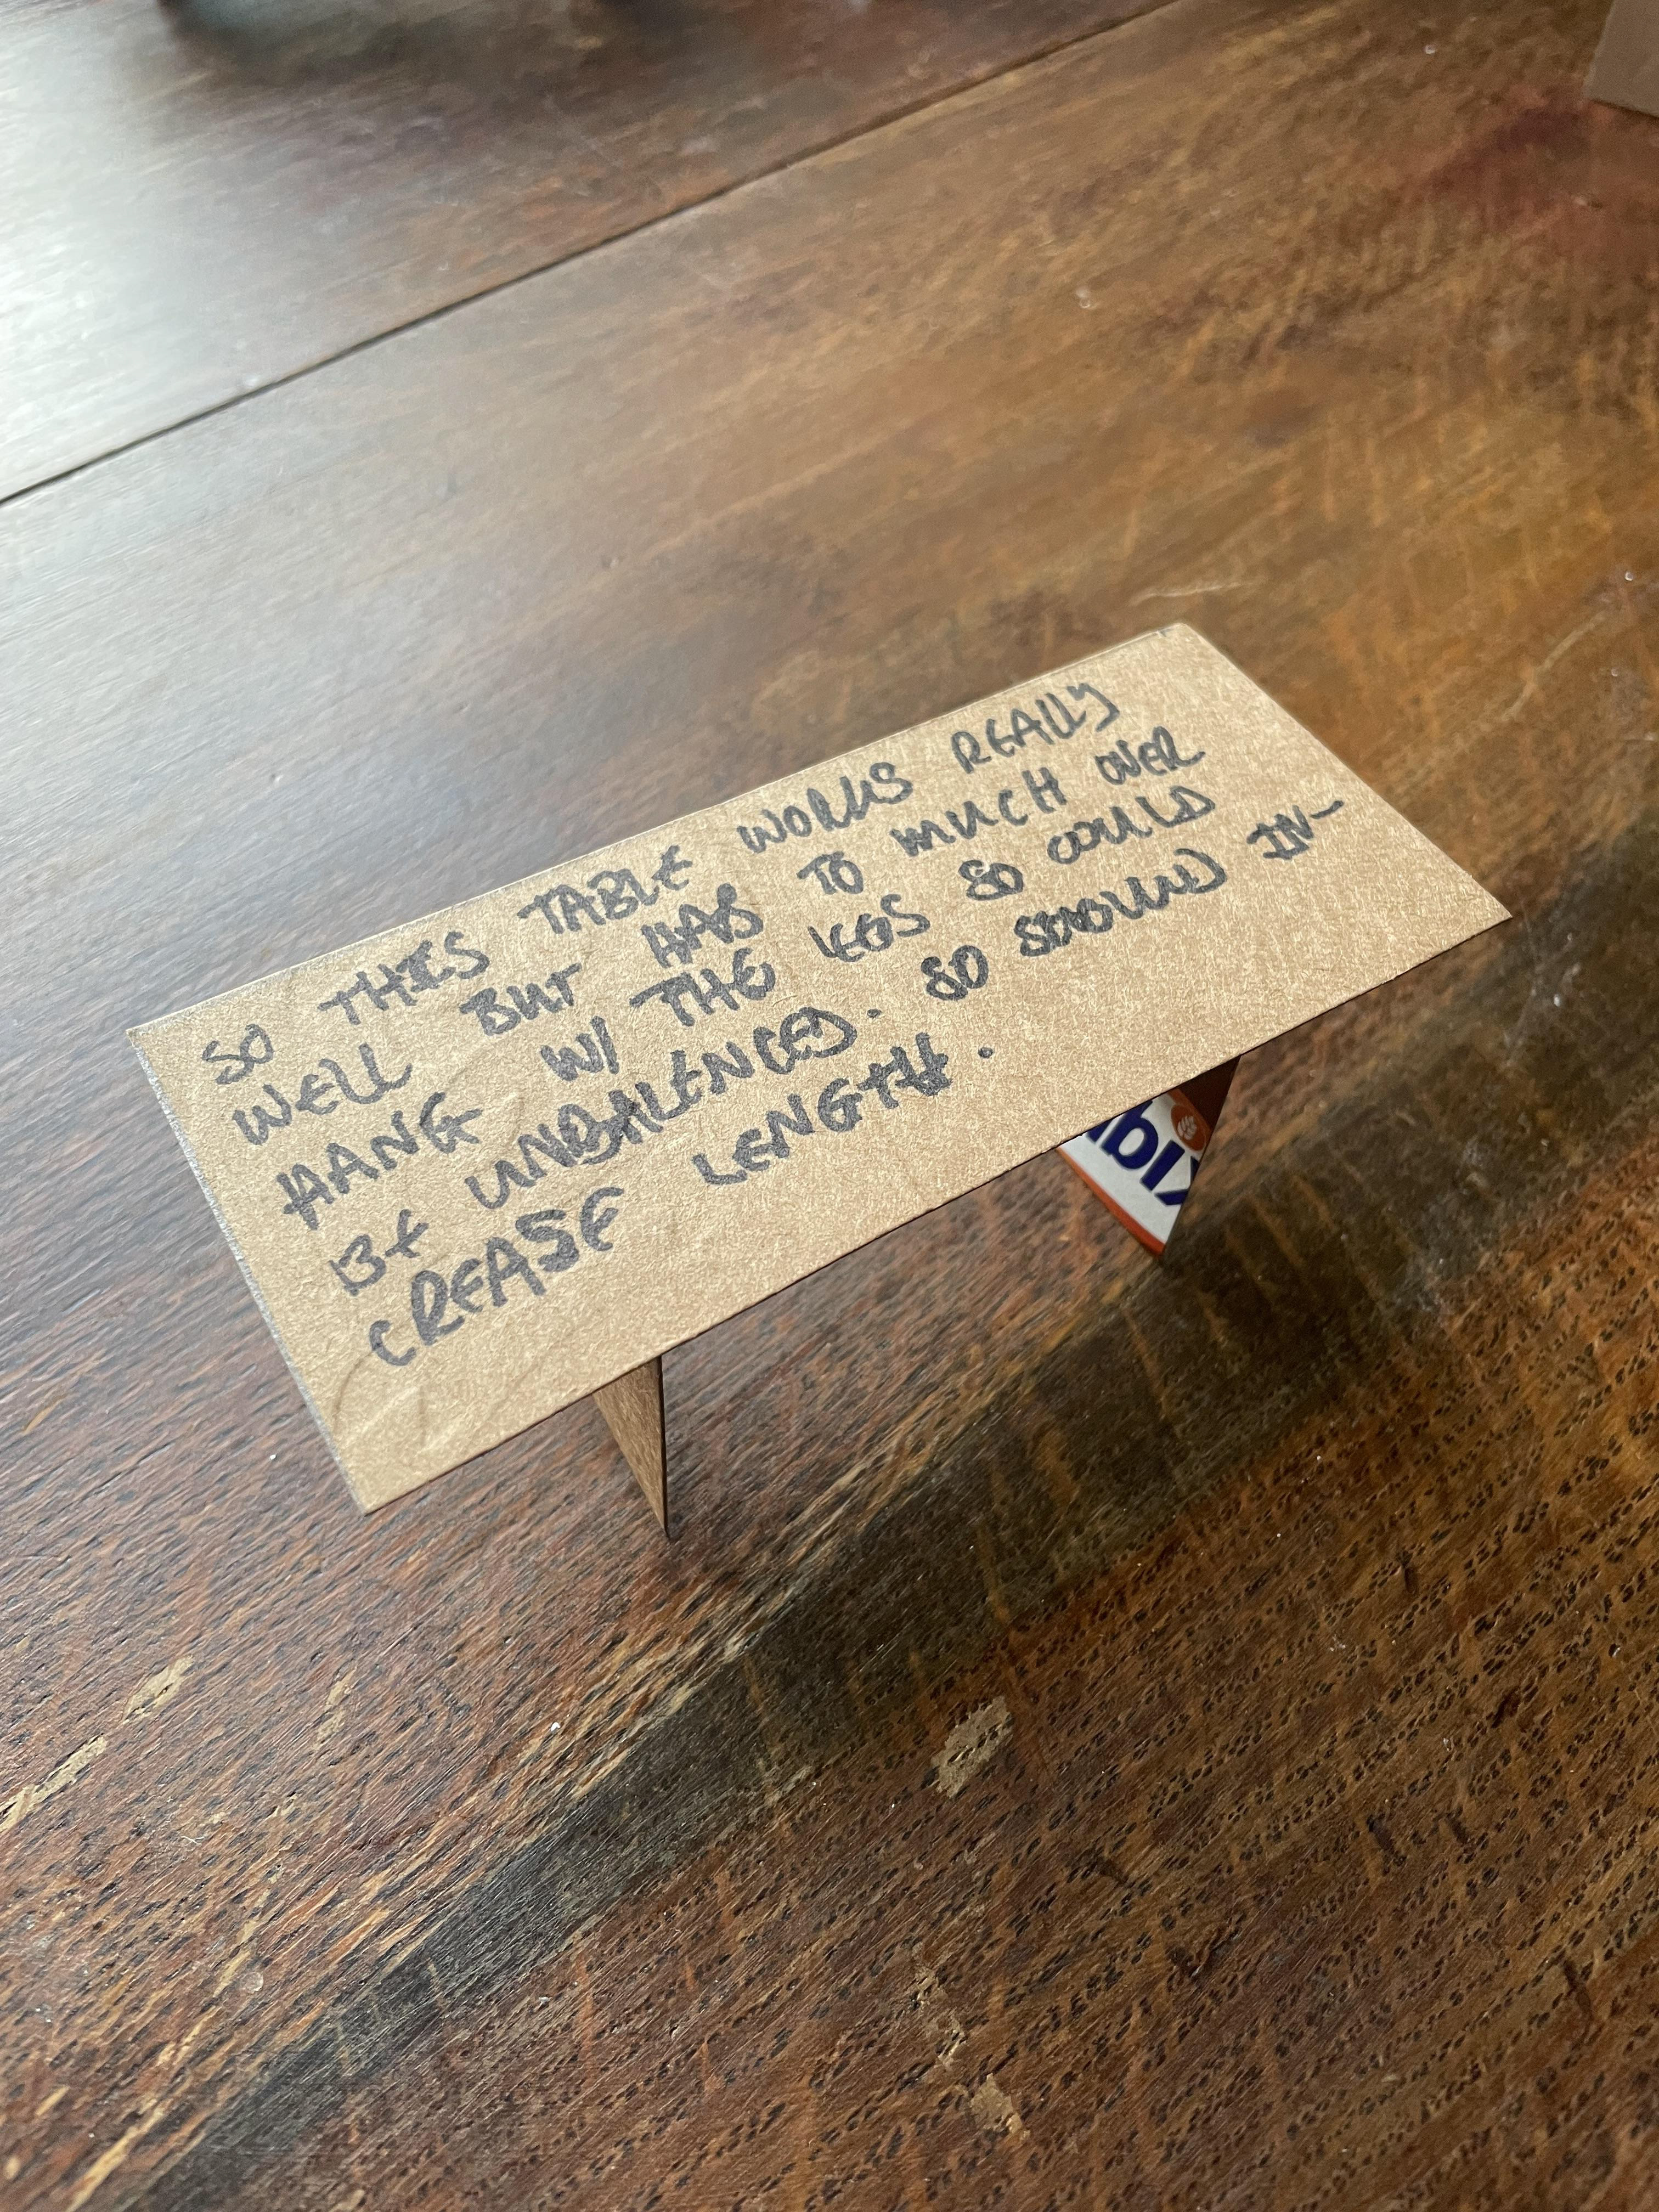
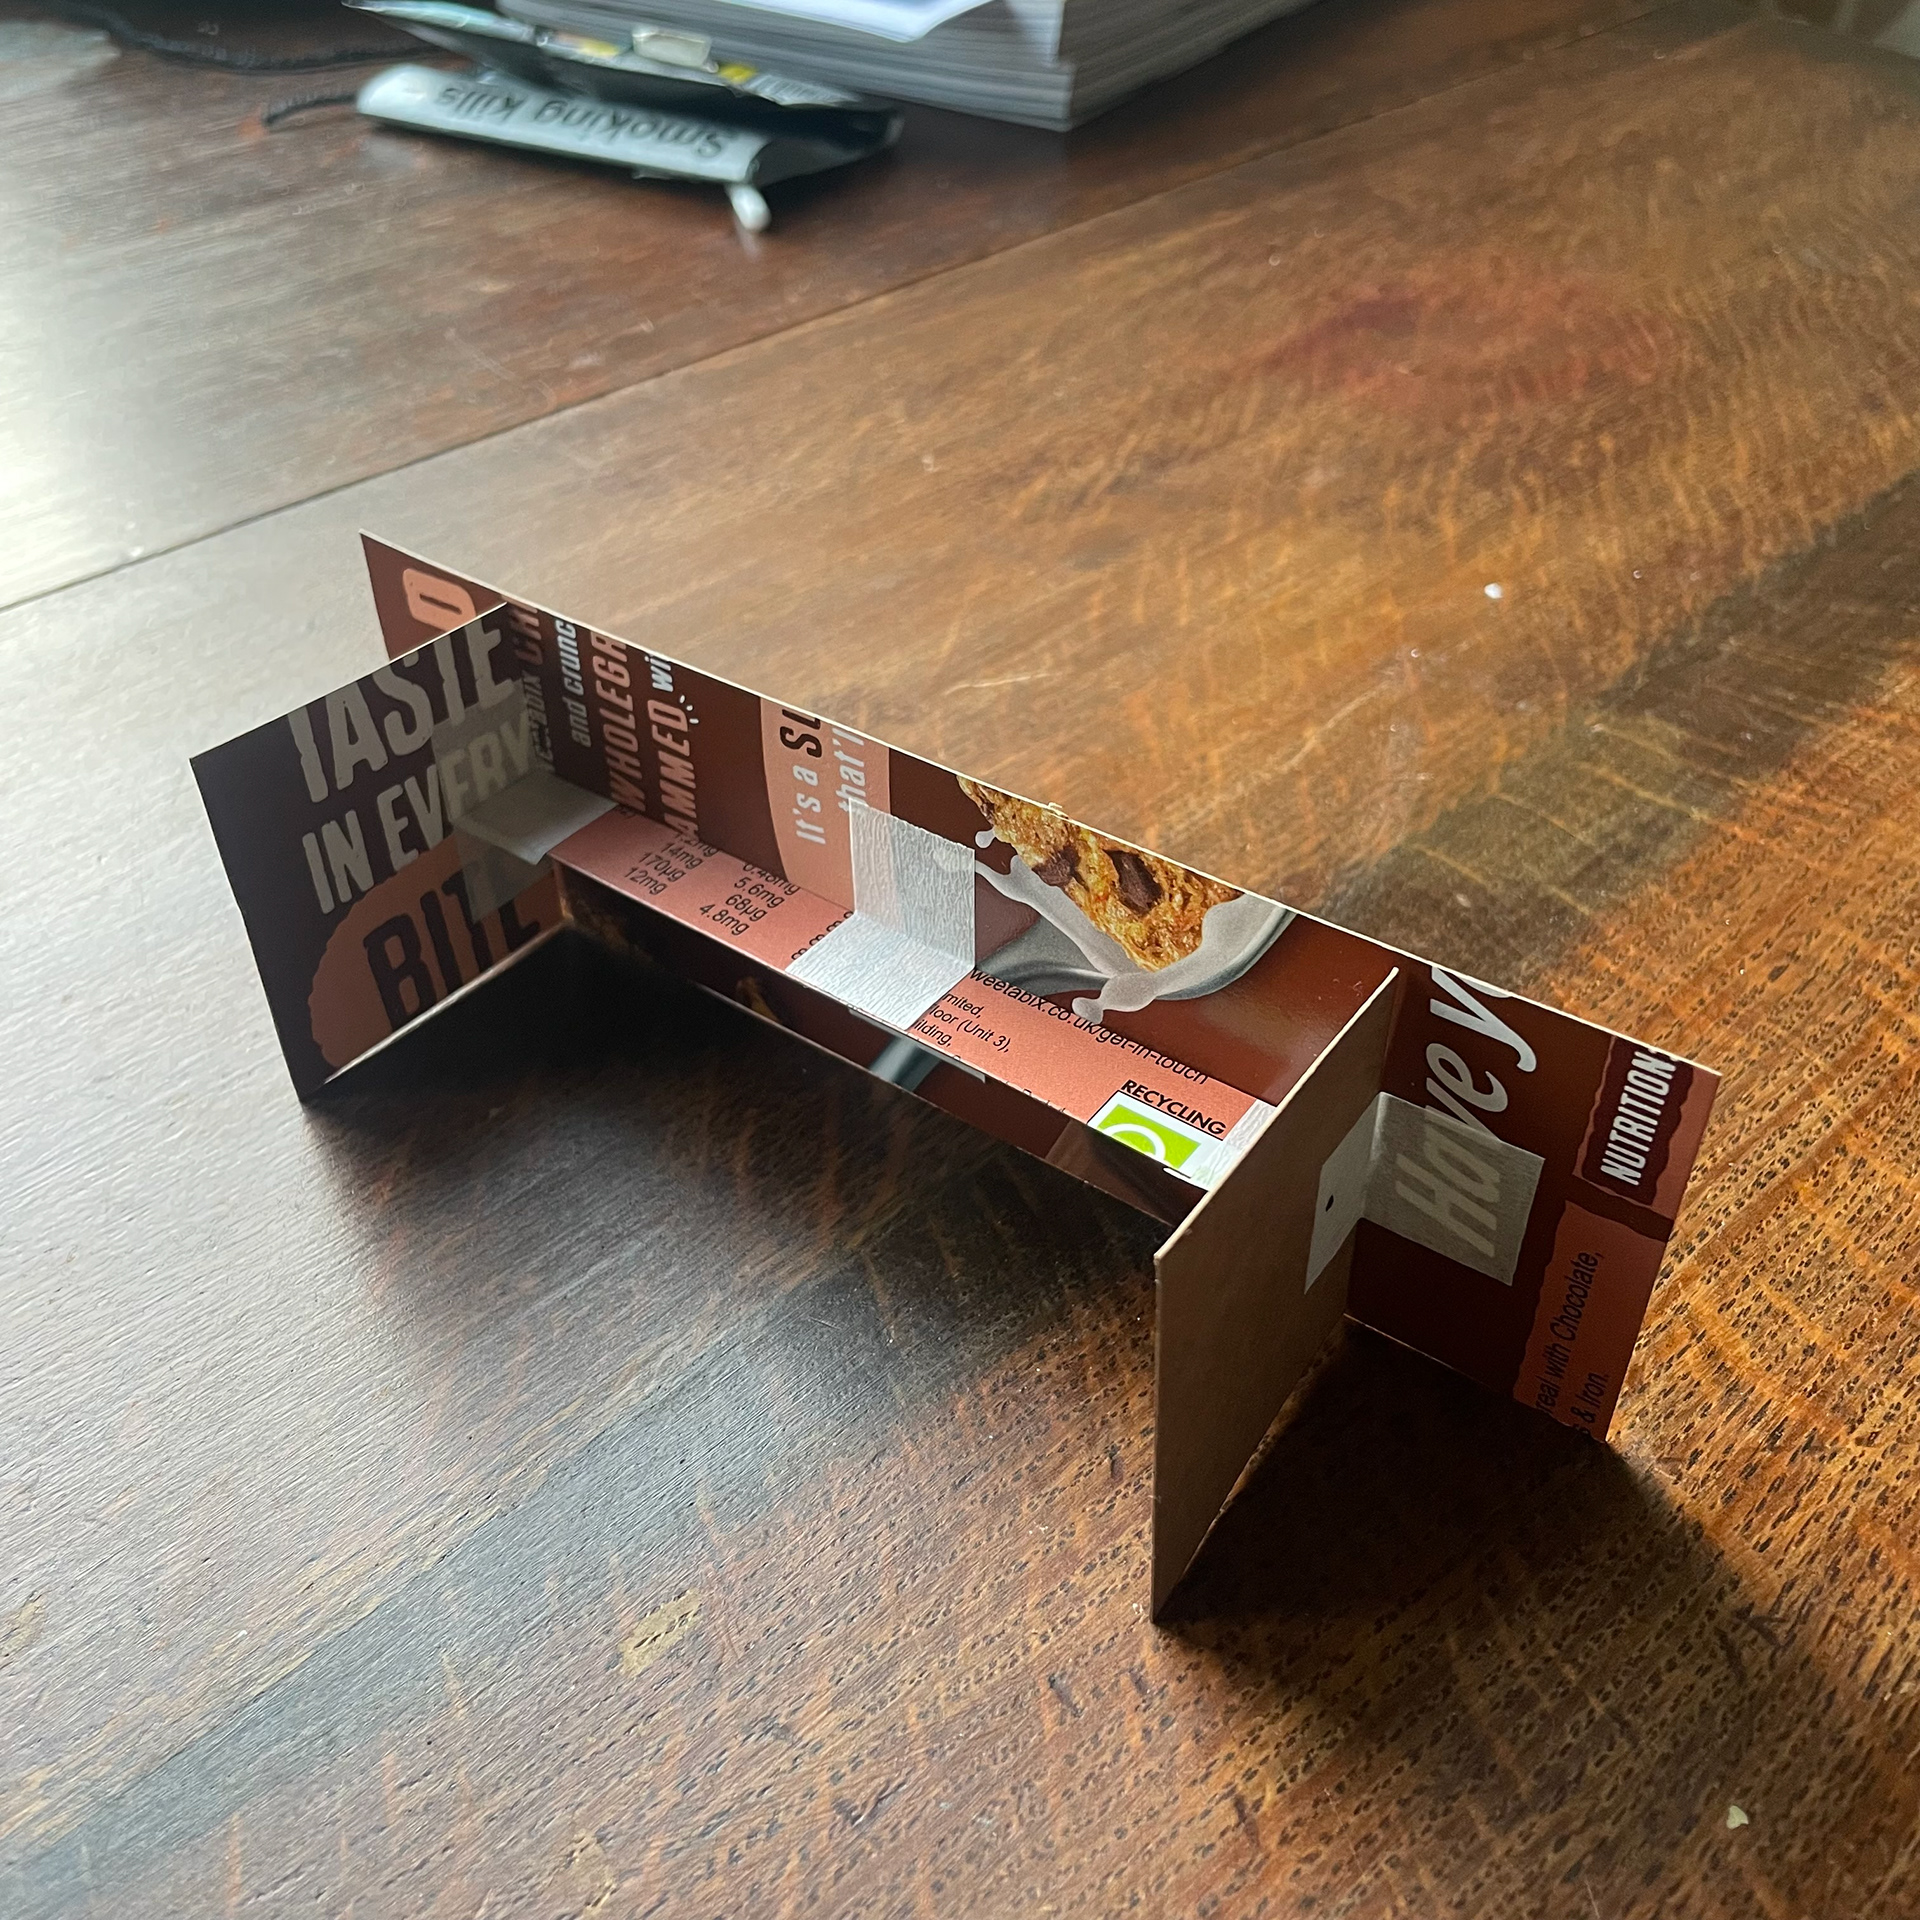
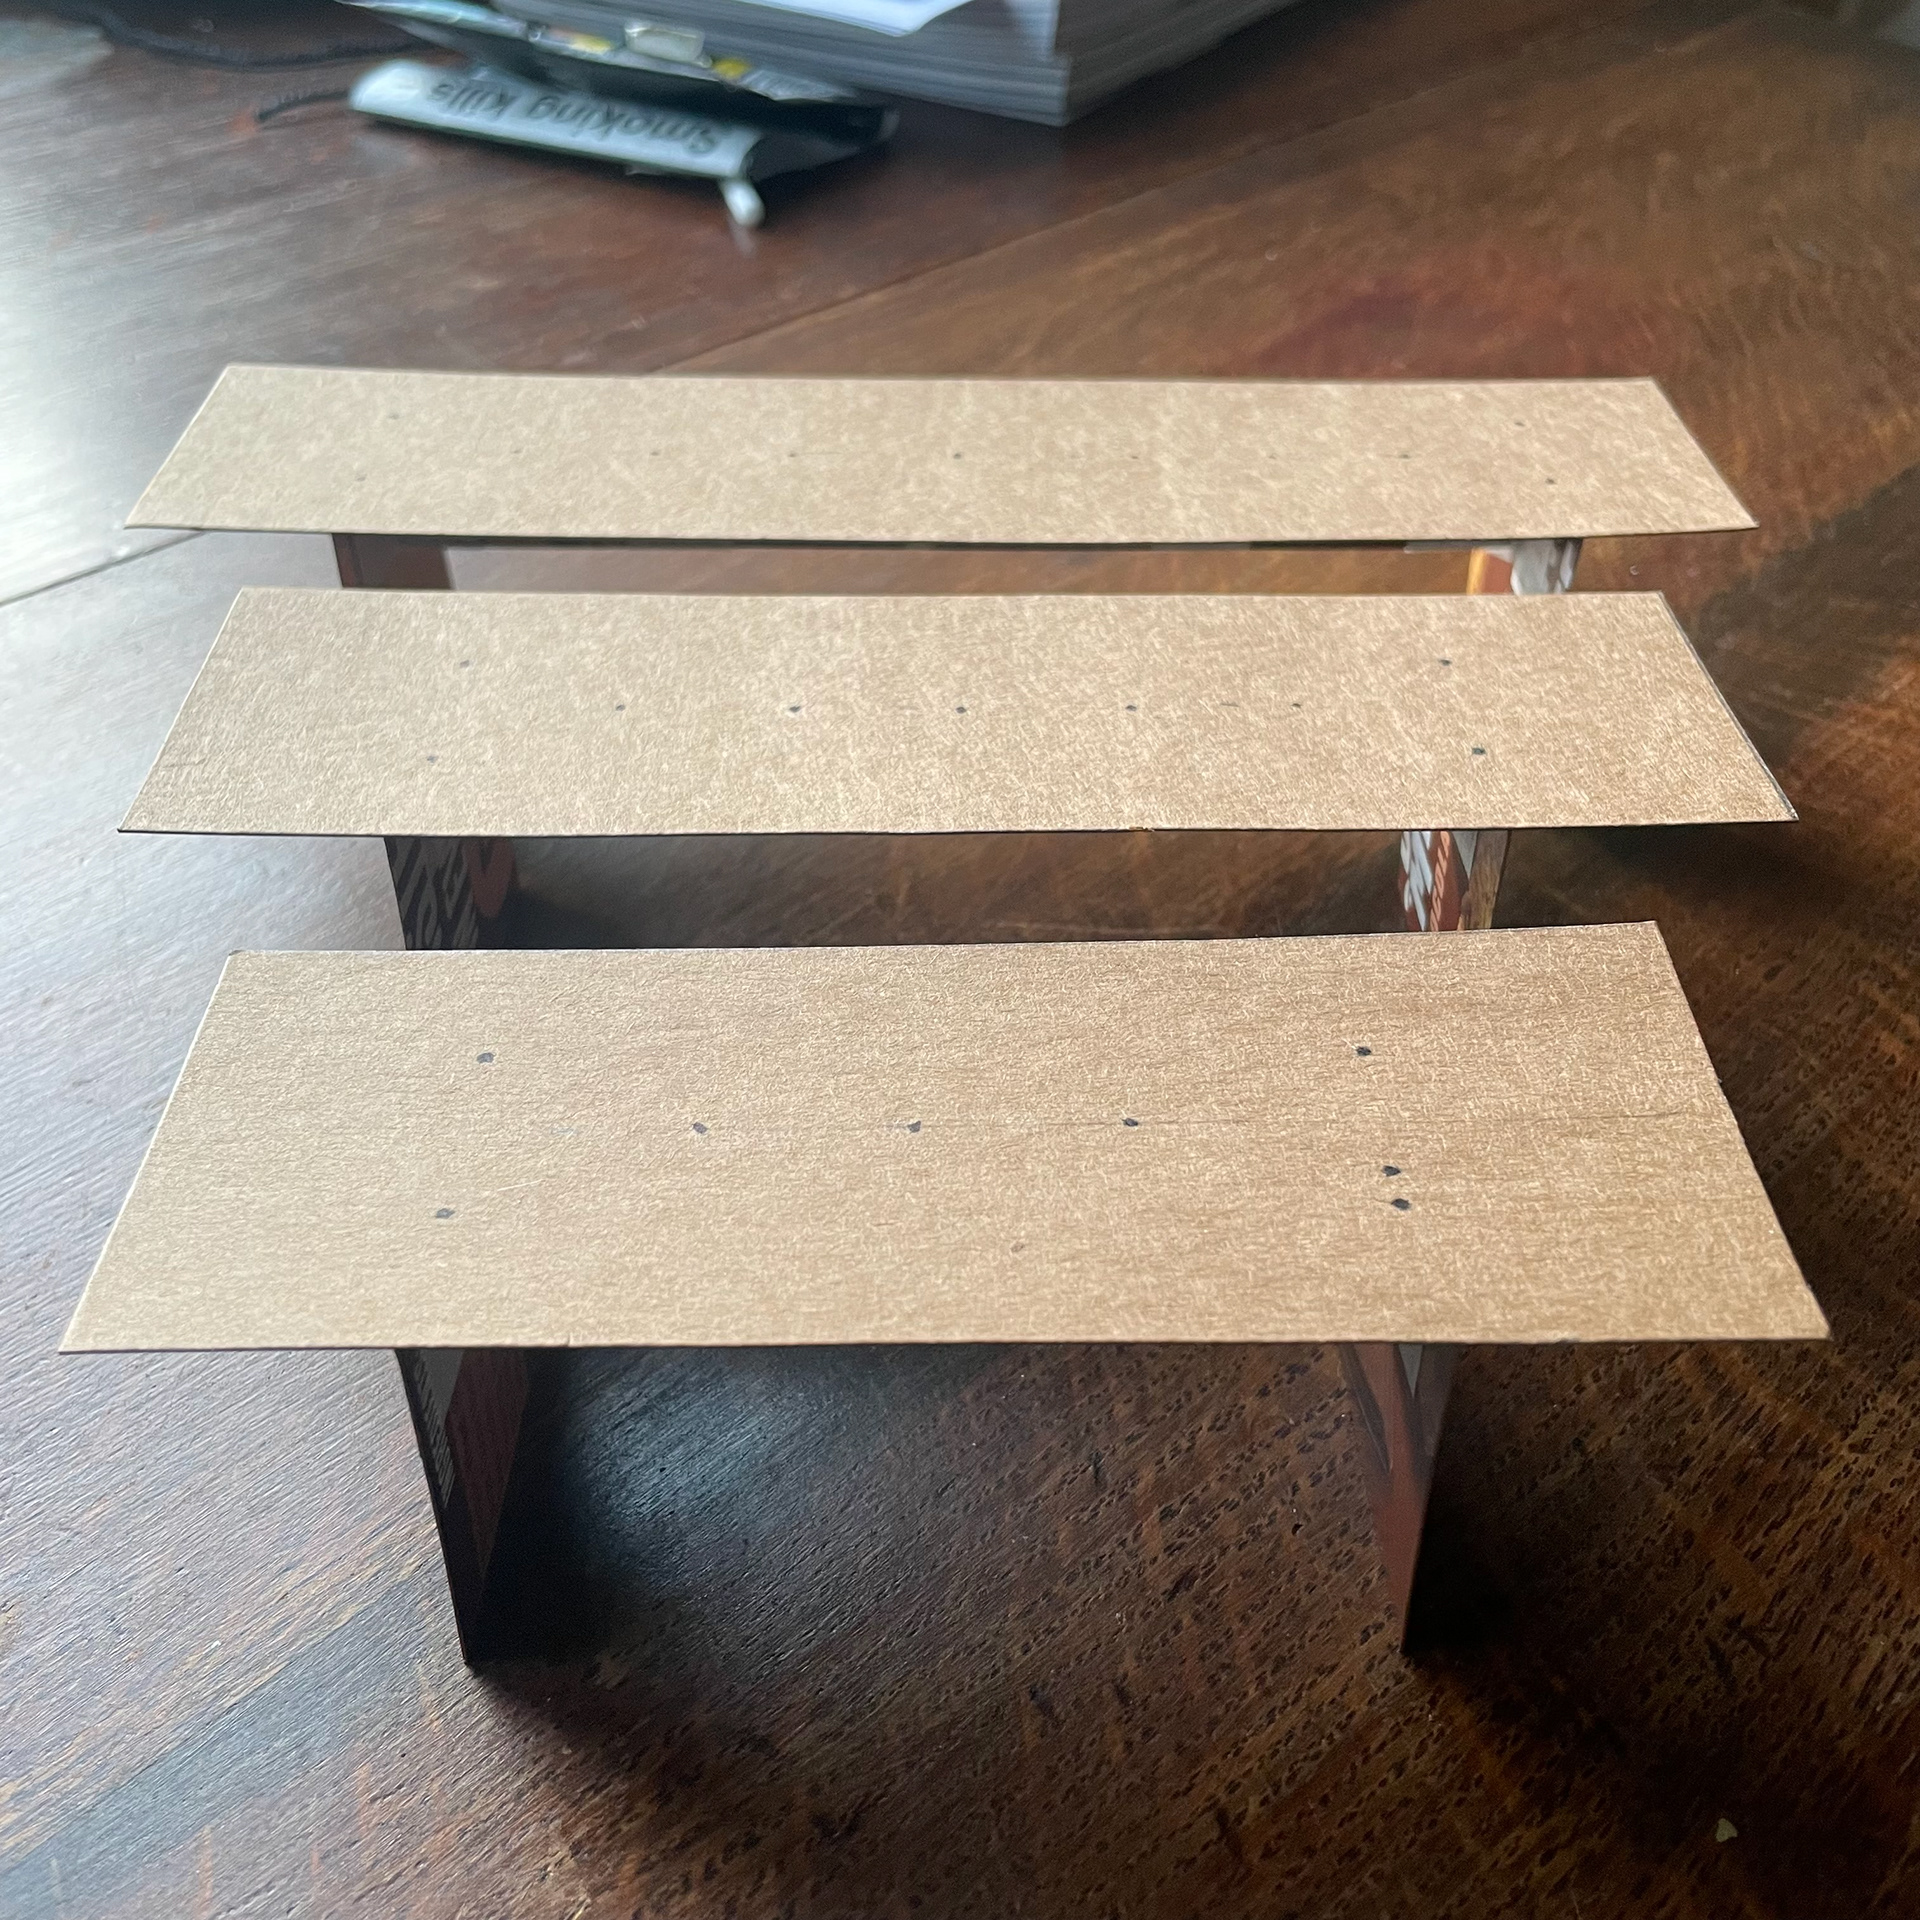
Scale Models - Making use of references - being able to visualise the furniture
Above and below are the scale models for the VG benches. The successful designs below make good use of my referencing I'd done previously with the legs being approx. 30cm in from the short edge, the lengths also take some cues from the reference with them all being roughly within the boundaries of the 1.6m and 2.3m long tops.
The visual aid of having the models meant decision making was a lot easier, designs that would be unsafe or unharmonious can easily be rejected but remain around so that they might be returned to later. Both of the above points have been made in tutorials with Geoff previously so being able to implement them effectively seems like a good step forward.
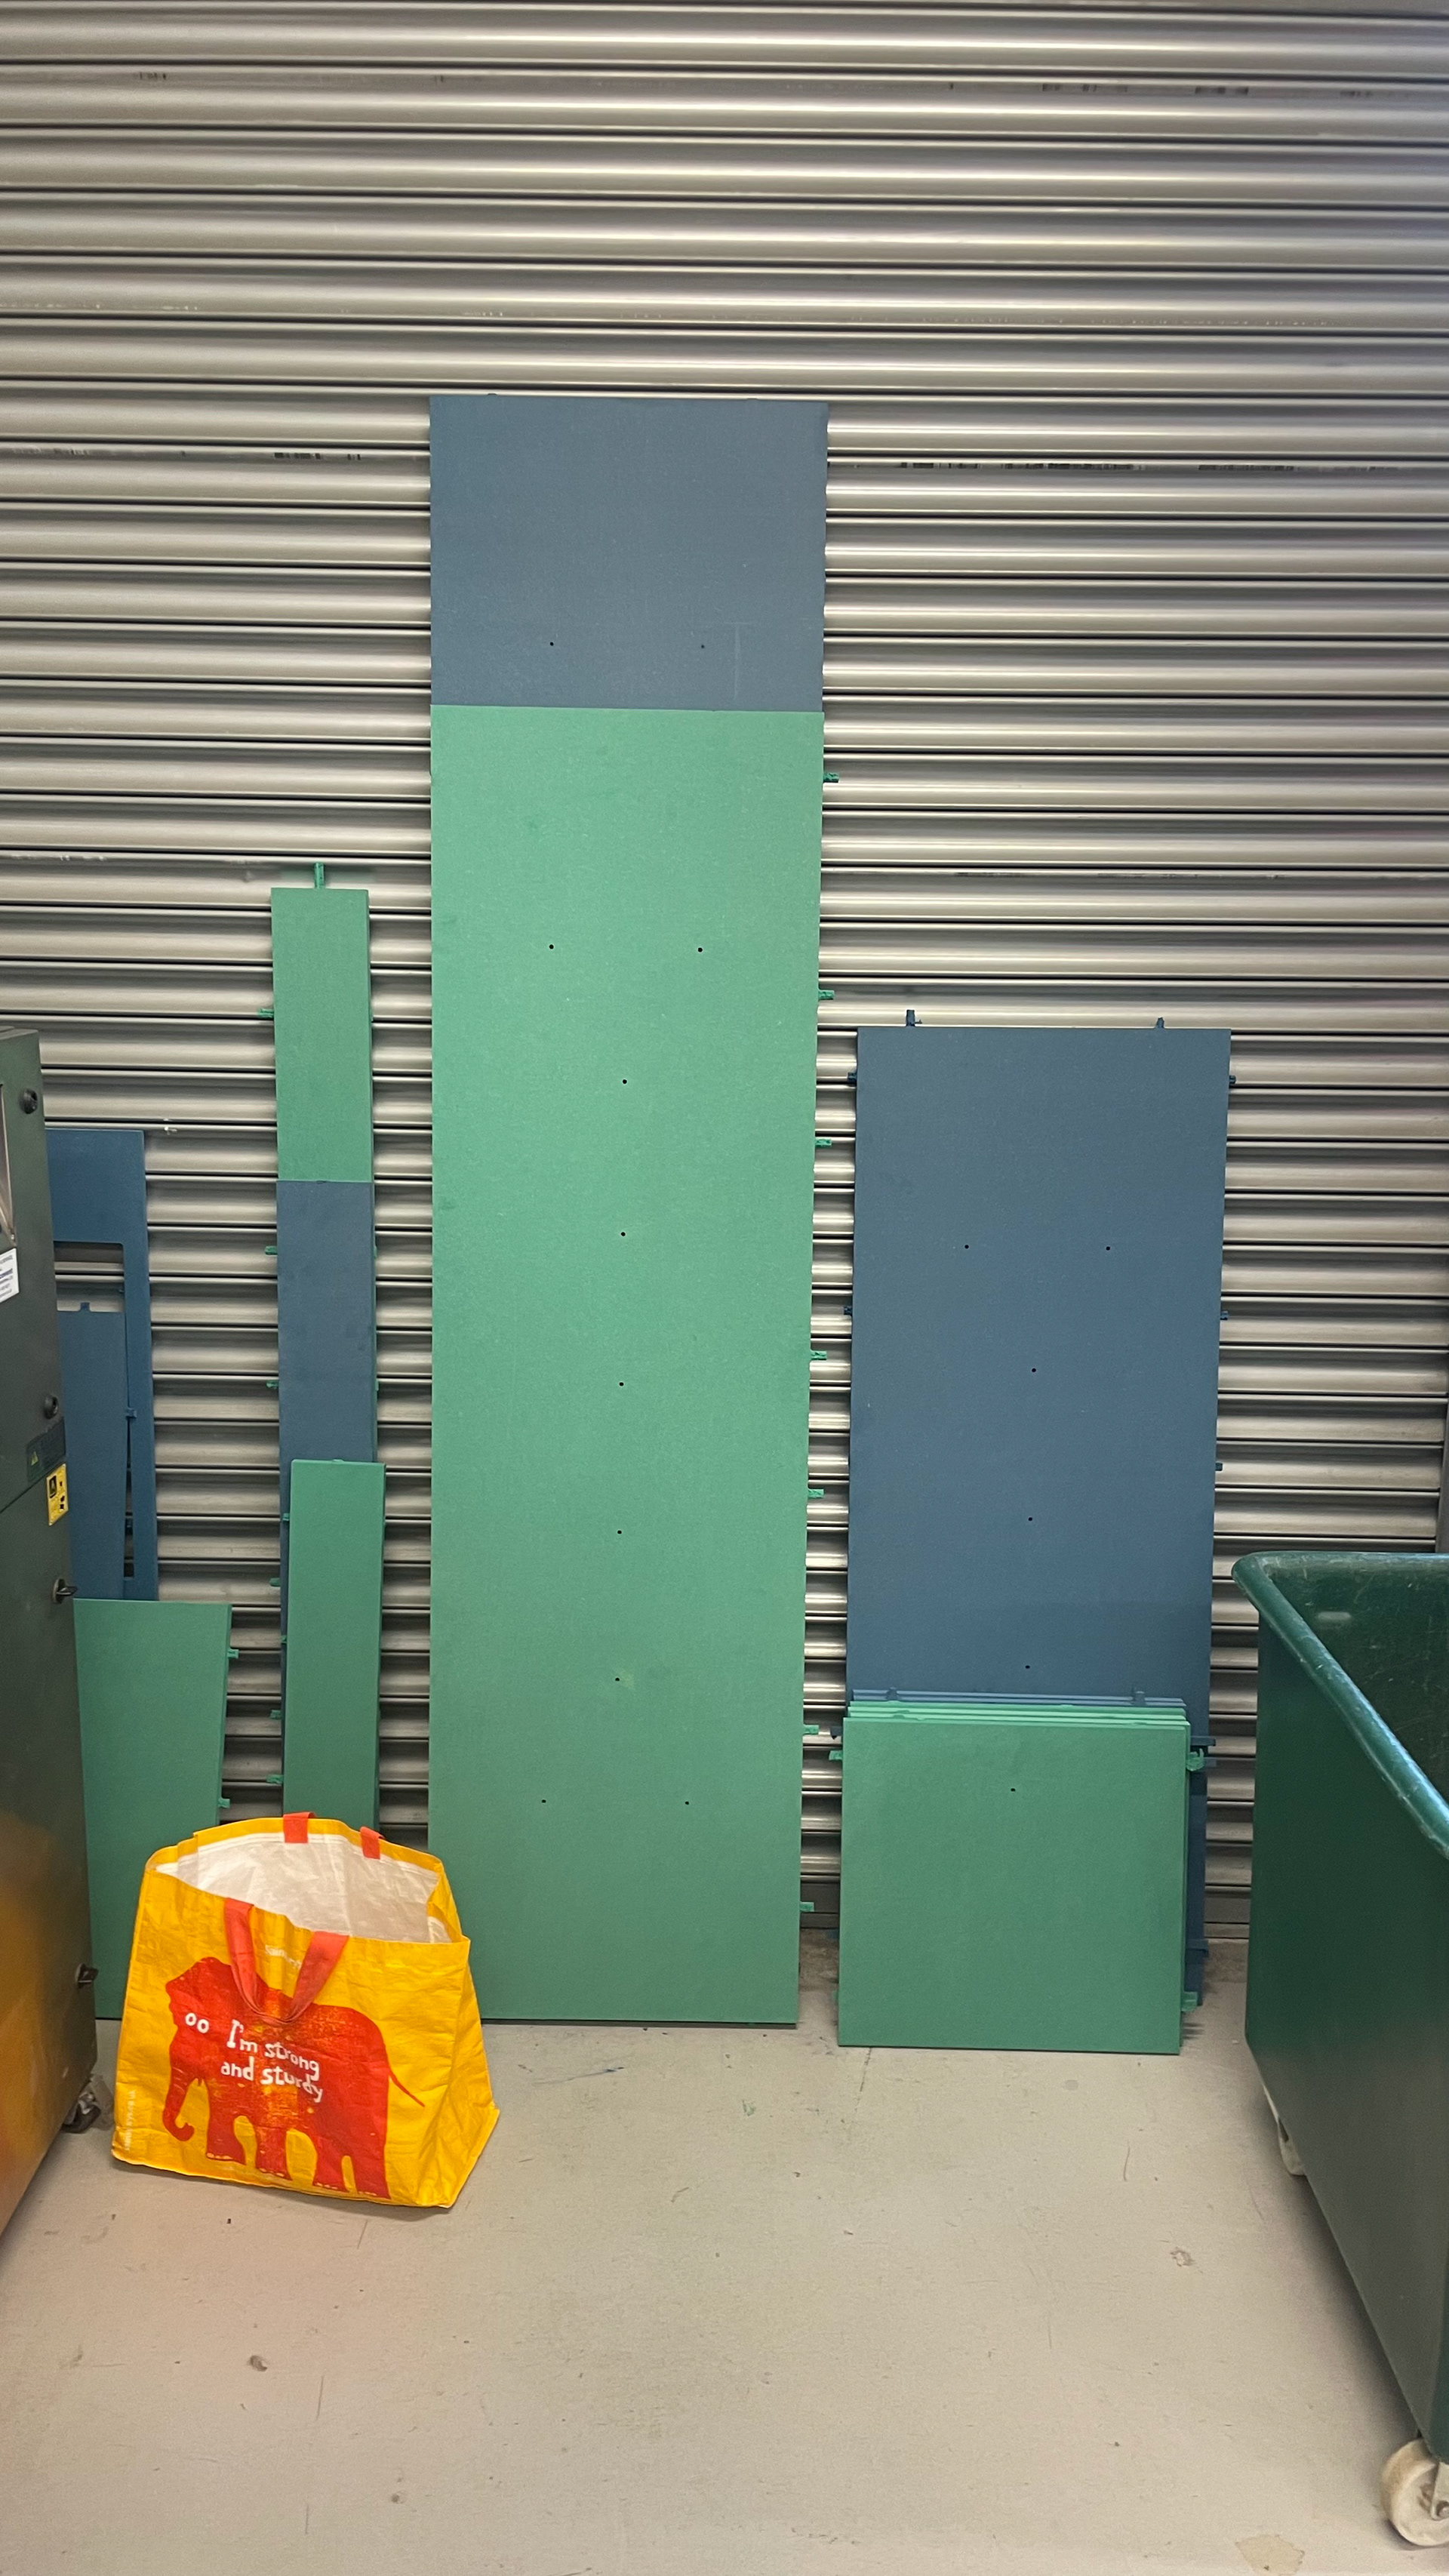
Making the most of the boards - Unto the last
Remember when I said about the lengths being within the boundaries of the reference, thats so that I can try and maximise the use of the board, while making a harmonious collection of furniture. In order to accommodate the two different board colours I have had to loose some material but that can be saved as offcuts and used else where.
It's a small reference but one I feel is interesting to add which is the approach to design Unto the last studio had before sadly closing. Their studio rule so to speak was to maximise cutting time and paths by using every possible area of a board but also their name is taken from a Ruskin book which highlights the connection modern makers have to that way of thinking.
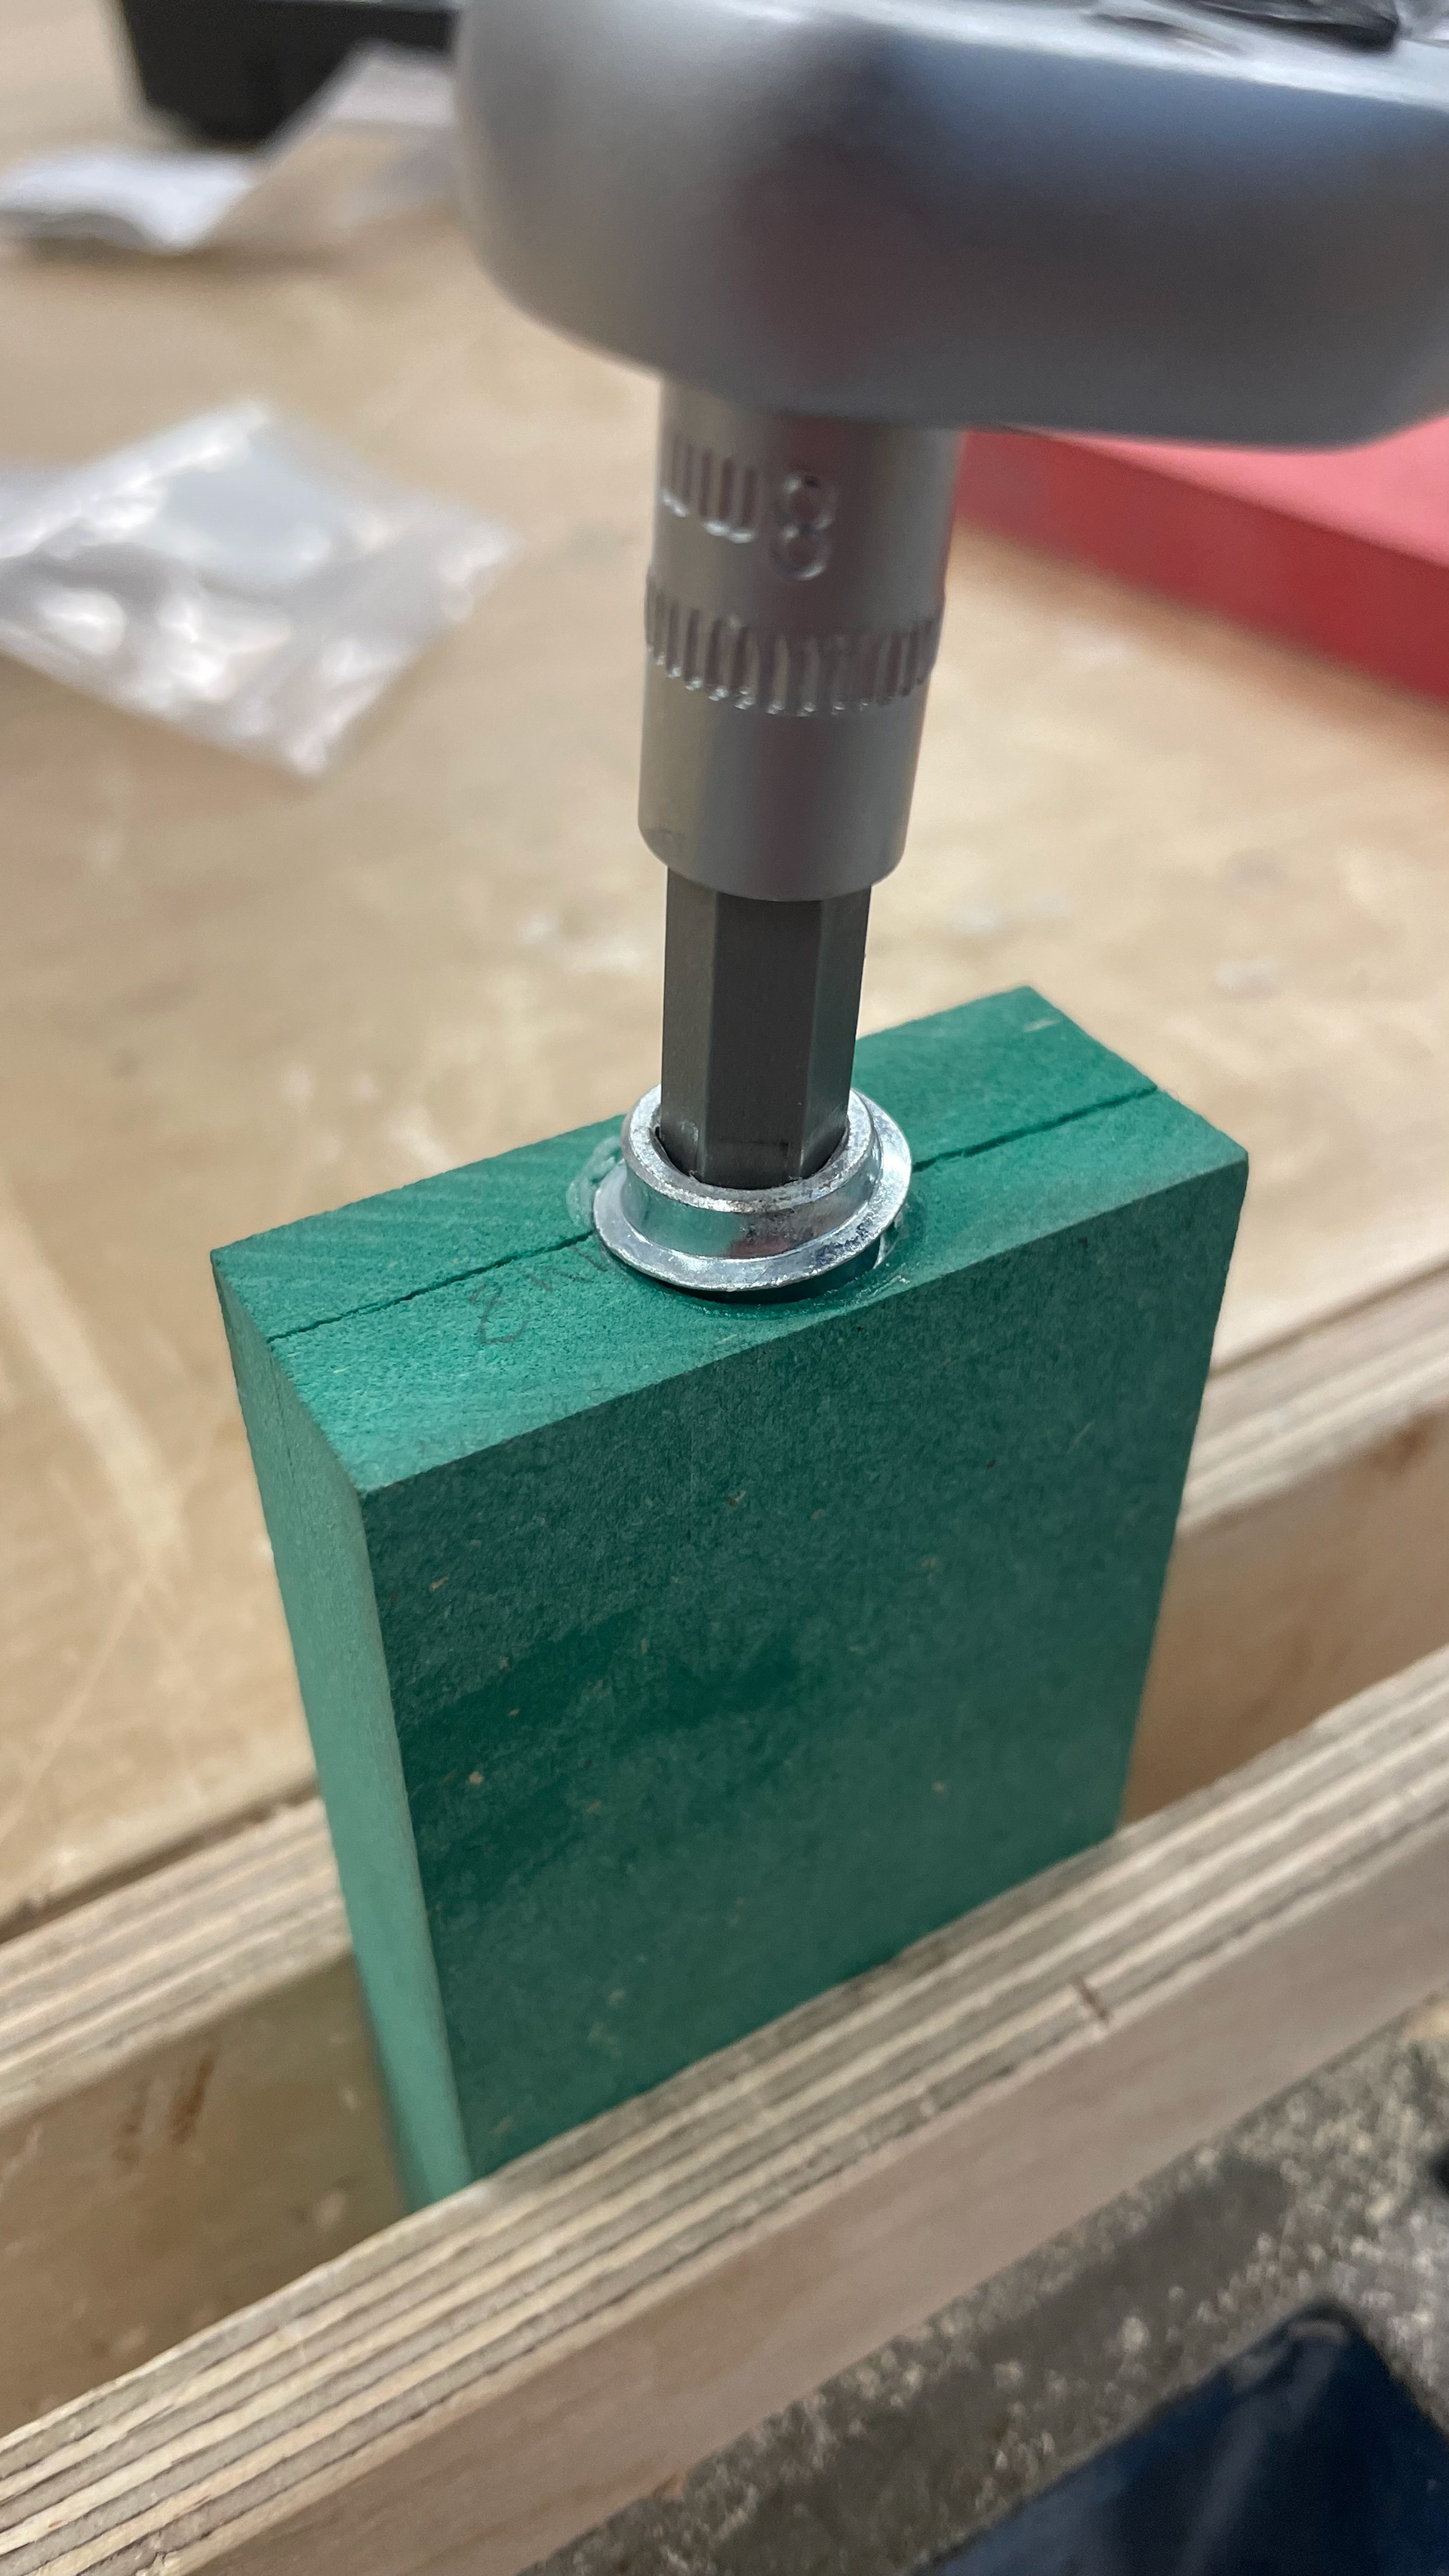
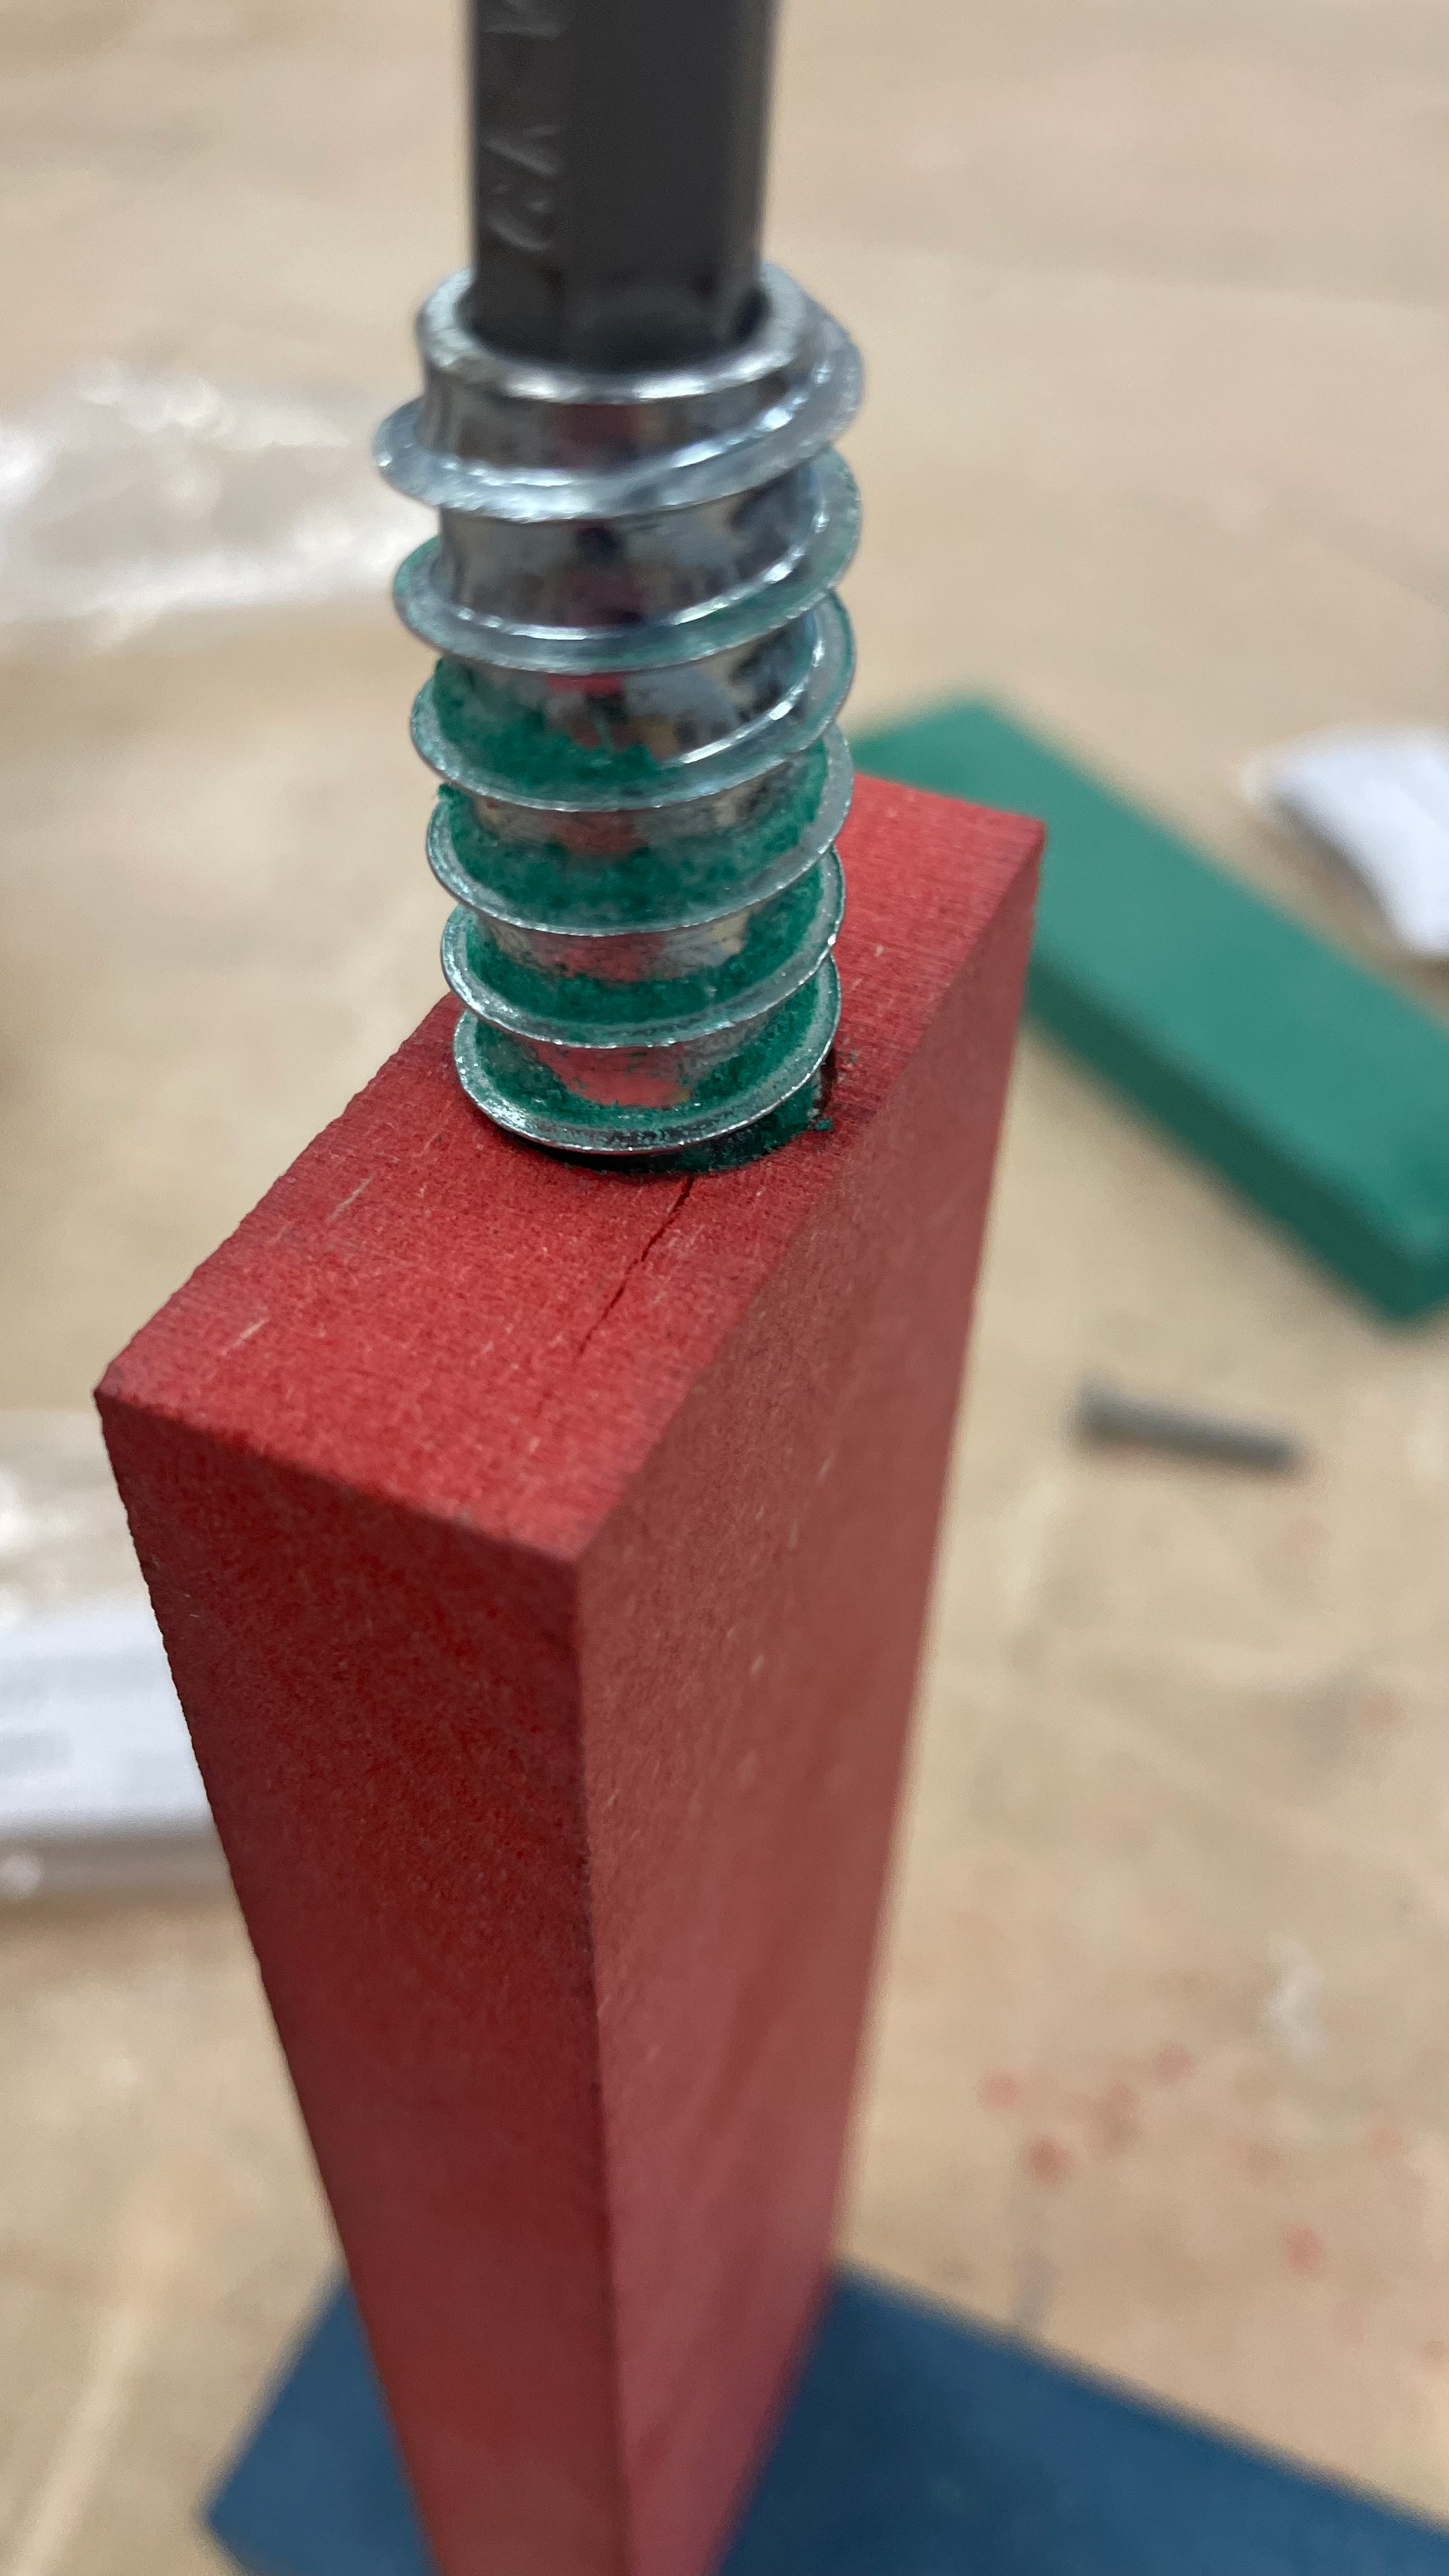
Disaster! - Insert Nuts Cause Cracking - Solution - Note on marking
I knew that changing not only thickness but material would through up some issue but the insert nuts, both at M6 and M8 diameter causing the material to crack was not ideal! To solve this issue I'll have to use the M6 which may reduce individual joint strength but can be made up for in additional joints. To prevent the cracking I'll have to drill a larger pilot hole that done in these test, the manufacturer recommends 10-11mm so I will just have to go to the upper end of that. Going one last step to really be sure the ends doing crack means applying an oil/lubricant to reduce friction.
Below are a sample joint which has been successfully assembled using the measures mentioned above. Also you can see a black sample which has been badly marked through hand marking out, thankfully I shouldn't need to do any hand making because I'm using the CNC but it's interesting to see that such a hard wearing dense material can still be dented by a pointed force.

CNC cutting - Peak period - Assembled bench
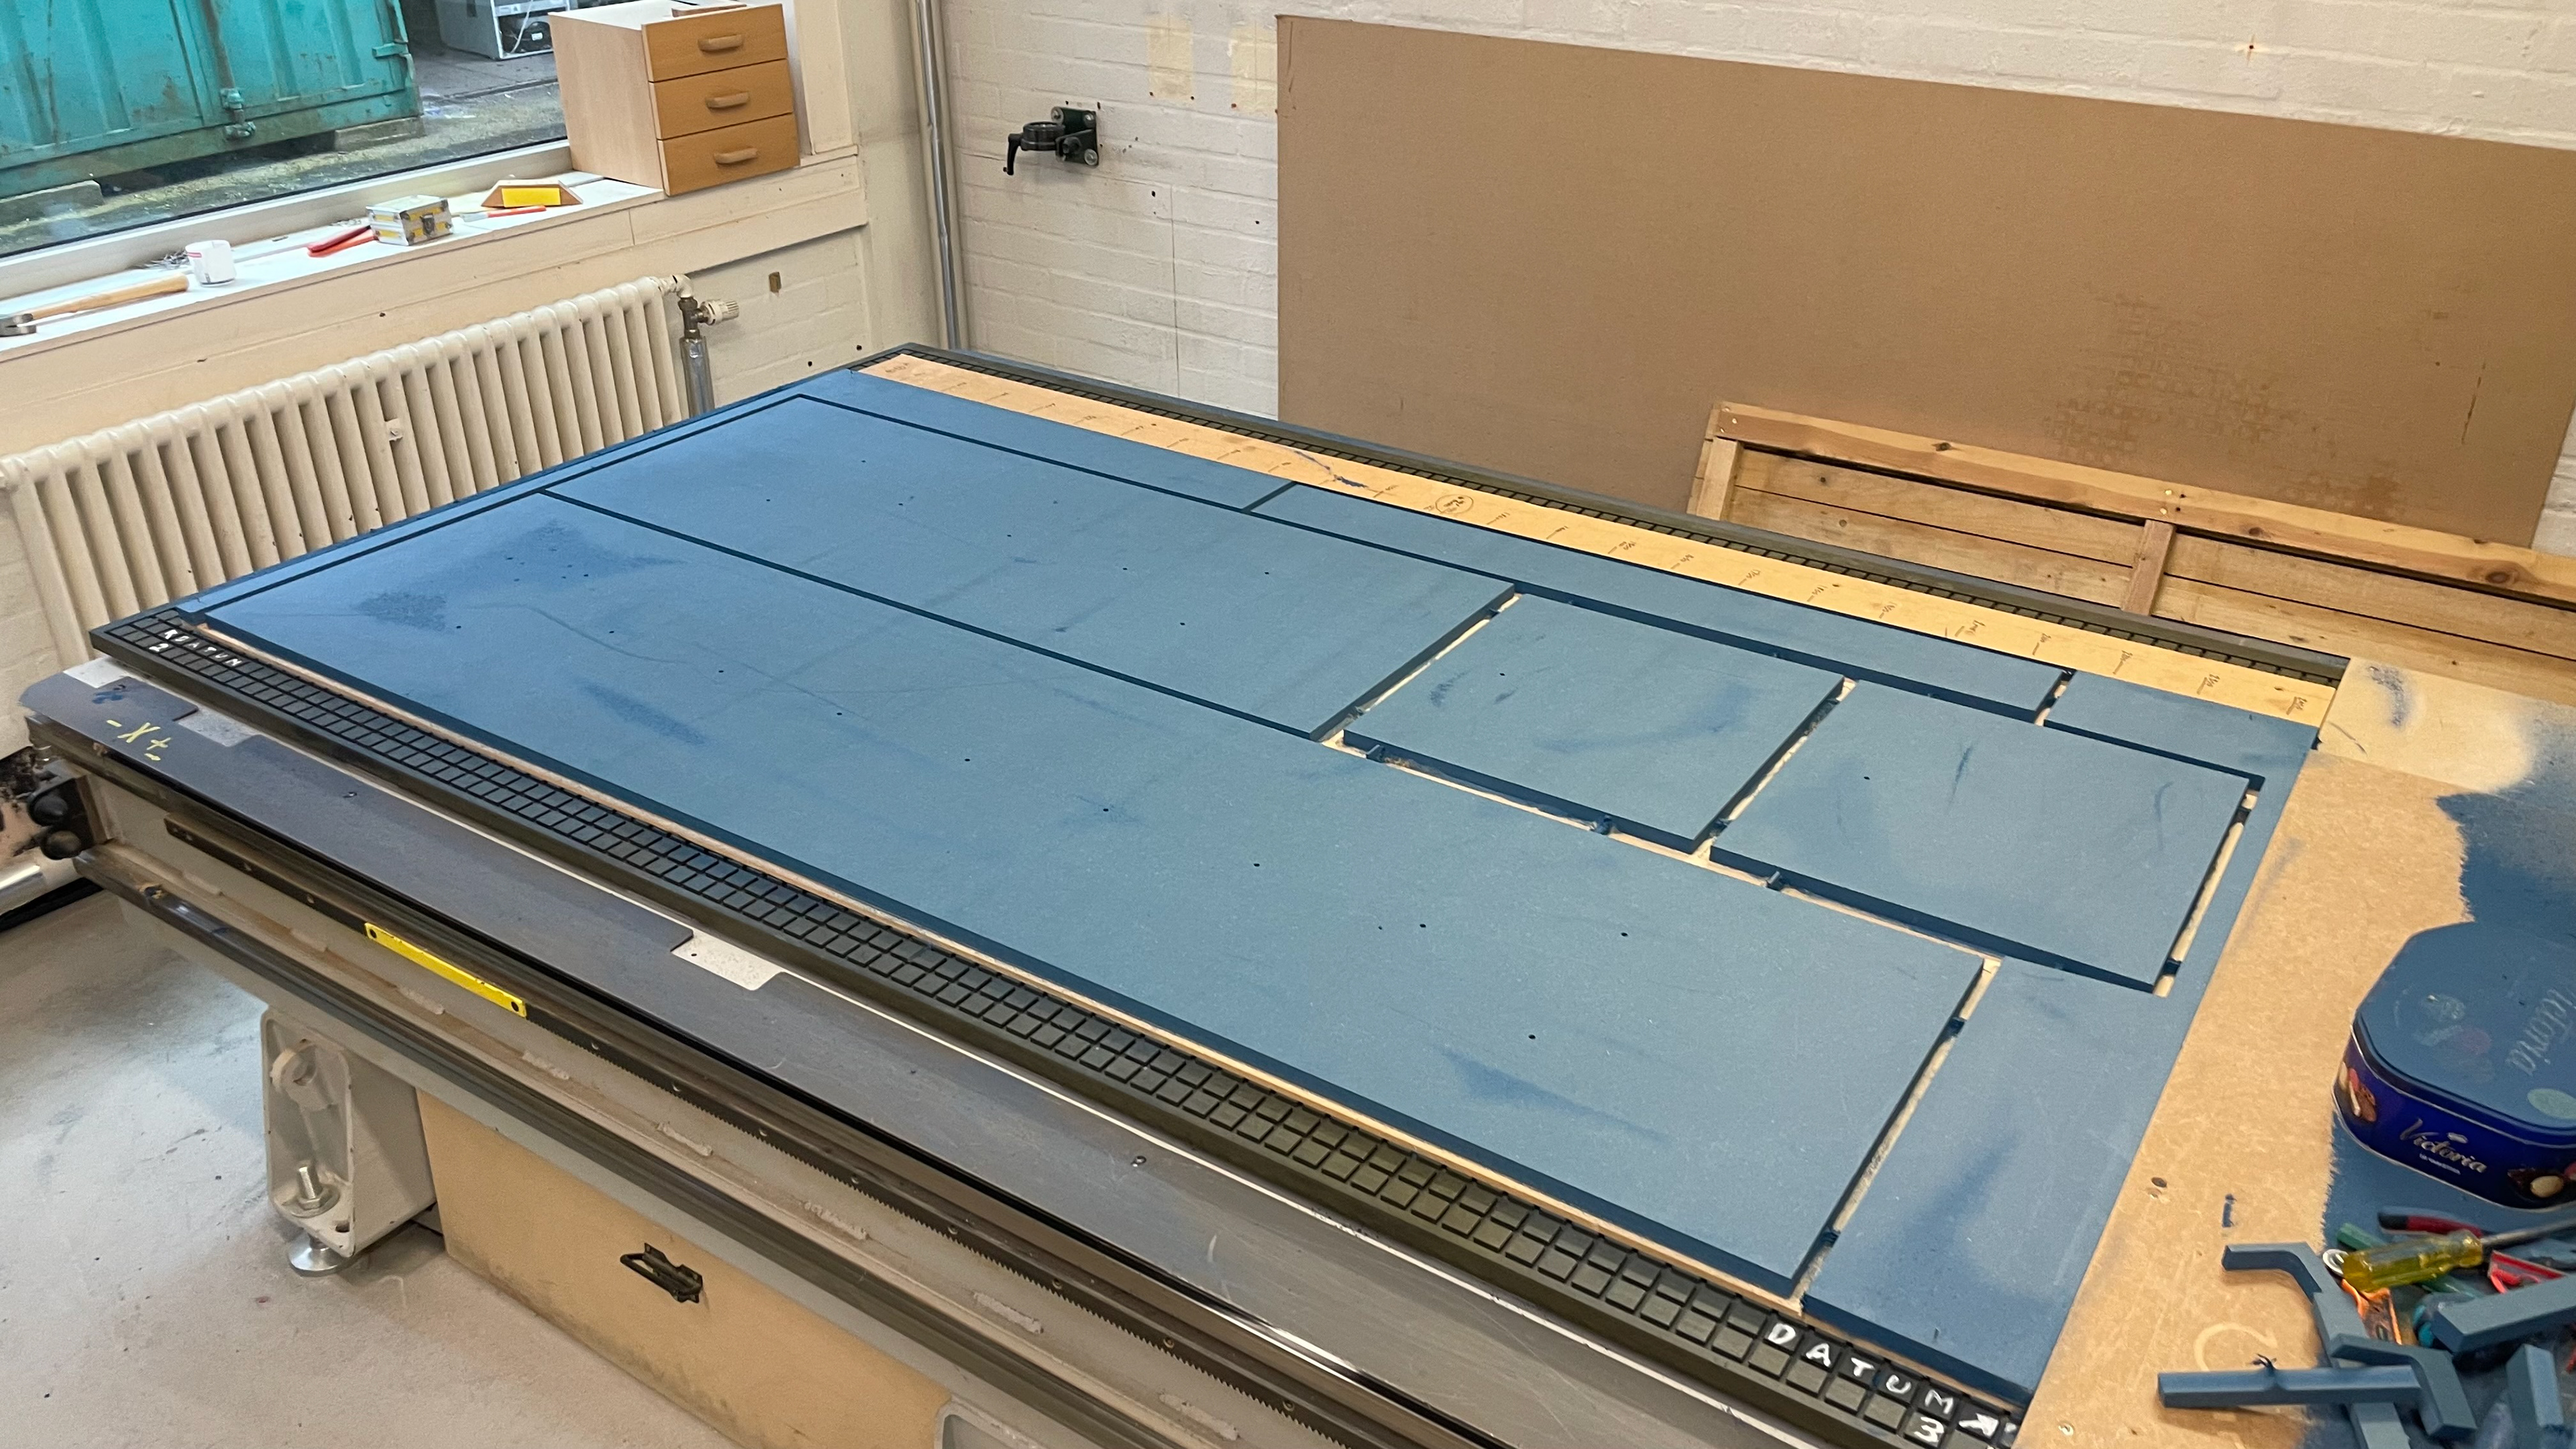
I've moved through the vertical gallery project quite quickly which feels really good, all the steps so far have been fairly simple and its given me a lot of confidence and ideas moving into the final collection for S+R. The last steps with the VG benches is to have the design CNC cut, assembled and then sanded and finished. So that I can included the pieces in my S+R submission I'll be assembling just one of the benches and then completing the rest of the work in the week after my hand-in.
The CNC cutting went smoothly with all the pieces came out undamaged and looking fantastic, although I was warned by Adan [CNC technician] that because it's peak time I may not get another chance to be on the CNC. This sort of messed up my plans to use the machine for the S+R project but I'm confident I'll be able to figure something out as there's plenty of CNC services in Manchester.
Assembly of the smallest bench was hard enough and I should definitely consider having someone help me with the larger ones, just to ensure that the edges remain in the best shape before showing at the degree show.
End of Pt. 1
This completes my Pt. 1 in the next section I'll be covering the final pieces of research, design and making leading up to my deadline. There will also be a curated page of my final outcomes including, my context video, images of my collection and critical reflection.